> ## Documentation Index
> Fetch the complete documentation index at: https://docs.evolink.ai/llms.txt
> Use this file to discover all available pages before exploring further.
# OpenClaw 自动安装
> 通过 OpenClaw Manager 一键安装和管理 OpenClaw 实例
## 概述
OpenClaw Manager 是一个可视化管理工具,帮助你快速安装、配置和管理 OpenClaw 实例。无需手动编辑配置文件,只需 3 步即可完成部署。
支持两种消息通道:
| | Telegram | 飞书(Feishu) |
| ----- | ---------------------- | ---------------------- |
| 连接方式 | Bot API(长轮询) | WebSocket 长连接 |
| 需要的凭证 | Bot Token + 你的 User ID | App ID + App Secret |
| 平台侧配置 | 仅创建 Bot | 创建应用 + 开启 WebSocket 订阅 |
| 用户鉴权 | 通过 User ID 绑定,仅授权用户可对话 | 所有能给 Bot 发消息的用户均可对话 |
| 适合场景 | 个人使用、海外用户 | 团队协作、国内用户 |
## 系统环境检查
在开始安装之前,建议先运行环境检查工具,确保你的系统满足 OpenClaw 的运行要求。
### 下载检查工具
从 [GitHub Releases](https://github.com/suuuuuu-1/openclaw-env-checker/releases) 下载对应平台的检查工具:
| 平台 | 文件名 |
| --------------------- | ------------------------------ |
| Windows | `openclaw-checker-win-x64.exe` |
| macOS (Intel) | `openclaw-checker-macos-x64` |
| macOS (Apple Silicon) | `openclaw-checker-macos-arm64` |
| Linux | `openclaw-checker-linux-x64` |
### 检查项目
工具会自动检查以下条件:
* ✅ Node.js 版本(需要 >= 22.12.0)
* ✅ npm 可用
* ✅ Git 可用
* ✅ 网络连通性(github.com、npmjs.org、evolink.ai)
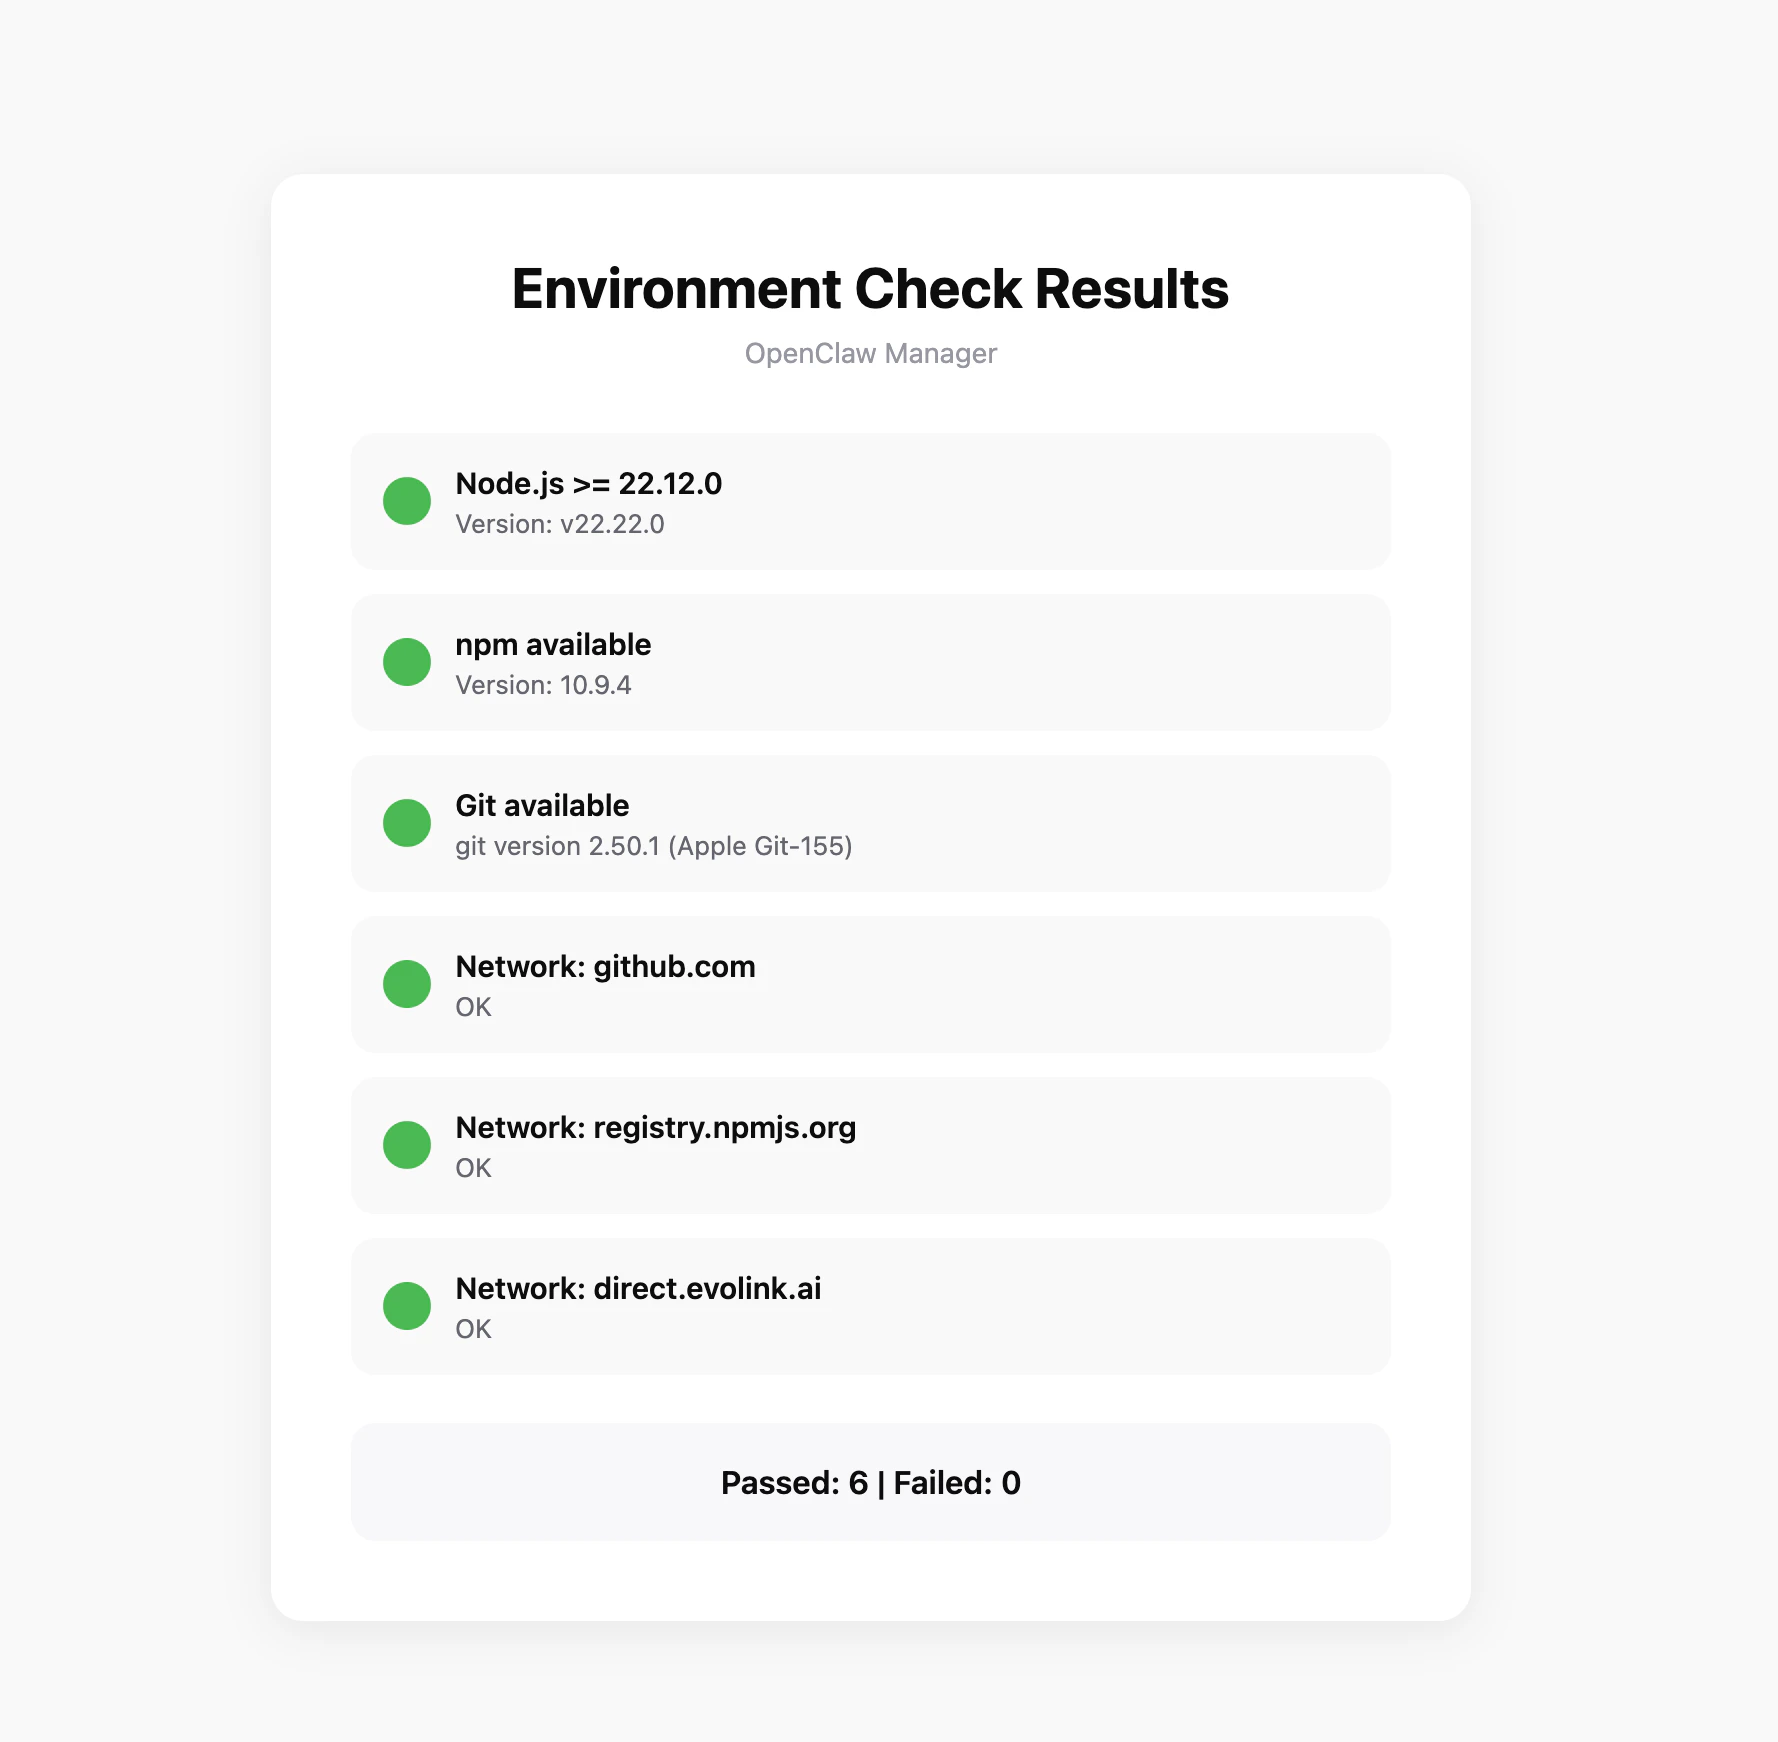 如果检查未通过,工具会给出具体的修复建议。
## 前置准备
### 1. 安装 Node.js
OpenClaw Manager 需要 Node.js 22 或更高版本。
访问 [Node.js 官网](https://nodejs.org/zh-cn/download),下载 Windows 安装包(.msi 文件),双击运行安装程序。
安装完成后,打开 PowerShell 验证:
```bash theme={null}
node --version
npm --version
```
建议以管理员身份运行 PowerShell,避免后续安装时出现权限问题。
**方式 1: 使用安装包**
访问 [Node.js 官网](https://nodejs.org/zh-cn/download),下载 macOS 安装包(.pkg 文件),双击运行安装程序。
**方式 2: 使用 Homebrew**
```bash theme={null}
brew install node
```
安装完成后,打开终端验证:
```bash theme={null}
node --version
npm --version
```
如果后续安装时遇到权限问题,可能需要在命令前加 `sudo`。
### 2. 安装 Git
OpenClaw 依赖 Git 进行版本管理和插件安装。
访问 [Git 官网](https://git-scm.com/downloads),下载 Windows 版本安装包,双击运行安装程序,按默认选项完成安装。
安装完成后,打开 PowerShell 验证:
```bash theme={null}
git --version
```
**方式 1: 使用 Homebrew(推荐)**
```bash theme={null}
brew install git
```
**方式 2: 使用 Xcode Command Line Tools**
```bash theme={null}
xcode-select --install
```
安装完成后,打开终端验证:
```bash theme={null}
git --version
```
### 3. 获取 EvoLink API Key
* 登录 [EvoLink 控制台](https://evolink.ai/dashboard)
* 在控制台中找到 API Keys,点击"创建新Key"按钮,然后复制生成的 Key
* API Key 通常以 `sk-` 开头,请妥善保存
### 4. 获取通道凭证
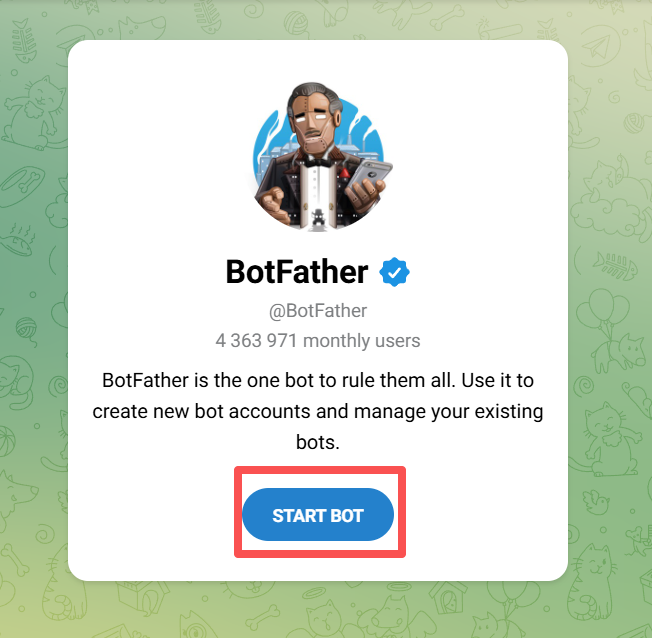
1. 在 Telegram 中搜索 [@BotFather](https://t.me/BotFather),点击 **START BOT** 开始对话
如果检查未通过,工具会给出具体的修复建议。
## 前置准备
### 1. 安装 Node.js
OpenClaw Manager 需要 Node.js 22 或更高版本。
访问 [Node.js 官网](https://nodejs.org/zh-cn/download),下载 Windows 安装包(.msi 文件),双击运行安装程序。
安装完成后,打开 PowerShell 验证:
```bash theme={null}
node --version
npm --version
```
建议以管理员身份运行 PowerShell,避免后续安装时出现权限问题。
**方式 1: 使用安装包**
访问 [Node.js 官网](https://nodejs.org/zh-cn/download),下载 macOS 安装包(.pkg 文件),双击运行安装程序。
**方式 2: 使用 Homebrew**
```bash theme={null}
brew install node
```
安装完成后,打开终端验证:
```bash theme={null}
node --version
npm --version
```
如果后续安装时遇到权限问题,可能需要在命令前加 `sudo`。
### 2. 安装 Git
OpenClaw 依赖 Git 进行版本管理和插件安装。
访问 [Git 官网](https://git-scm.com/downloads),下载 Windows 版本安装包,双击运行安装程序,按默认选项完成安装。
安装完成后,打开 PowerShell 验证:
```bash theme={null}
git --version
```
**方式 1: 使用 Homebrew(推荐)**
```bash theme={null}
brew install git
```
**方式 2: 使用 Xcode Command Line Tools**
```bash theme={null}
xcode-select --install
```
安装完成后,打开终端验证:
```bash theme={null}
git --version
```
### 3. 获取 EvoLink API Key
* 登录 [EvoLink 控制台](https://evolink.ai/dashboard)
* 在控制台中找到 API Keys,点击"创建新Key"按钮,然后复制生成的 Key
* API Key 通常以 `sk-` 开头,请妥善保存
### 4. 获取通道凭证
1. 在 Telegram 中搜索 [@BotFather](https://t.me/BotFather),点击 **START BOT** 开始对话
 2. 发送 `/newbot`,按提示设置 Bot 名称,获得 **Bot Token**(格式:`123456789:ABCdef...`)
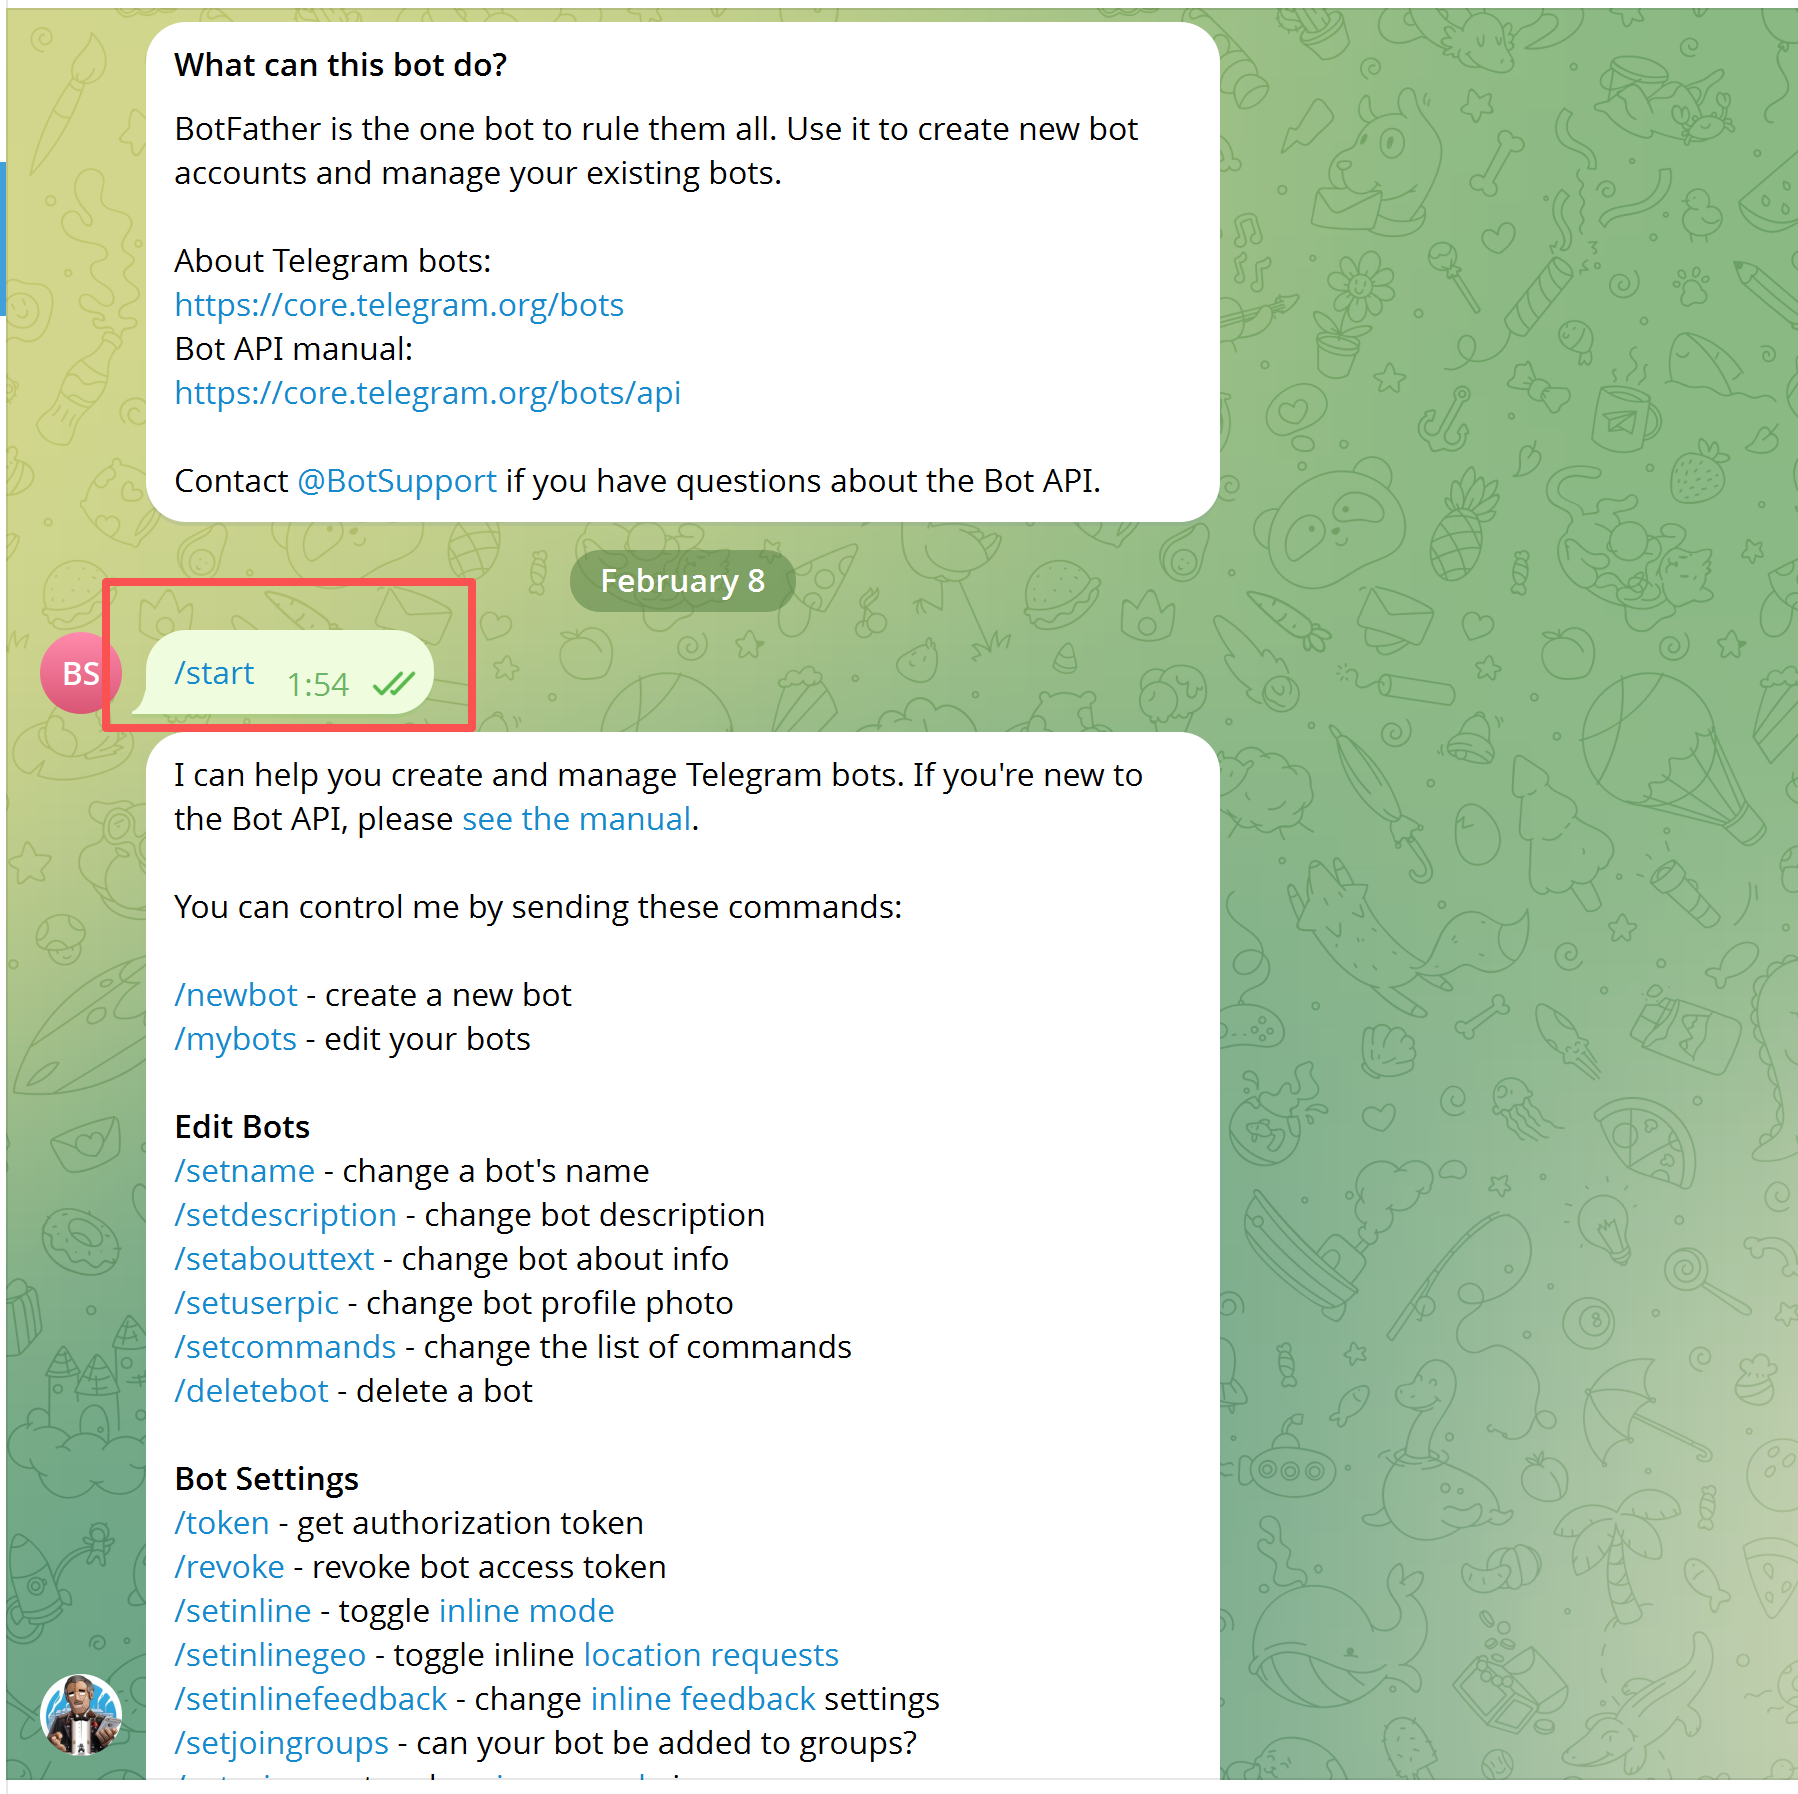 3. 获取你的 **Telegram User ID**:向 [@userinfobot](https://t.me/userinfobot) 发送 `/start`,记下返回的数字 ID
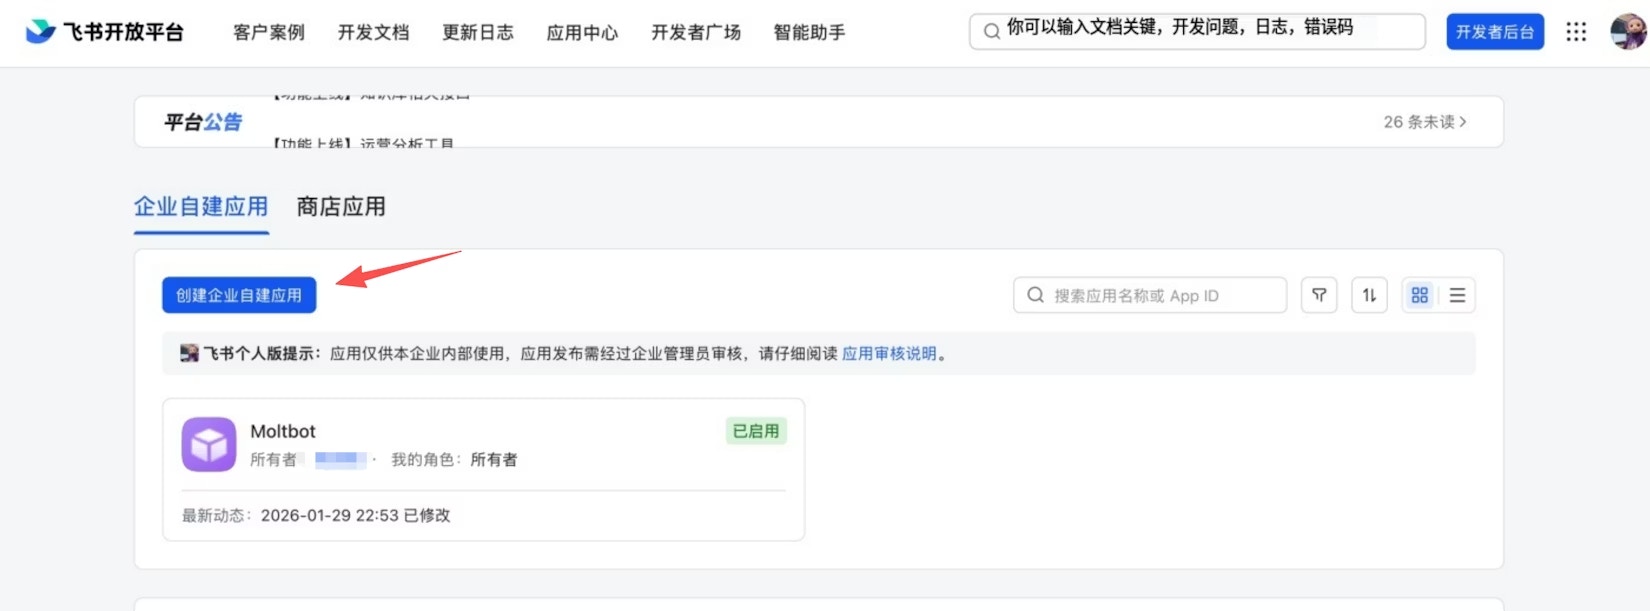
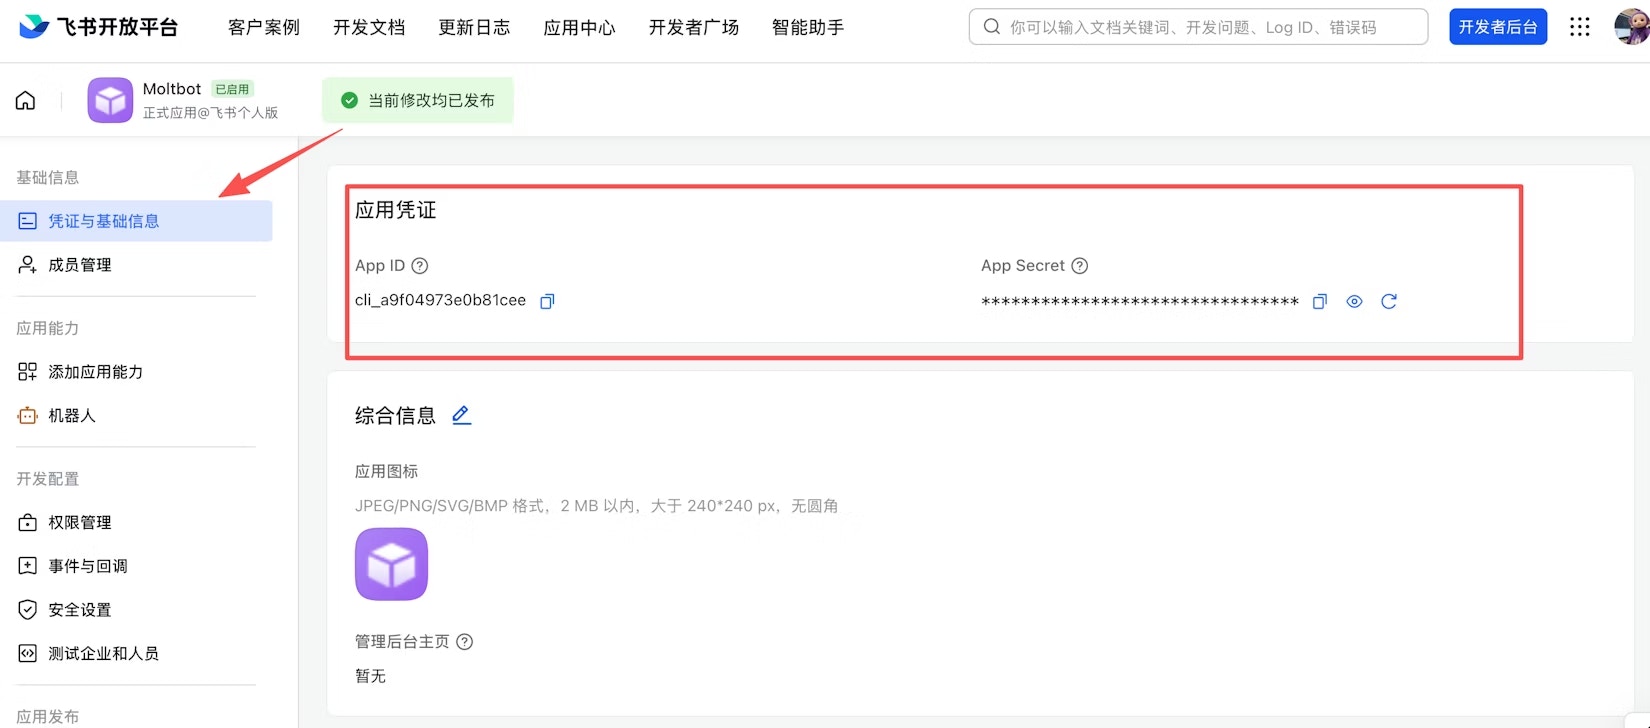
1. 前往 [飞书开放平台](https://open.feishu.cn/app),创建一个企业自建应用
3. 获取你的 **Telegram User ID**:向 [@userinfobot](https://t.me/userinfobot) 发送 `/start`,记下返回的数字 ID
1. 前往 [飞书开放平台](https://open.feishu.cn/app),创建一个企业自建应用
 2. 在应用的「凭证与基础信息」页面获取 **App ID** 和 **App Secret**
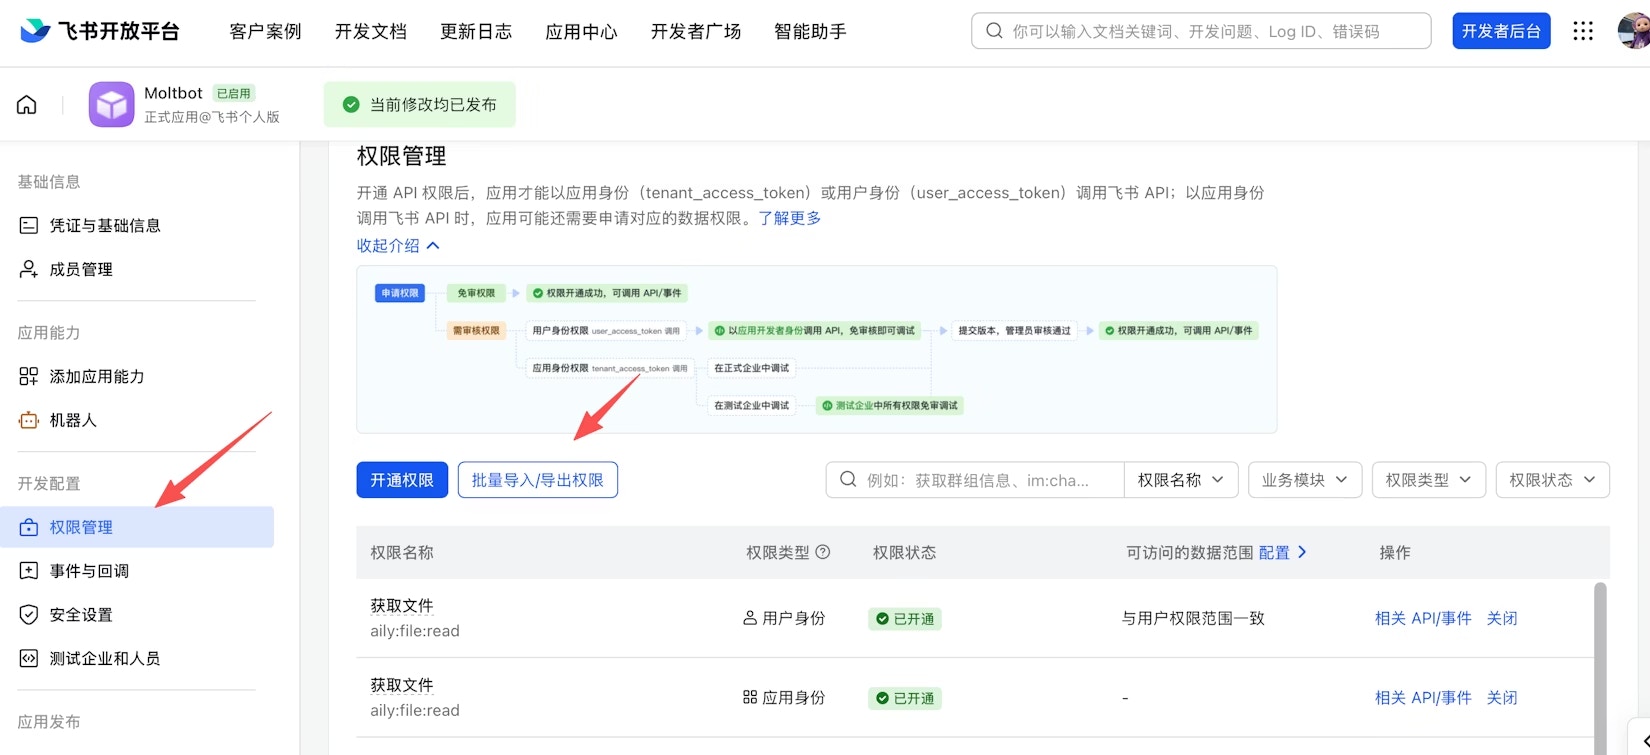
 3. 在「权限管理」页面,点击 **批量导入**,粘贴以下 JSON 一键导入所需权限:
```json theme={null}
{
"scopes": {
"tenant": [
"aily:file:read",
"aily:file:write",
"application:application.app_message_stats.overview:readonly",
"application:application:self_manage",
"application:bot.menu:write",
"cardkit:card:write",
"contact:contact.base:readonly",
"contact:user.employee_id:readonly",
"corehr:file:download",
"docs:document.content:read",
"event:ip_list",
"im:chat",
"im:chat.access_event.bot_p2p_chat:read",
"im:chat.members:bot_access",
"im:message",
"im:message.group_at_msg:readonly",
"im:message.group_msg",
"im:message.p2p_msg:readonly",
"im:message:readonly",
"im:message:send_as_bot",
"im:resource",
"sheets:spreadsheet",
"wiki:wiki:readonly"
],
"user": [
"aily:file:read",
"aily:file:write",
"im:chat.access_event.bot_p2p_chat:read"
]
}
}
```
3. 在「权限管理」页面,点击 **批量导入**,粘贴以下 JSON 一键导入所需权限:
```json theme={null}
{
"scopes": {
"tenant": [
"aily:file:read",
"aily:file:write",
"application:application.app_message_stats.overview:readonly",
"application:application:self_manage",
"application:bot.menu:write",
"cardkit:card:write",
"contact:contact.base:readonly",
"contact:user.employee_id:readonly",
"corehr:file:download",
"docs:document.content:read",
"event:ip_list",
"im:chat",
"im:chat.access_event.bot_p2p_chat:read",
"im:chat.members:bot_access",
"im:message",
"im:message.group_at_msg:readonly",
"im:message.group_msg",
"im:message.p2p_msg:readonly",
"im:message:readonly",
"im:message:send_as_bot",
"im:resource",
"sheets:spreadsheet",
"wiki:wiki:readonly"
],
"user": [
"aily:file:read",
"aily:file:write",
"im:chat.access_event.bot_p2p_chat:read"
]
}
}
```
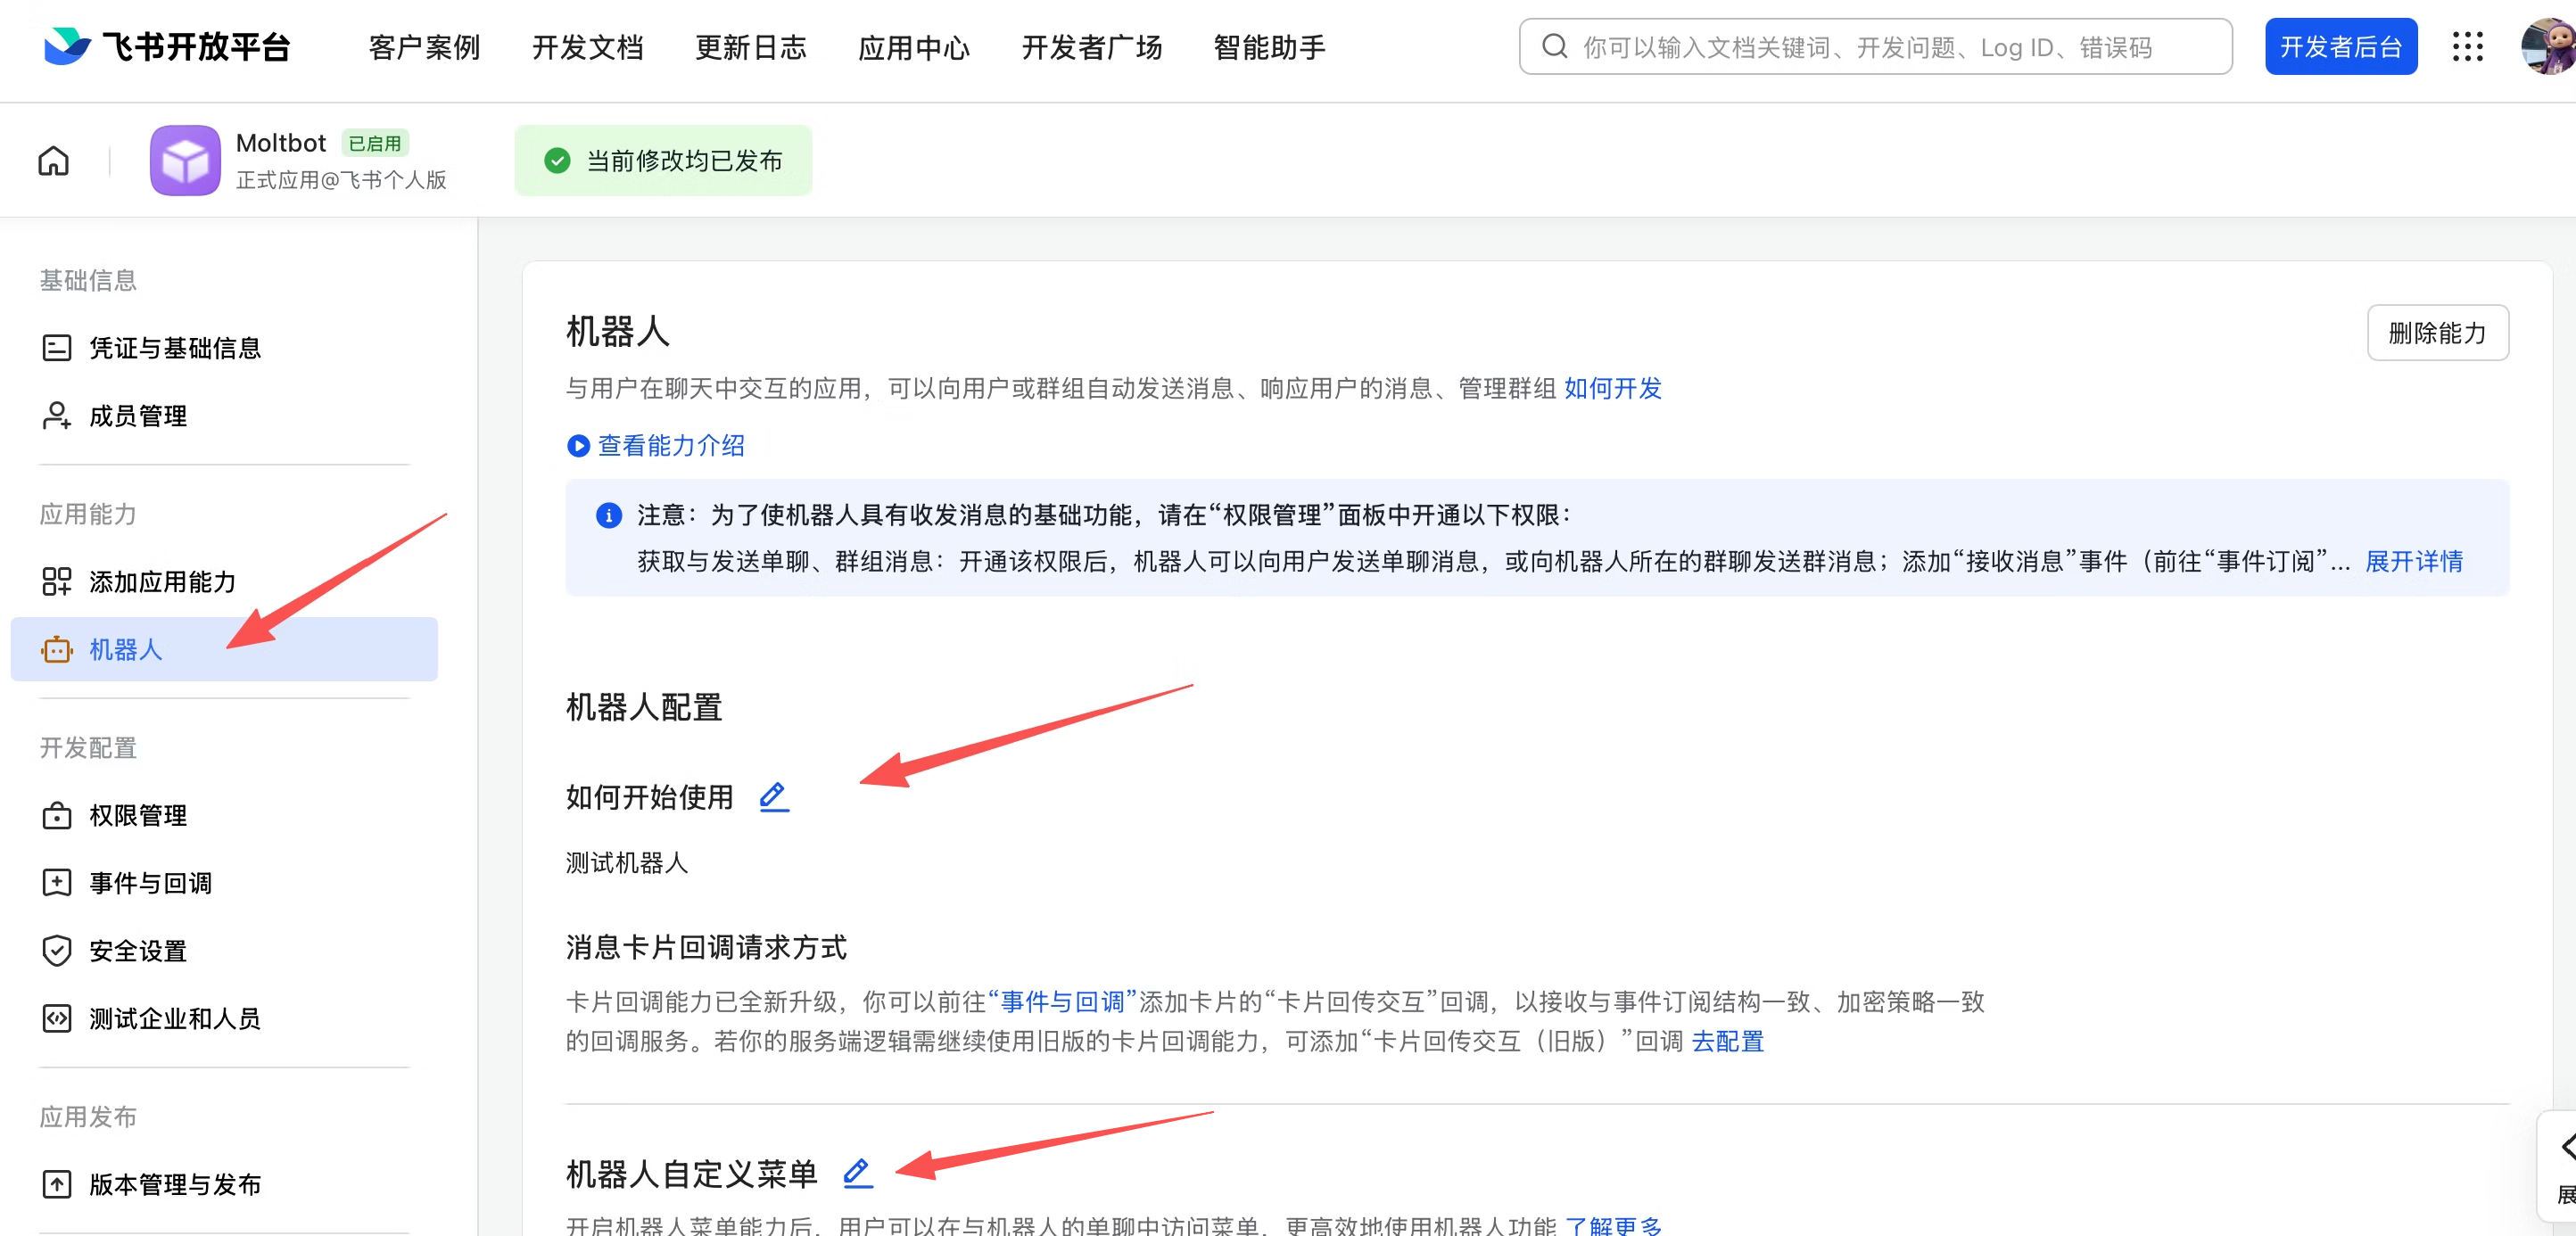
 4. 在「应用能力 > 机器人」页面,开启机器人能力并配置机器人名称
 到此为止,飞书应用的基础配置已完成。接下来的事件订阅和版本发布需要在网关部署完成后再操作,否则长连接设置将保存失败。请先完成下方第一步和第二步的部署,再回到飞书开放平台继续配置。
## 第一步:下载并运行
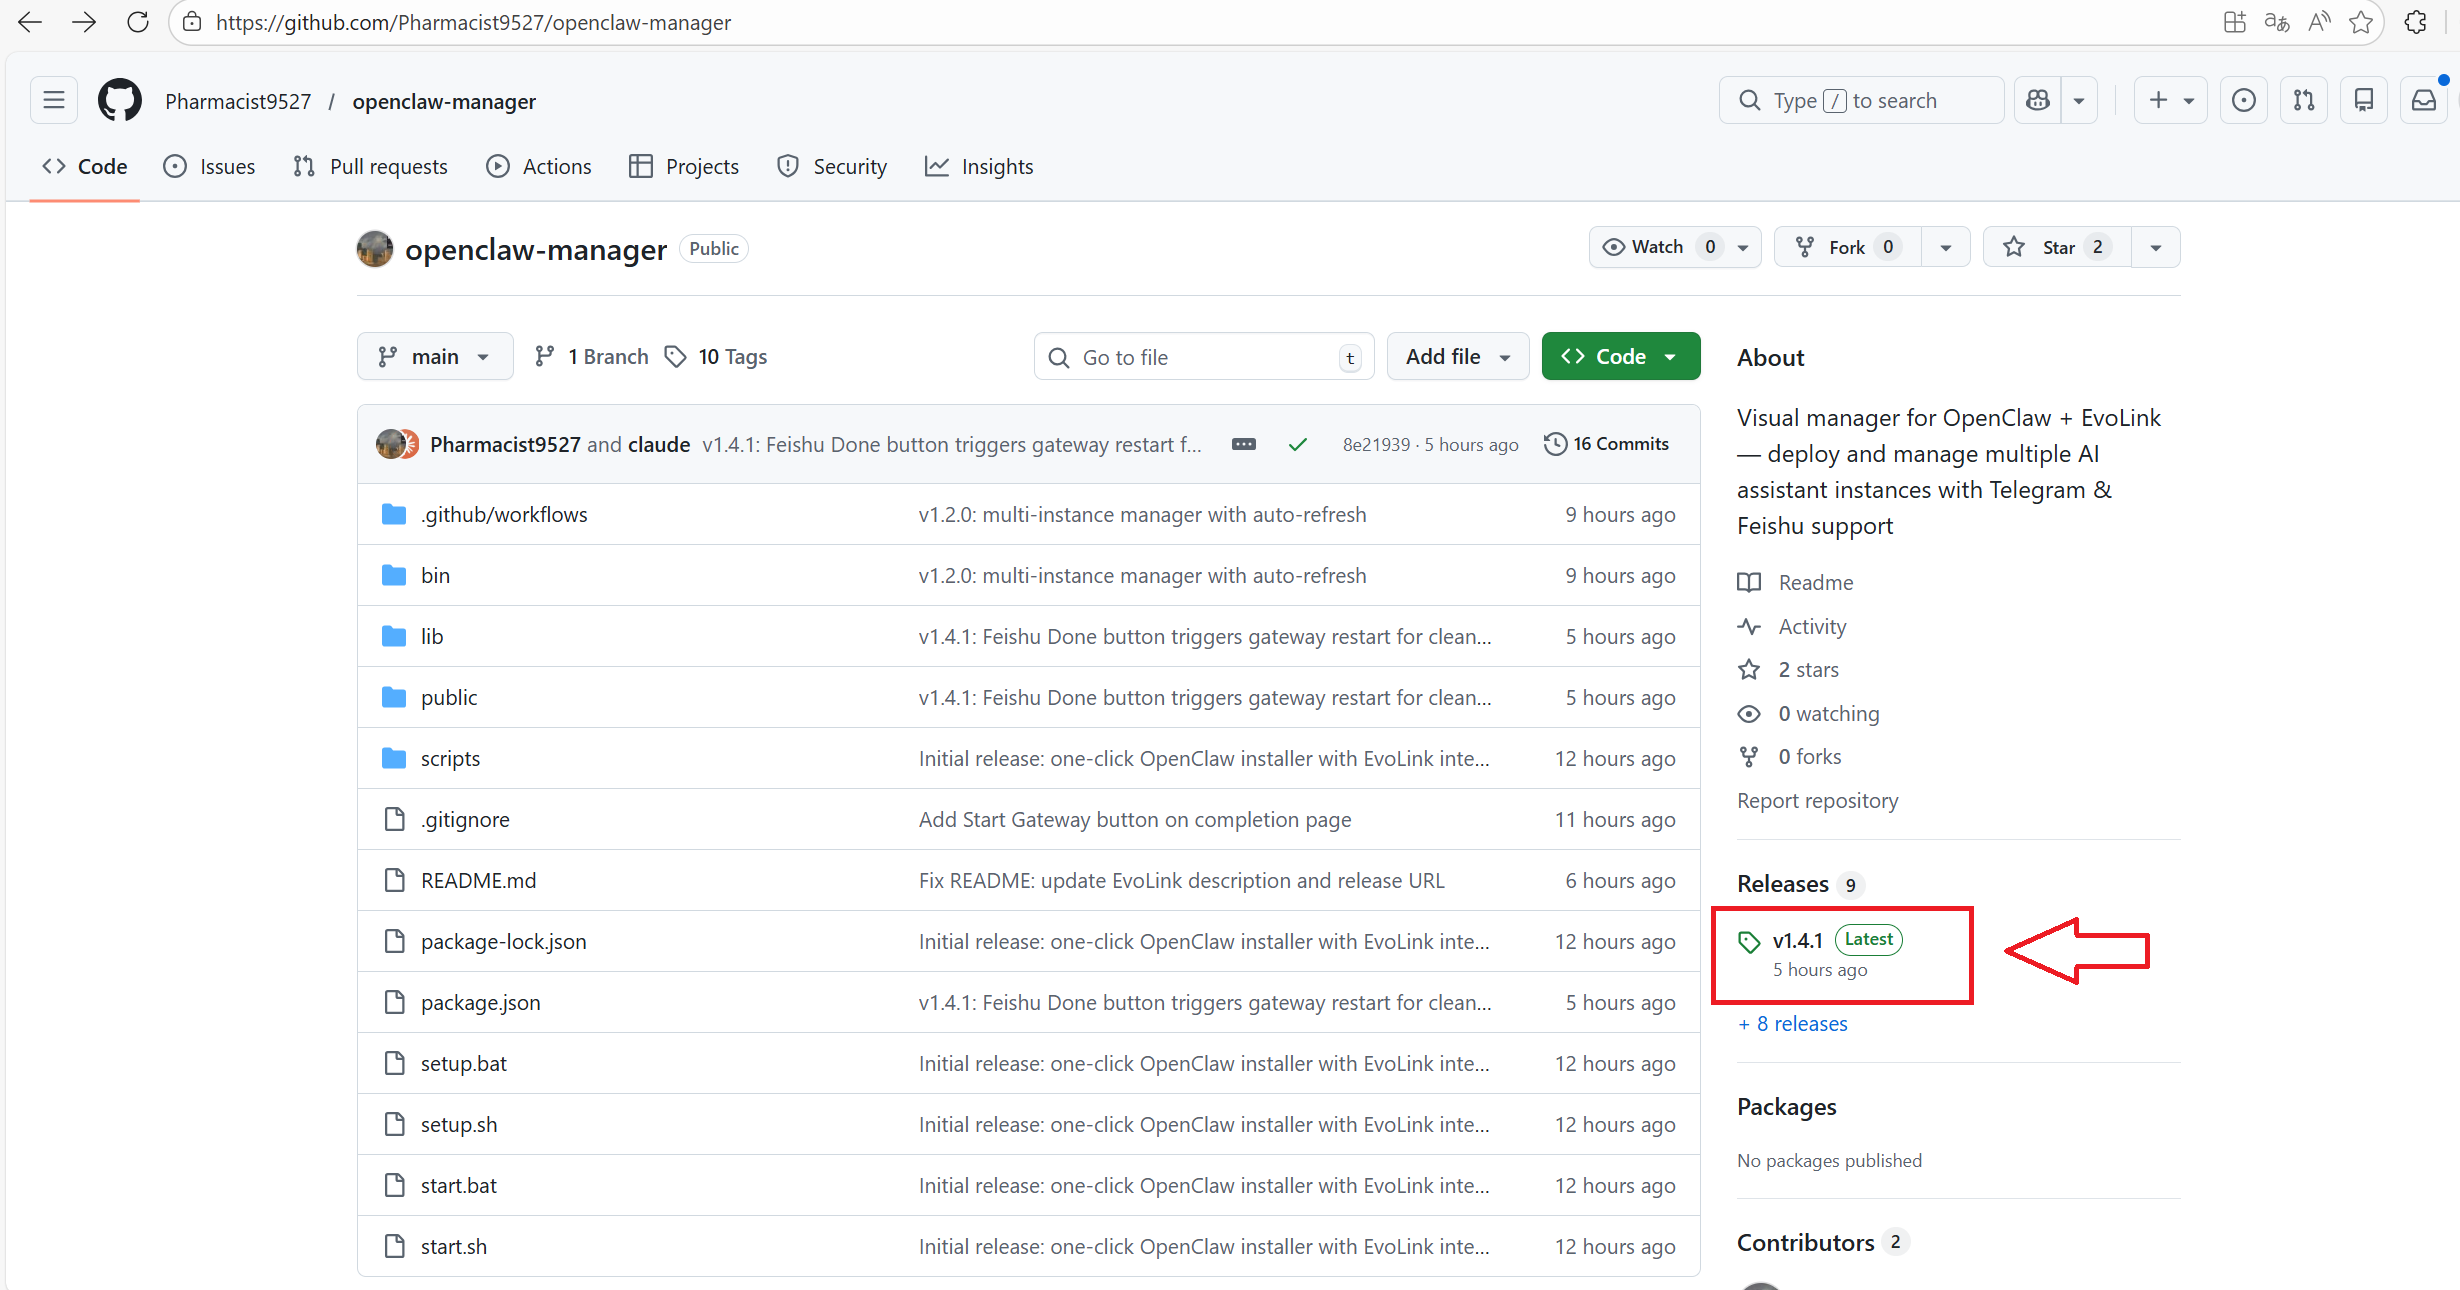
从 [Releases](https://github.com/Pharmacist9527/openclaw-manager/releases) 下载对应平台的可执行文件:
到此为止,飞书应用的基础配置已完成。接下来的事件订阅和版本发布需要在网关部署完成后再操作,否则长连接设置将保存失败。请先完成下方第一步和第二步的部署,再回到飞书开放平台继续配置。
## 第一步:下载并运行
从 [Releases](https://github.com/Pharmacist9527/openclaw-manager/releases) 下载对应平台的可执行文件:
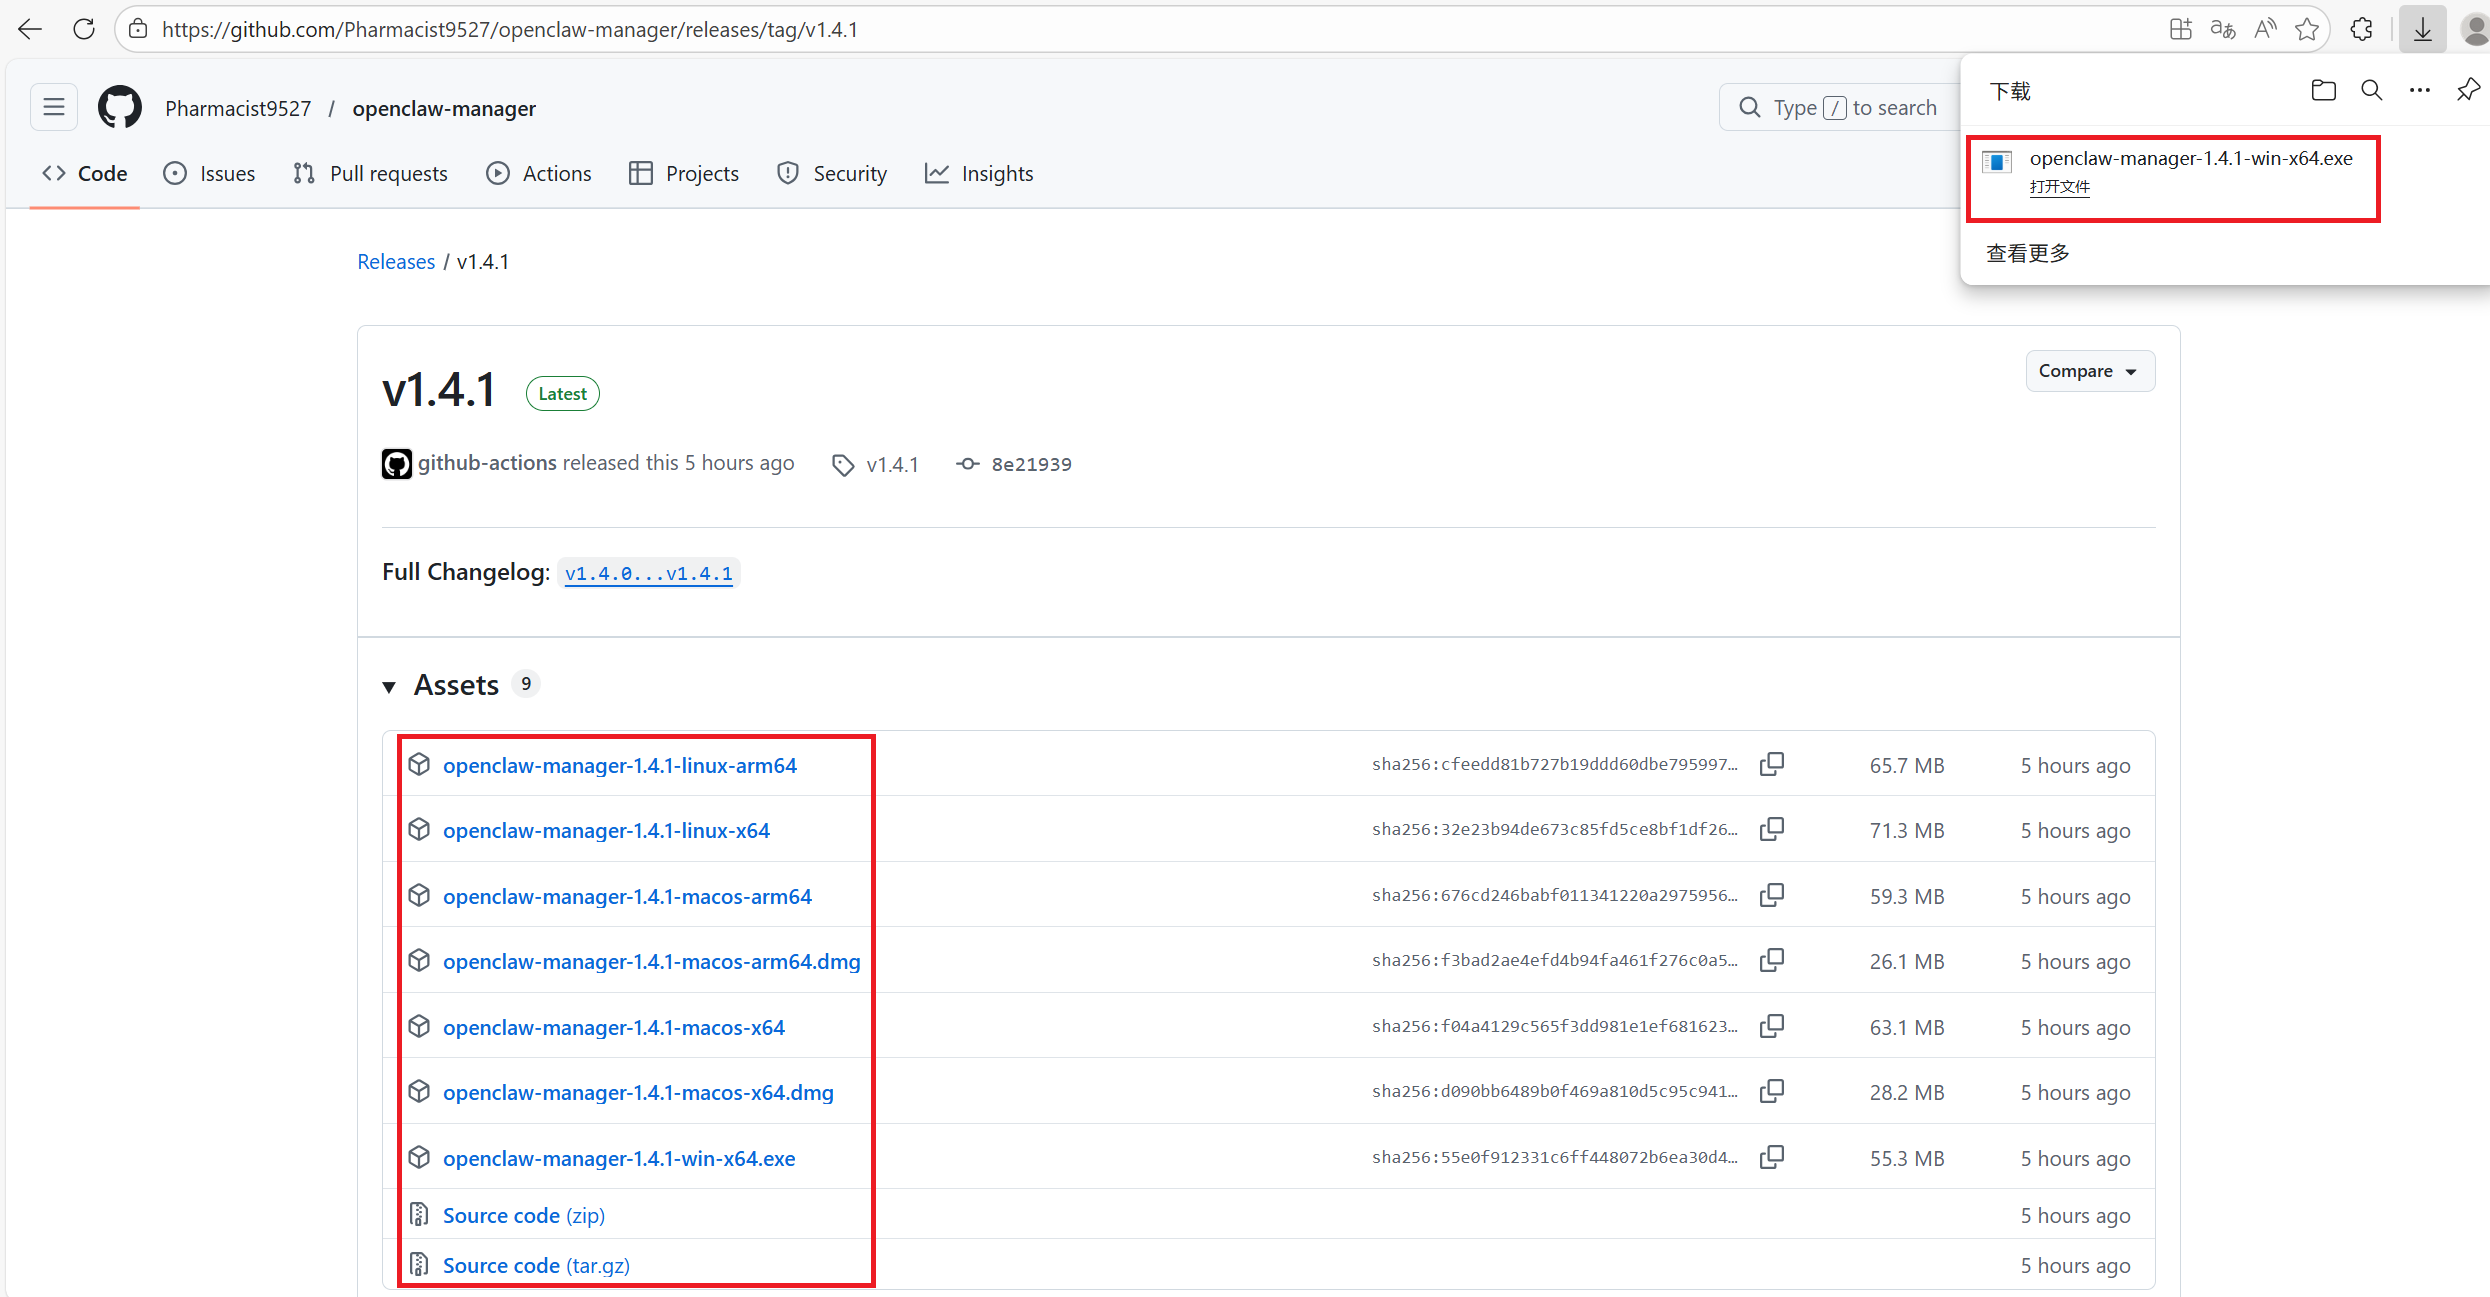 | 平台 | 文件名 |
| --------------------- | ------------------------------ |
| Windows | `openclaw-manager-win-x64.exe` |
| macOS (Intel) | `openclaw-manager-macos-x64` |
| macOS (Apple Silicon) | `openclaw-manager-macos-arm64` |
| Linux | `openclaw-manager-linux-x64` |
运行前请确保已安装 [Node.js 22+](https://nodejs.org/zh-cn/download)。
Windows 用户右键以管理员身份运行。macOS / Linux 用户在终端中使用 `sudo` 执行:
```bash theme={null}
chmod +x ./openclaw-manager && sudo ./openclaw-manager
```
脚本会自动检查并安装 OpenClaw,然后启动本地 Web 管理界面并打开浏览器。
| 平台 | 文件名 |
| --------------------- | ------------------------------ |
| Windows | `openclaw-manager-win-x64.exe` |
| macOS (Intel) | `openclaw-manager-macos-x64` |
| macOS (Apple Silicon) | `openclaw-manager-macos-arm64` |
| Linux | `openclaw-manager-linux-x64` |
运行前请确保已安装 [Node.js 22+](https://nodejs.org/zh-cn/download)。
Windows 用户右键以管理员身份运行。macOS / Linux 用户在终端中使用 `sudo` 执行:
```bash theme={null}
chmod +x ./openclaw-manager && sudo ./openclaw-manager
```
脚本会自动检查并安装 OpenClaw,然后启动本地 Web 管理界面并打开浏览器。
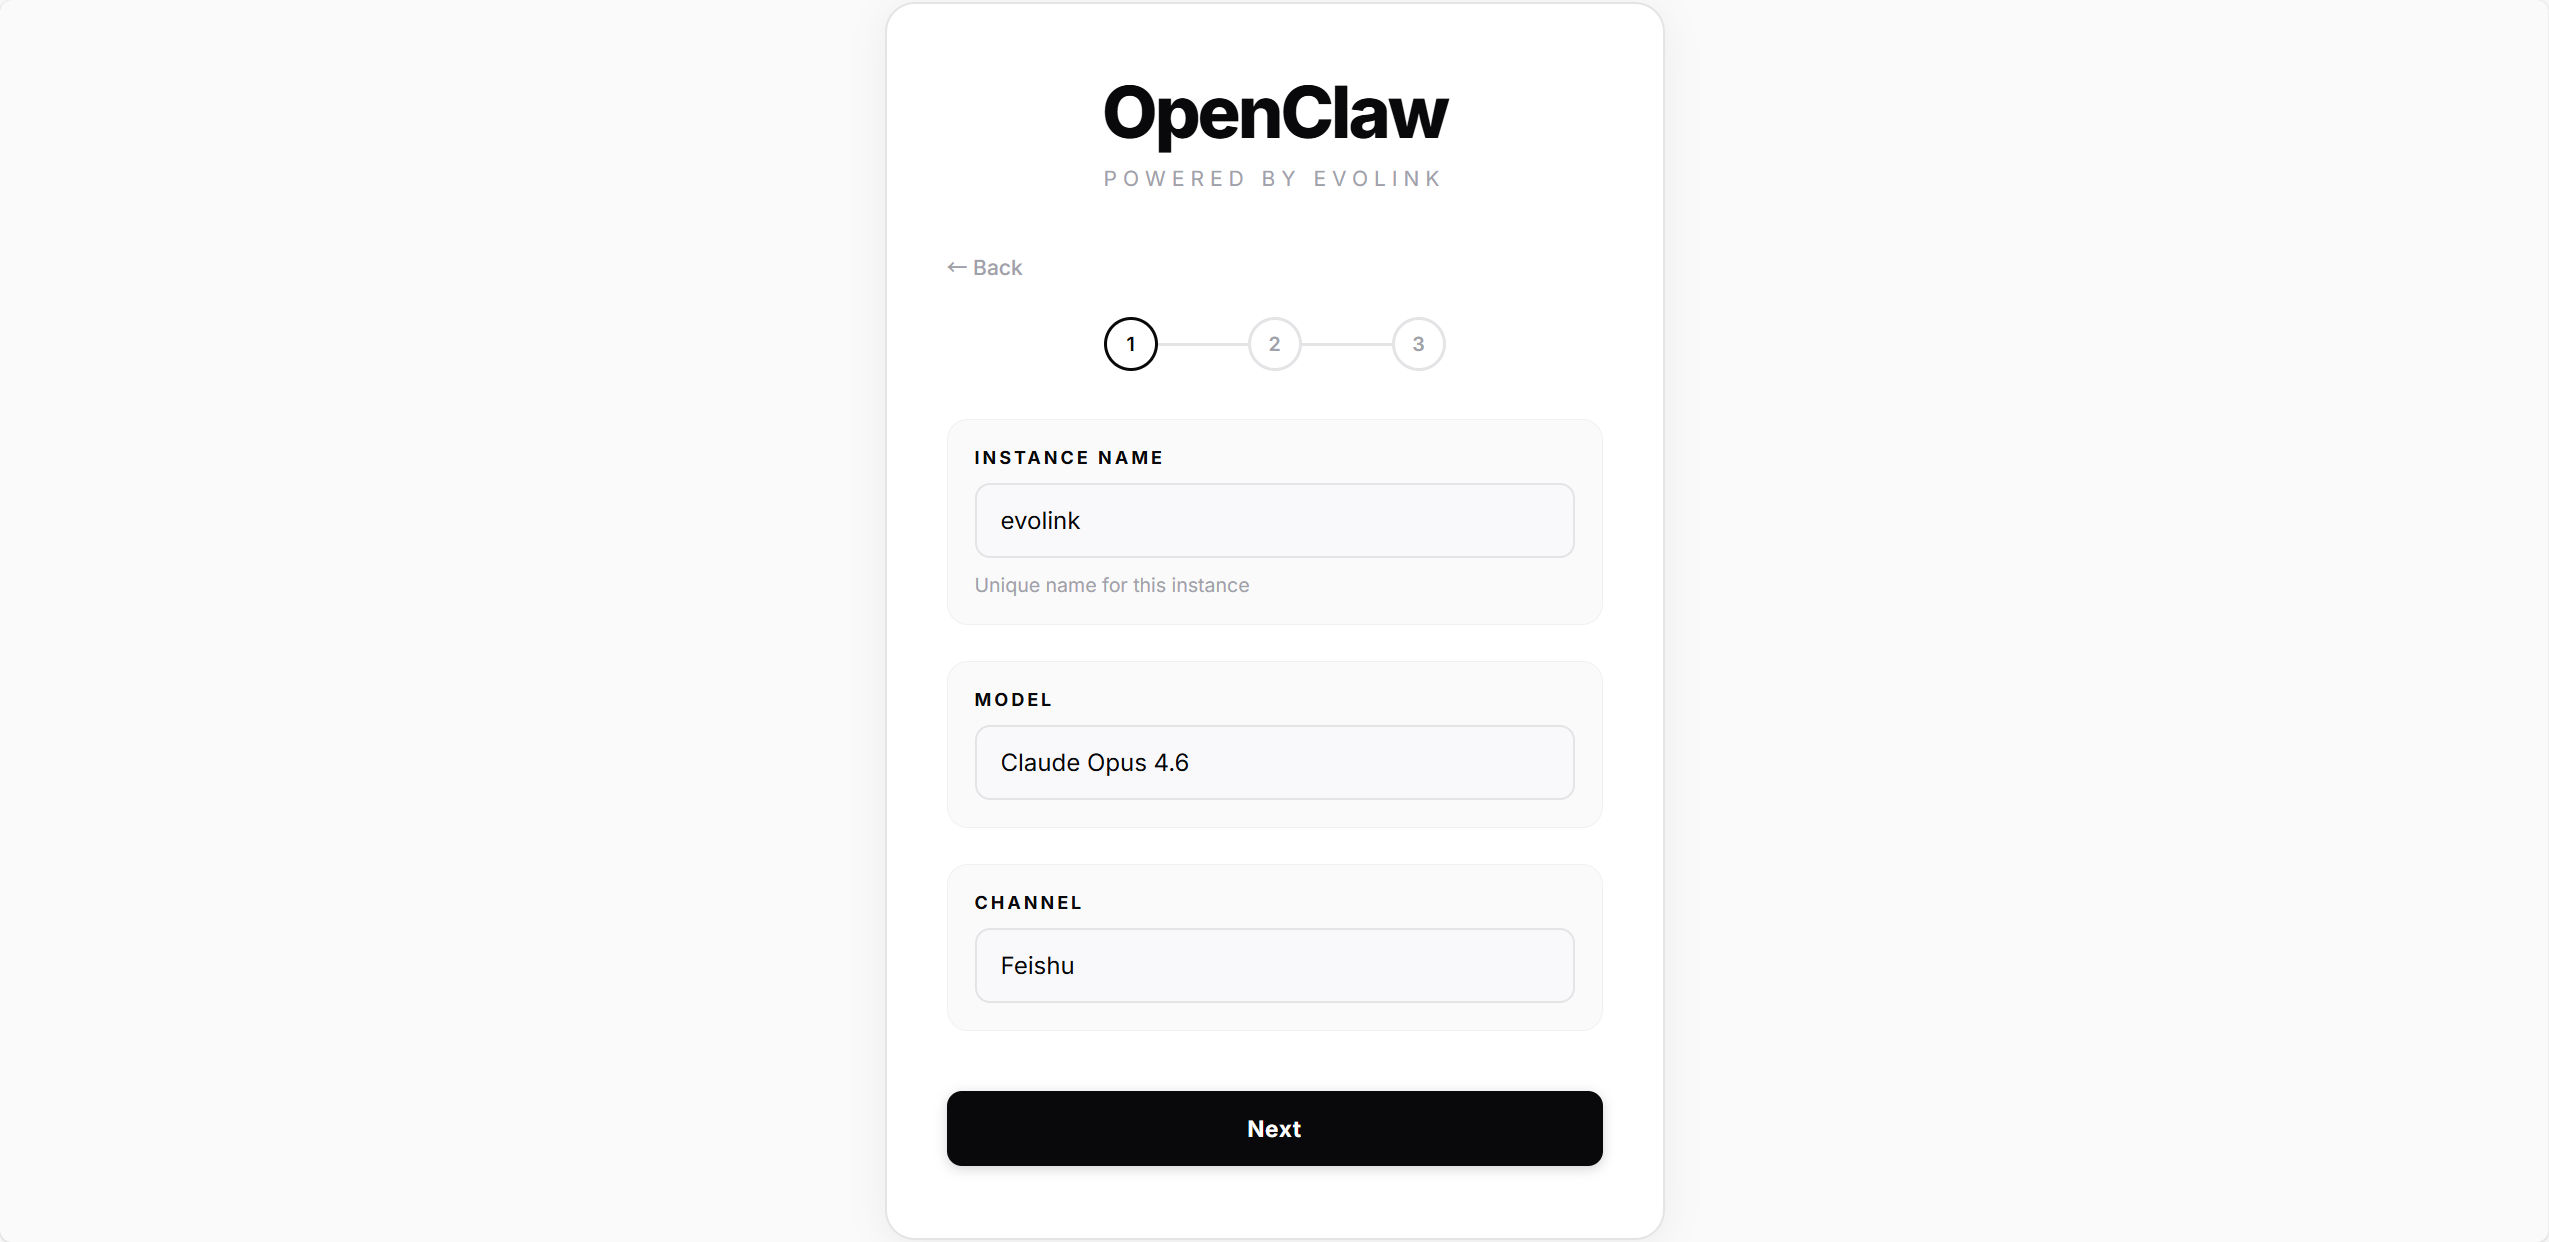
 ## 第二步:创建实例
### 2.1 — 基本信息
| 字段 | 说明 |
| ------------- | ------------------------------------------------- |
| Instance Name | 实例名称(如 `mybot`),同一台机器上不可重复 |
| Model | 选择模型:Haiku 4.5 / Sonnet 4.5 / Opus 4.5 / Opus 4.6 |
| Channel | 选择通道:Telegram 或 Feishu |
## 第二步:创建实例
### 2.1 — 基本信息
| 字段 | 说明 |
| ------------- | ------------------------------------------------- |
| Instance Name | 实例名称(如 `mybot`),同一台机器上不可重复 |
| Model | 选择模型:Haiku 4.5 / Sonnet 4.5 / Opus 4.5 / Opus 4.6 |
| Channel | 选择通道:Telegram 或 Feishu |
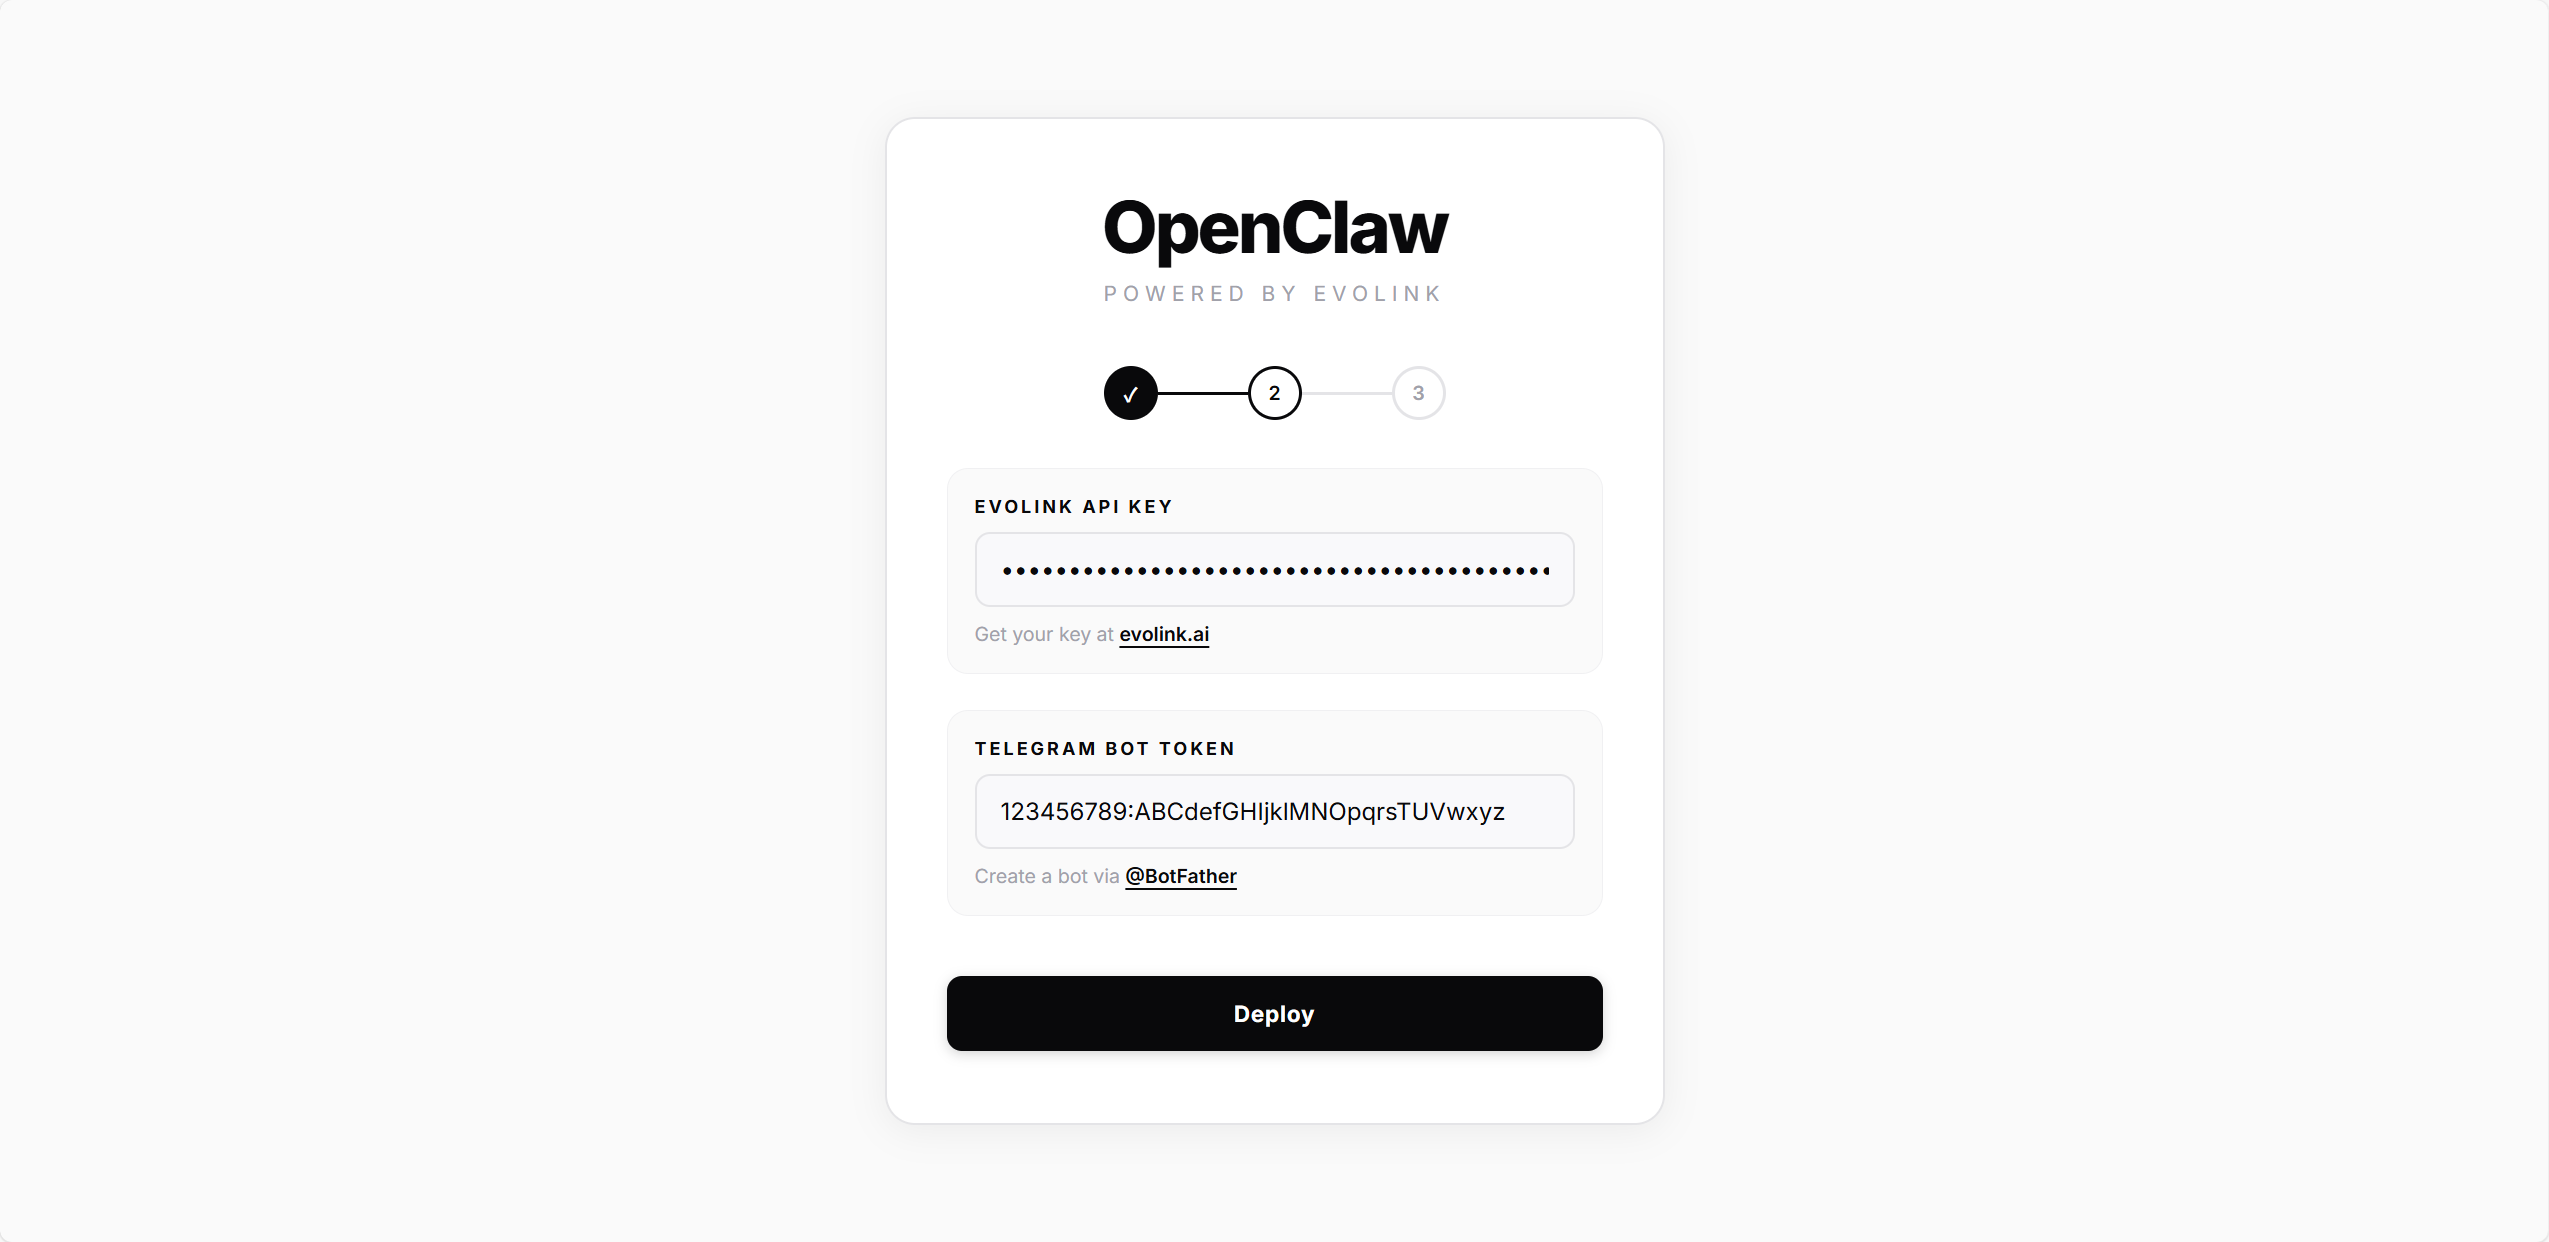
 ### 2.2 — 填写凭证并部署
所有通道都需要填写 **EvoLink API Key**。
填写从 @BotFather 获取的 **Bot Token**,点击 **Deploy**。
脚本会自动完成:
1. 创建 OpenClaw 配置文件
2. 写入模型和 API Key 配置
3. 配置 Telegram 插件并启用
4. 安装并启动网关服务
### 2.2 — 填写凭证并部署
所有通道都需要填写 **EvoLink API Key**。
填写从 @BotFather 获取的 **Bot Token**,点击 **Deploy**。
脚本会自动完成:
1. 创建 OpenClaw 配置文件
2. 写入模型和 API Key 配置
3. 配置 Telegram 插件并启用
4. 安装并启动网关服务
 填写从飞书开放平台获取的 **App ID** 和 **App Secret**,点击 **Deploy**。
脚本会自动完成:
1. 创建 OpenClaw 配置文件
2. 写入模型和 API Key 配置
3. 配置飞书插件(写入 App ID / App Secret)并启用
4. 安装并启动网关服务
填写从飞书开放平台获取的 **App ID** 和 **App Secret**,点击 **Deploy**。
脚本会自动完成:
1. 创建 OpenClaw 配置文件
2. 写入模型和 API Key 配置
3. 配置飞书插件(写入 App ID / App Secret)并启用
4. 安装并启动网关服务
 等待进度条完成后自动进入下一步。
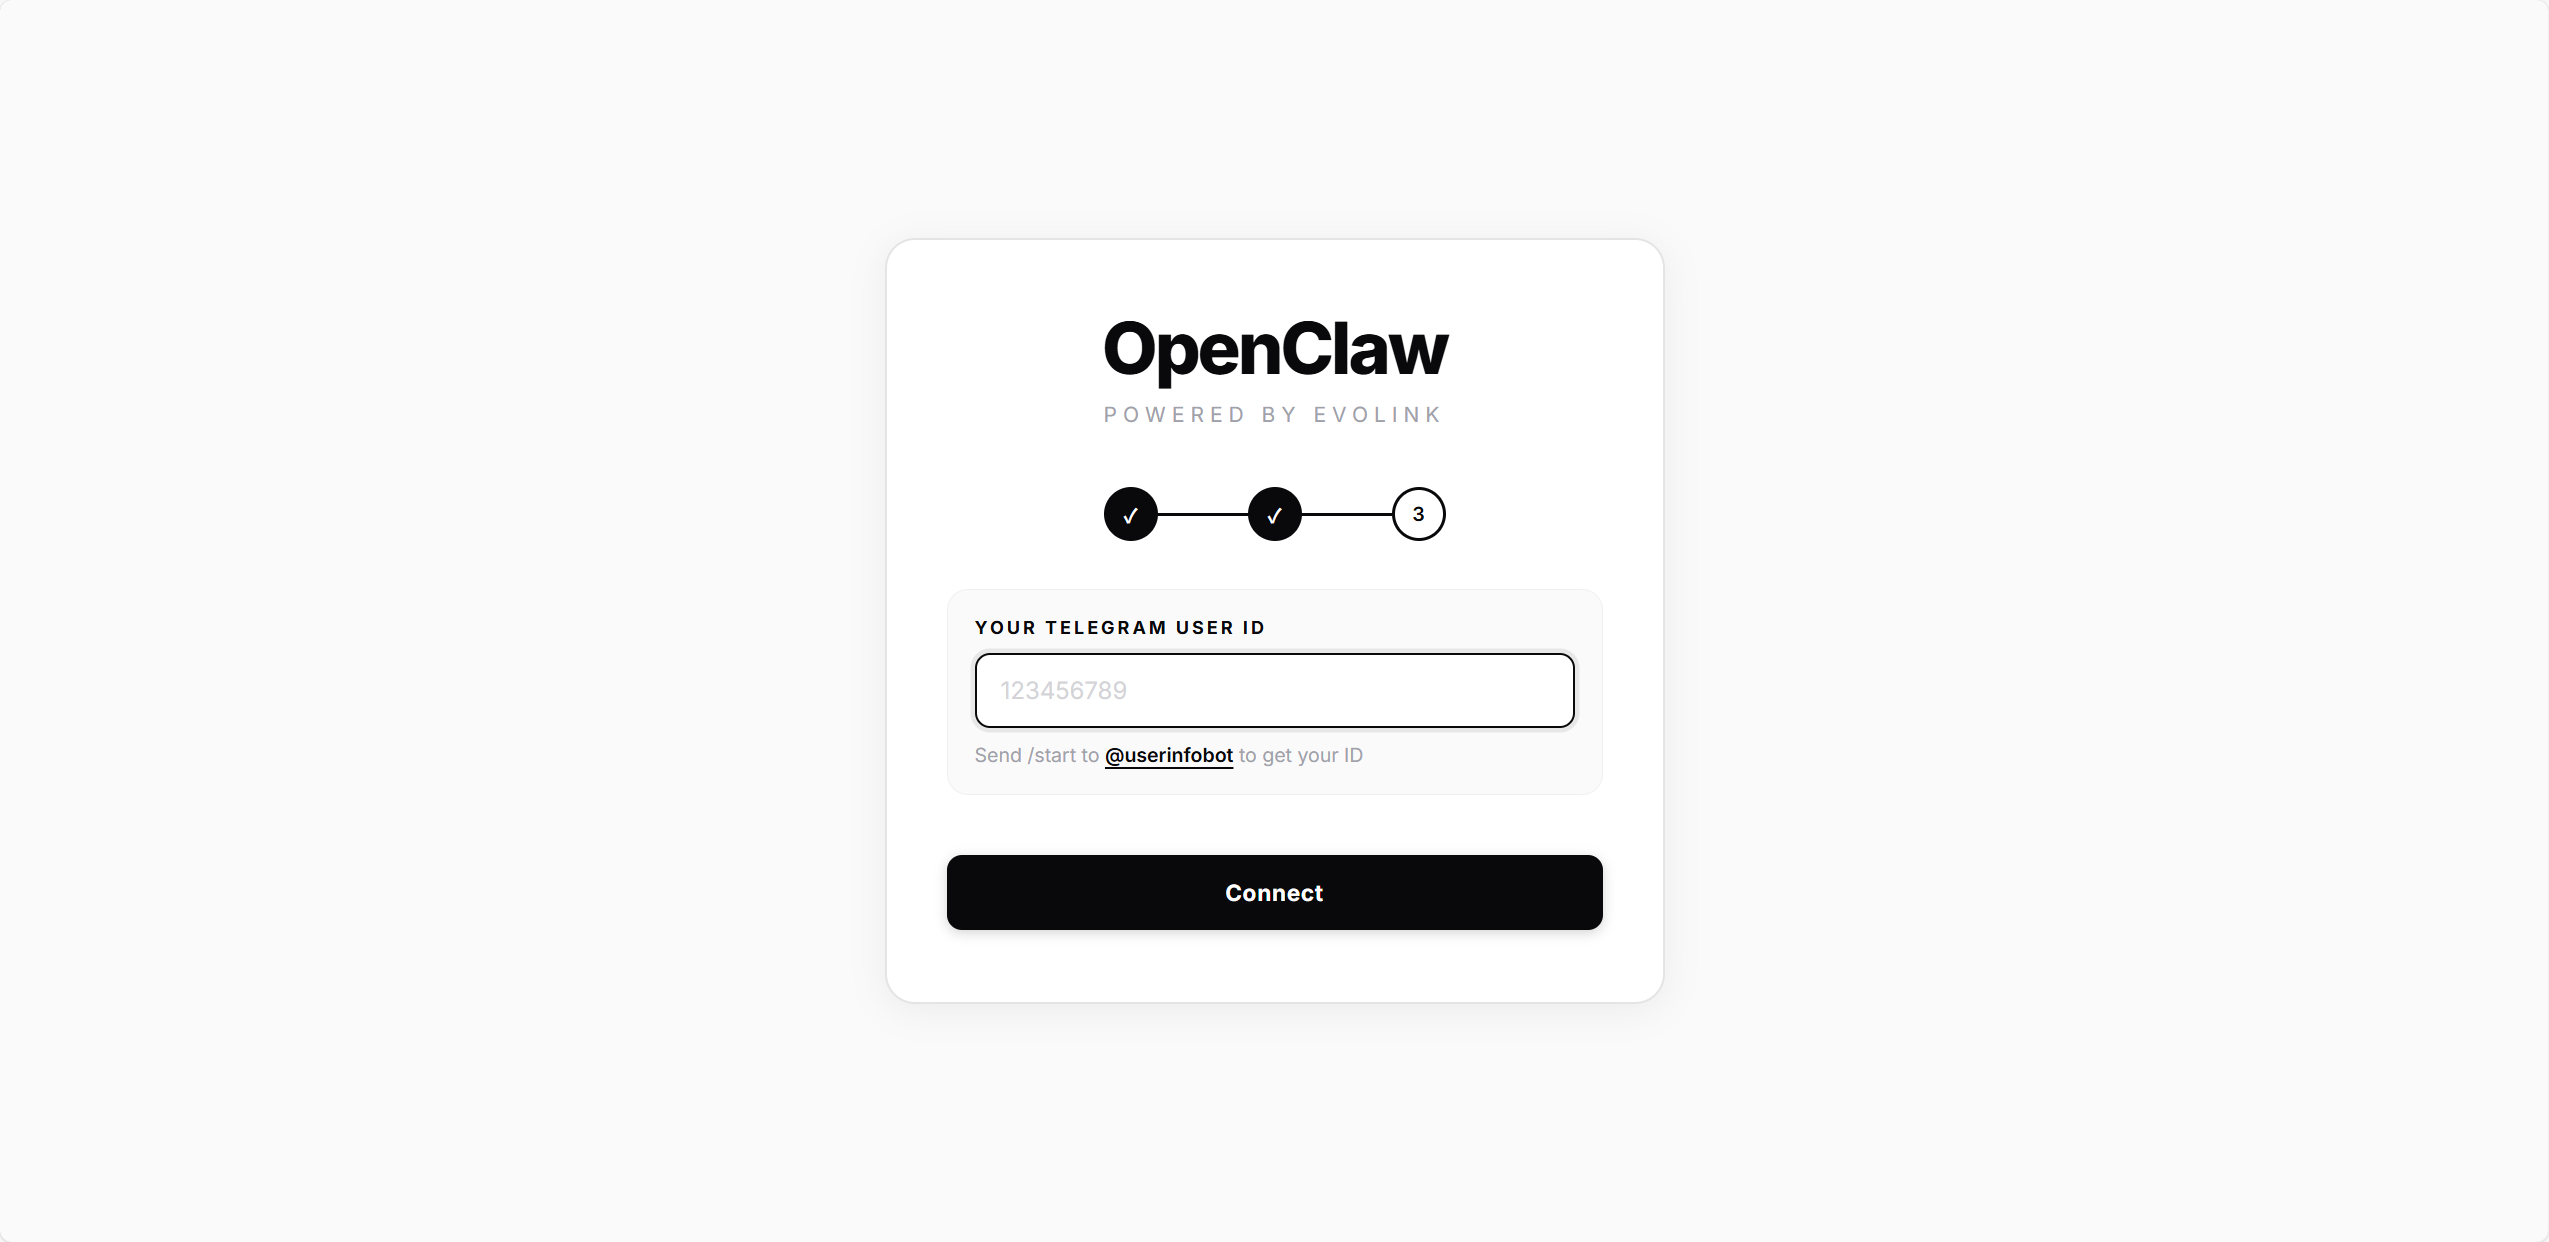
### 2.3 — 连接
填写你的 **Telegram User ID**(从 @userinfobot 获取的数字 ID),点击 **Connect**。
脚本会将该 ID 写入配置的 `allowedUsers`,只有该用户可以与 Bot 对话。连接完成后自动跳转到主页。
等待进度条完成后自动进入下一步。
### 2.3 — 连接
填写你的 **Telegram User ID**(从 @userinfobot 获取的数字 ID),点击 **Connect**。
脚本会将该 ID 写入配置的 `allowedUsers`,只有该用户可以与 Bot 对话。连接完成后自动跳转到主页。
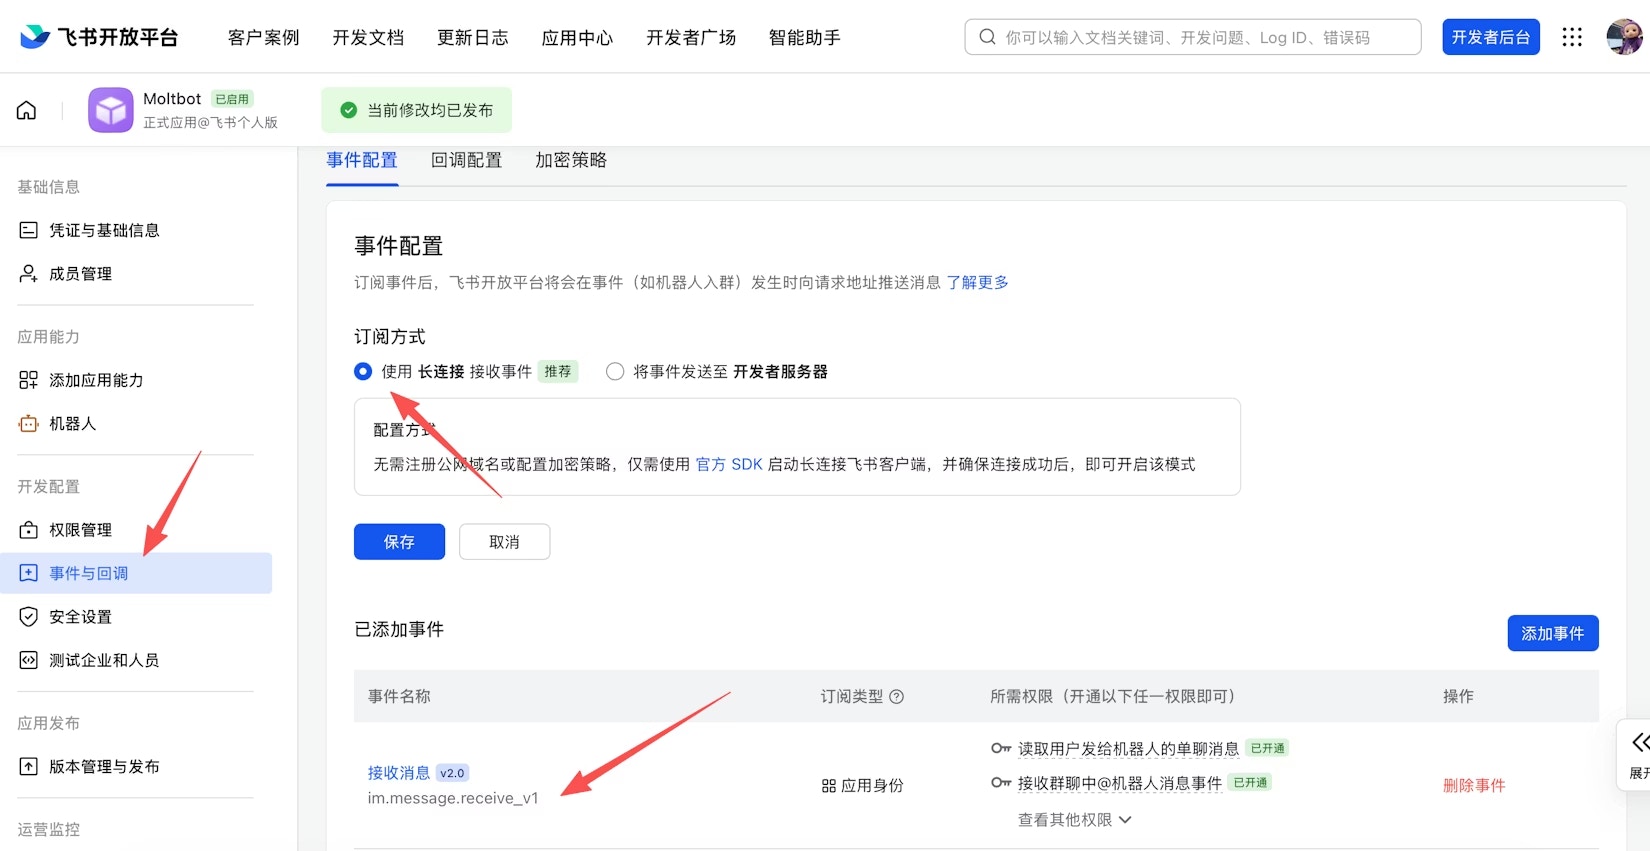
 部署已完成,现在回到飞书开放平台配置事件订阅。
在配置事件订阅前,请确保已完成以下步骤:
* 已完成飞书渠道配置(见第二步部署)
* 网关处于启动状态(可通过 `openclaw gateway status` 检查)
在 **事件订阅** 页面:
1. 选择 **使用长连接接收事件**(WebSocket 模式)
2. 添加事件:`im.message.receive_v1`(接收消息)
如果网关未启动或渠道未添加,长连接设置将保存失败。
部署已完成,现在回到飞书开放平台配置事件订阅。
在配置事件订阅前,请确保已完成以下步骤:
* 已完成飞书渠道配置(见第二步部署)
* 网关处于启动状态(可通过 `openclaw gateway status` 检查)
在 **事件订阅** 页面:
1. 选择 **使用长连接接收事件**(WebSocket 模式)
2. 添加事件:`im.message.receive_v1`(接收消息)
如果网关未启动或渠道未添加,长连接设置将保存失败。
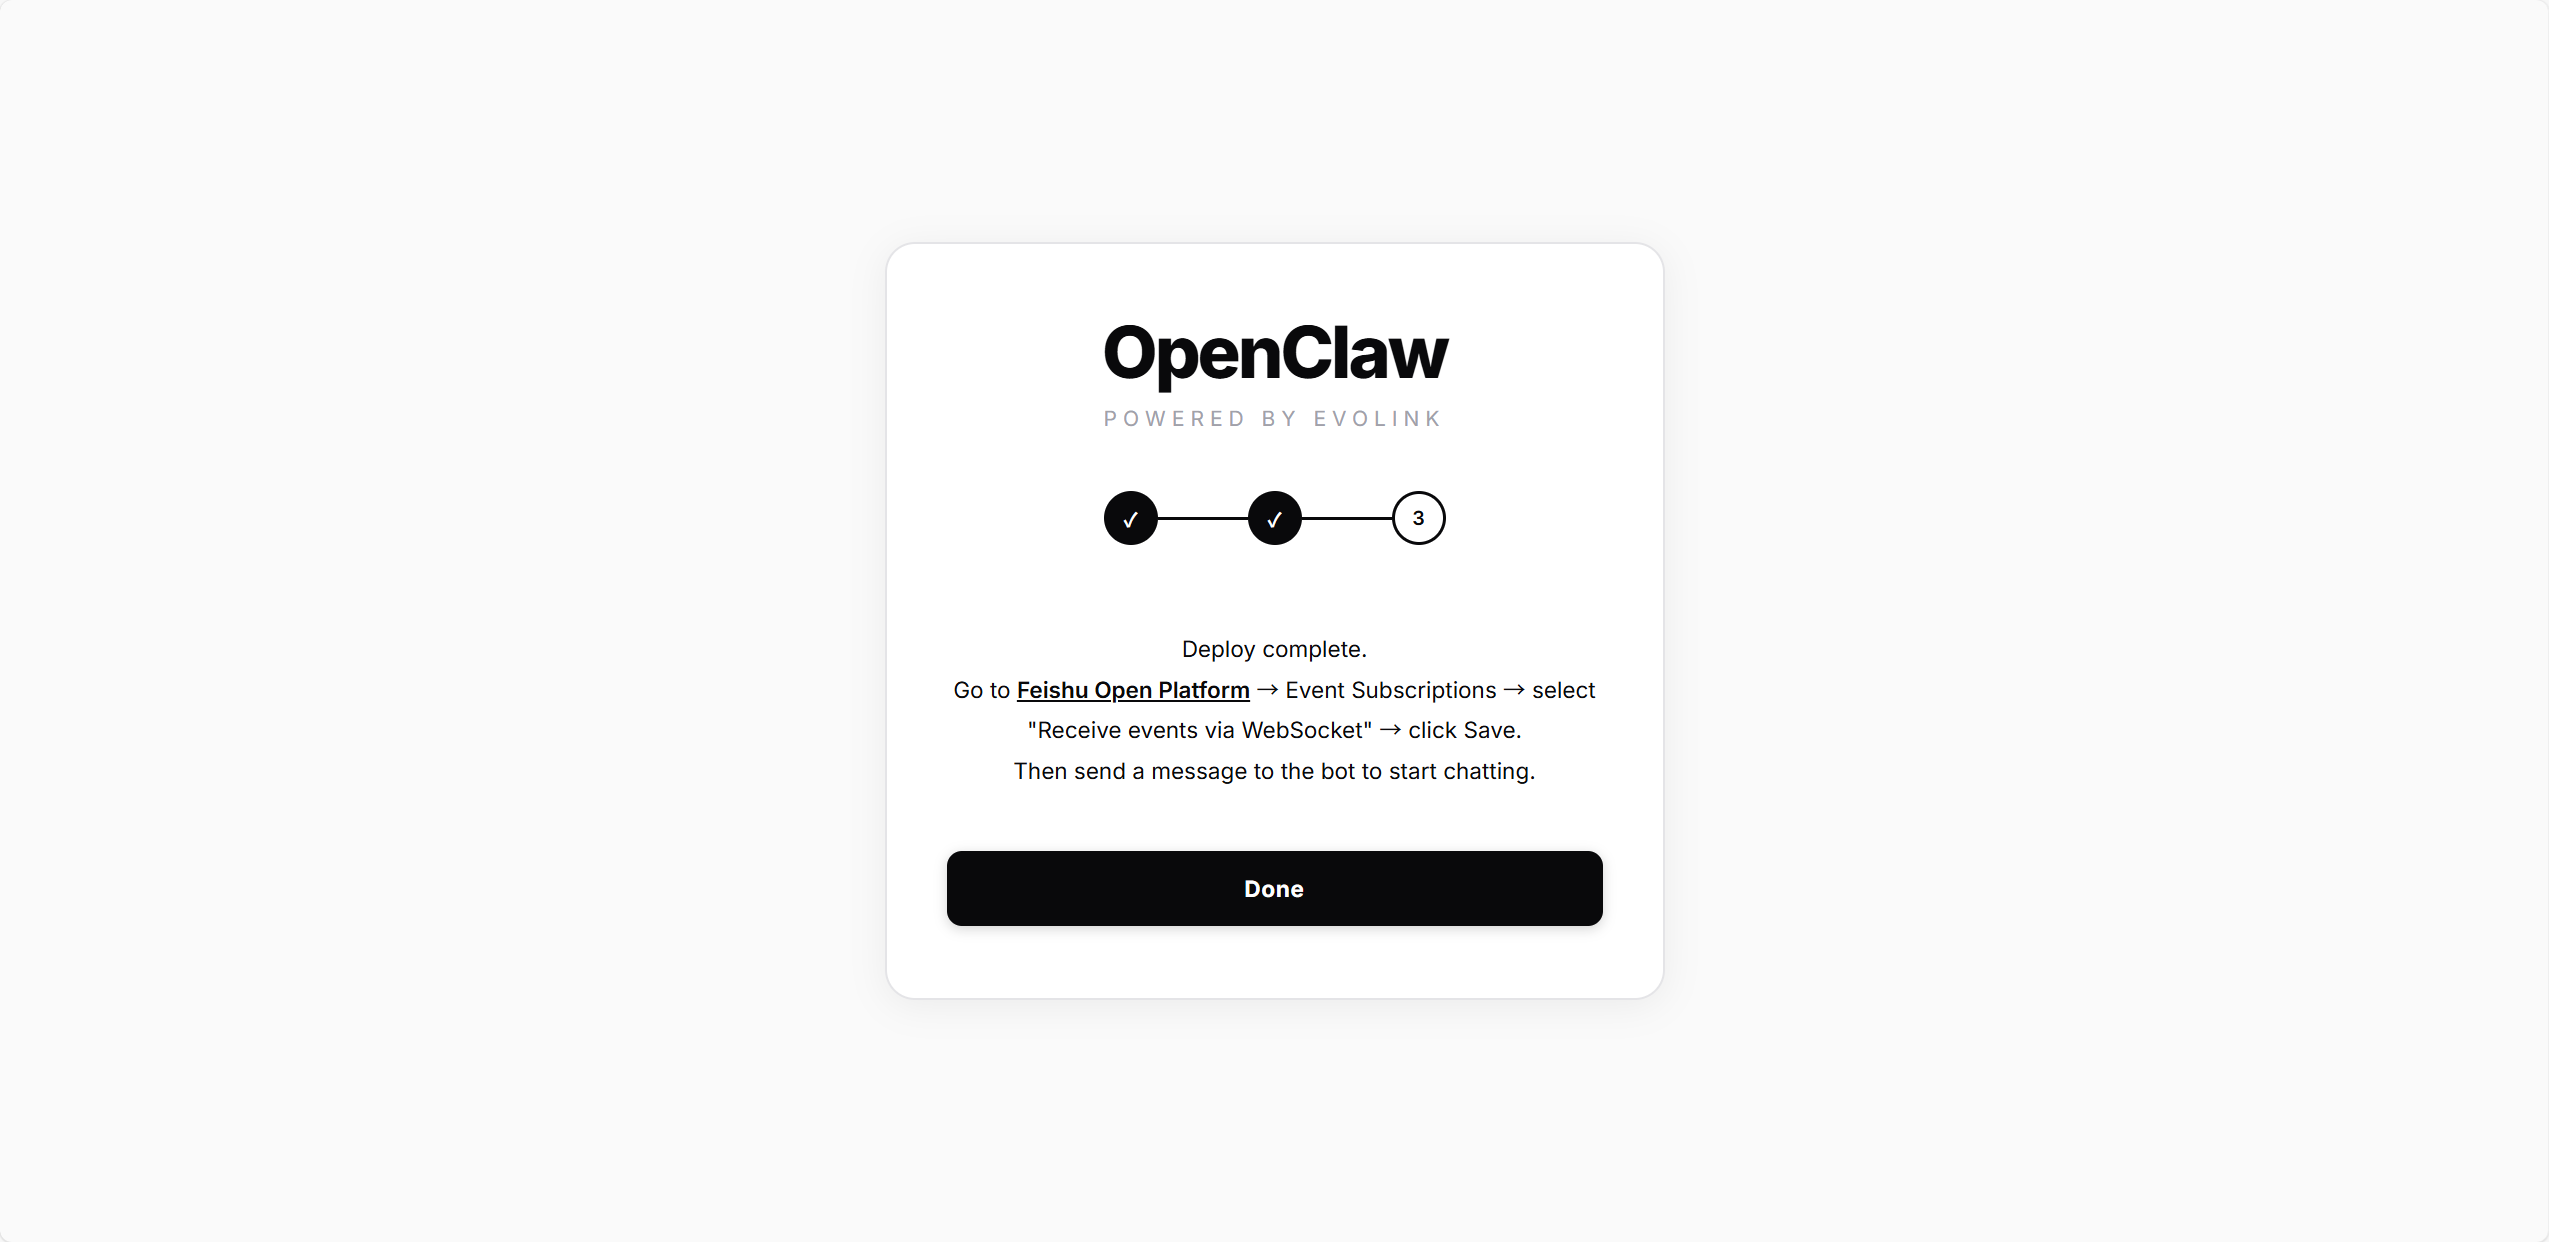
 3. 在「版本管理与发布」页面创建版本,提交审核并发布
飞书应用需要管理员审批发布后才能正常使用。企业自建应用通常自动通过审批。
确认后点击 **Done**,脚本会重启网关以加载飞书 WebSocket 连接。跳转到主页后即可在飞书中给 Bot 发消息。
3. 在「版本管理与发布」页面创建版本,提交审核并发布
飞书应用需要管理员审批发布后才能正常使用。企业自建应用通常自动通过审批。
确认后点击 **Done**,脚本会重启网关以加载飞书 WebSocket 连接。跳转到主页后即可在飞书中给 Bot 发消息。
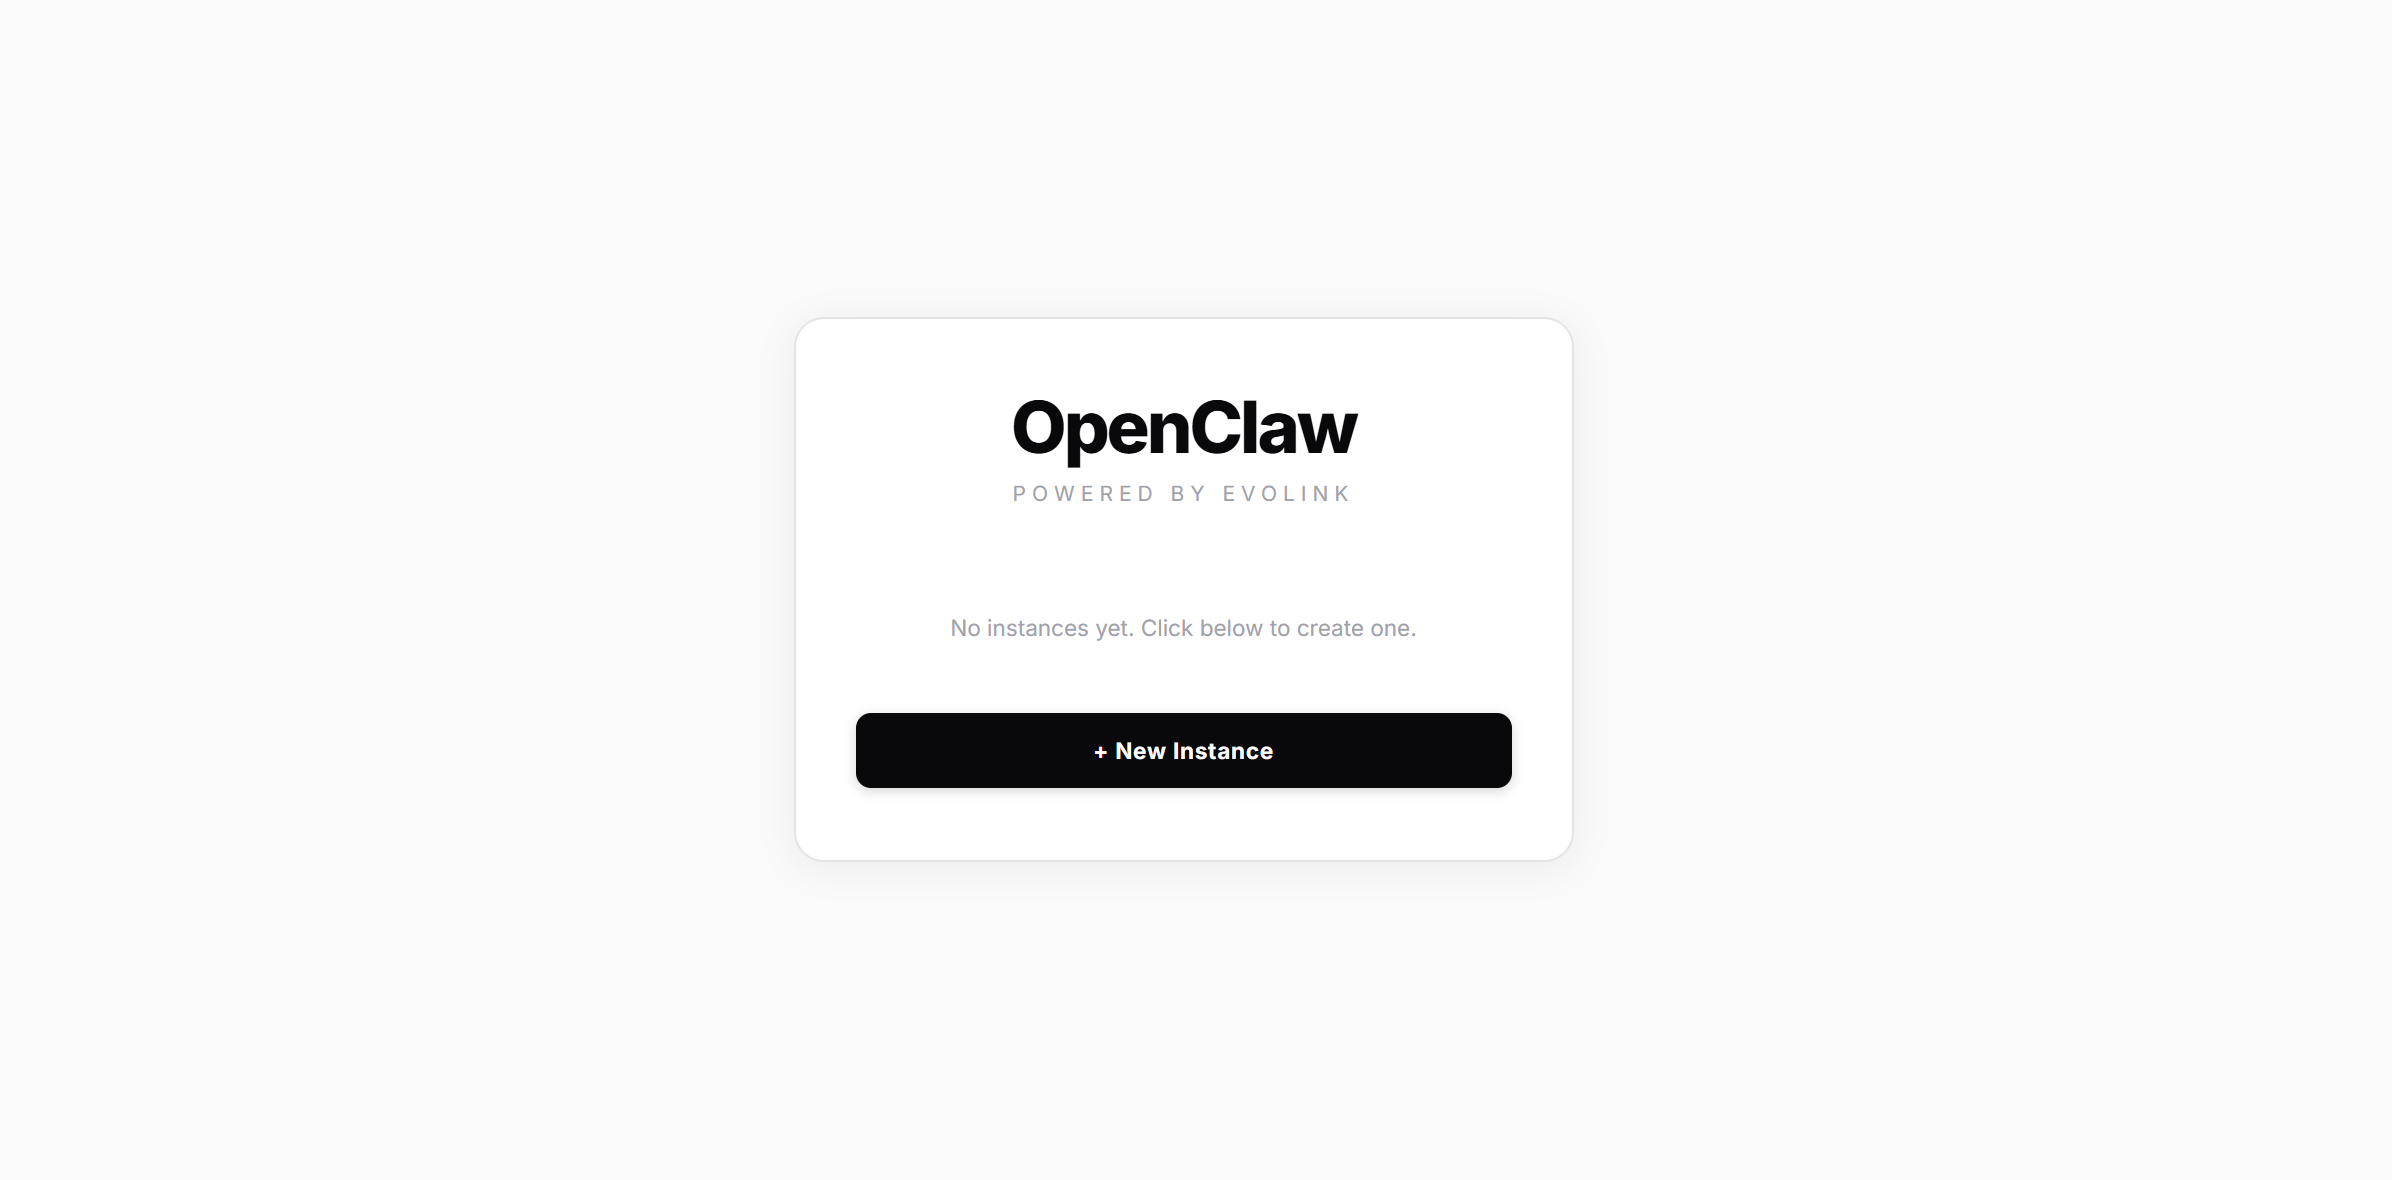
 ## 管理实例
部署完成后,主页会显示所有实例:
## 管理实例
部署完成后,主页会显示所有实例:
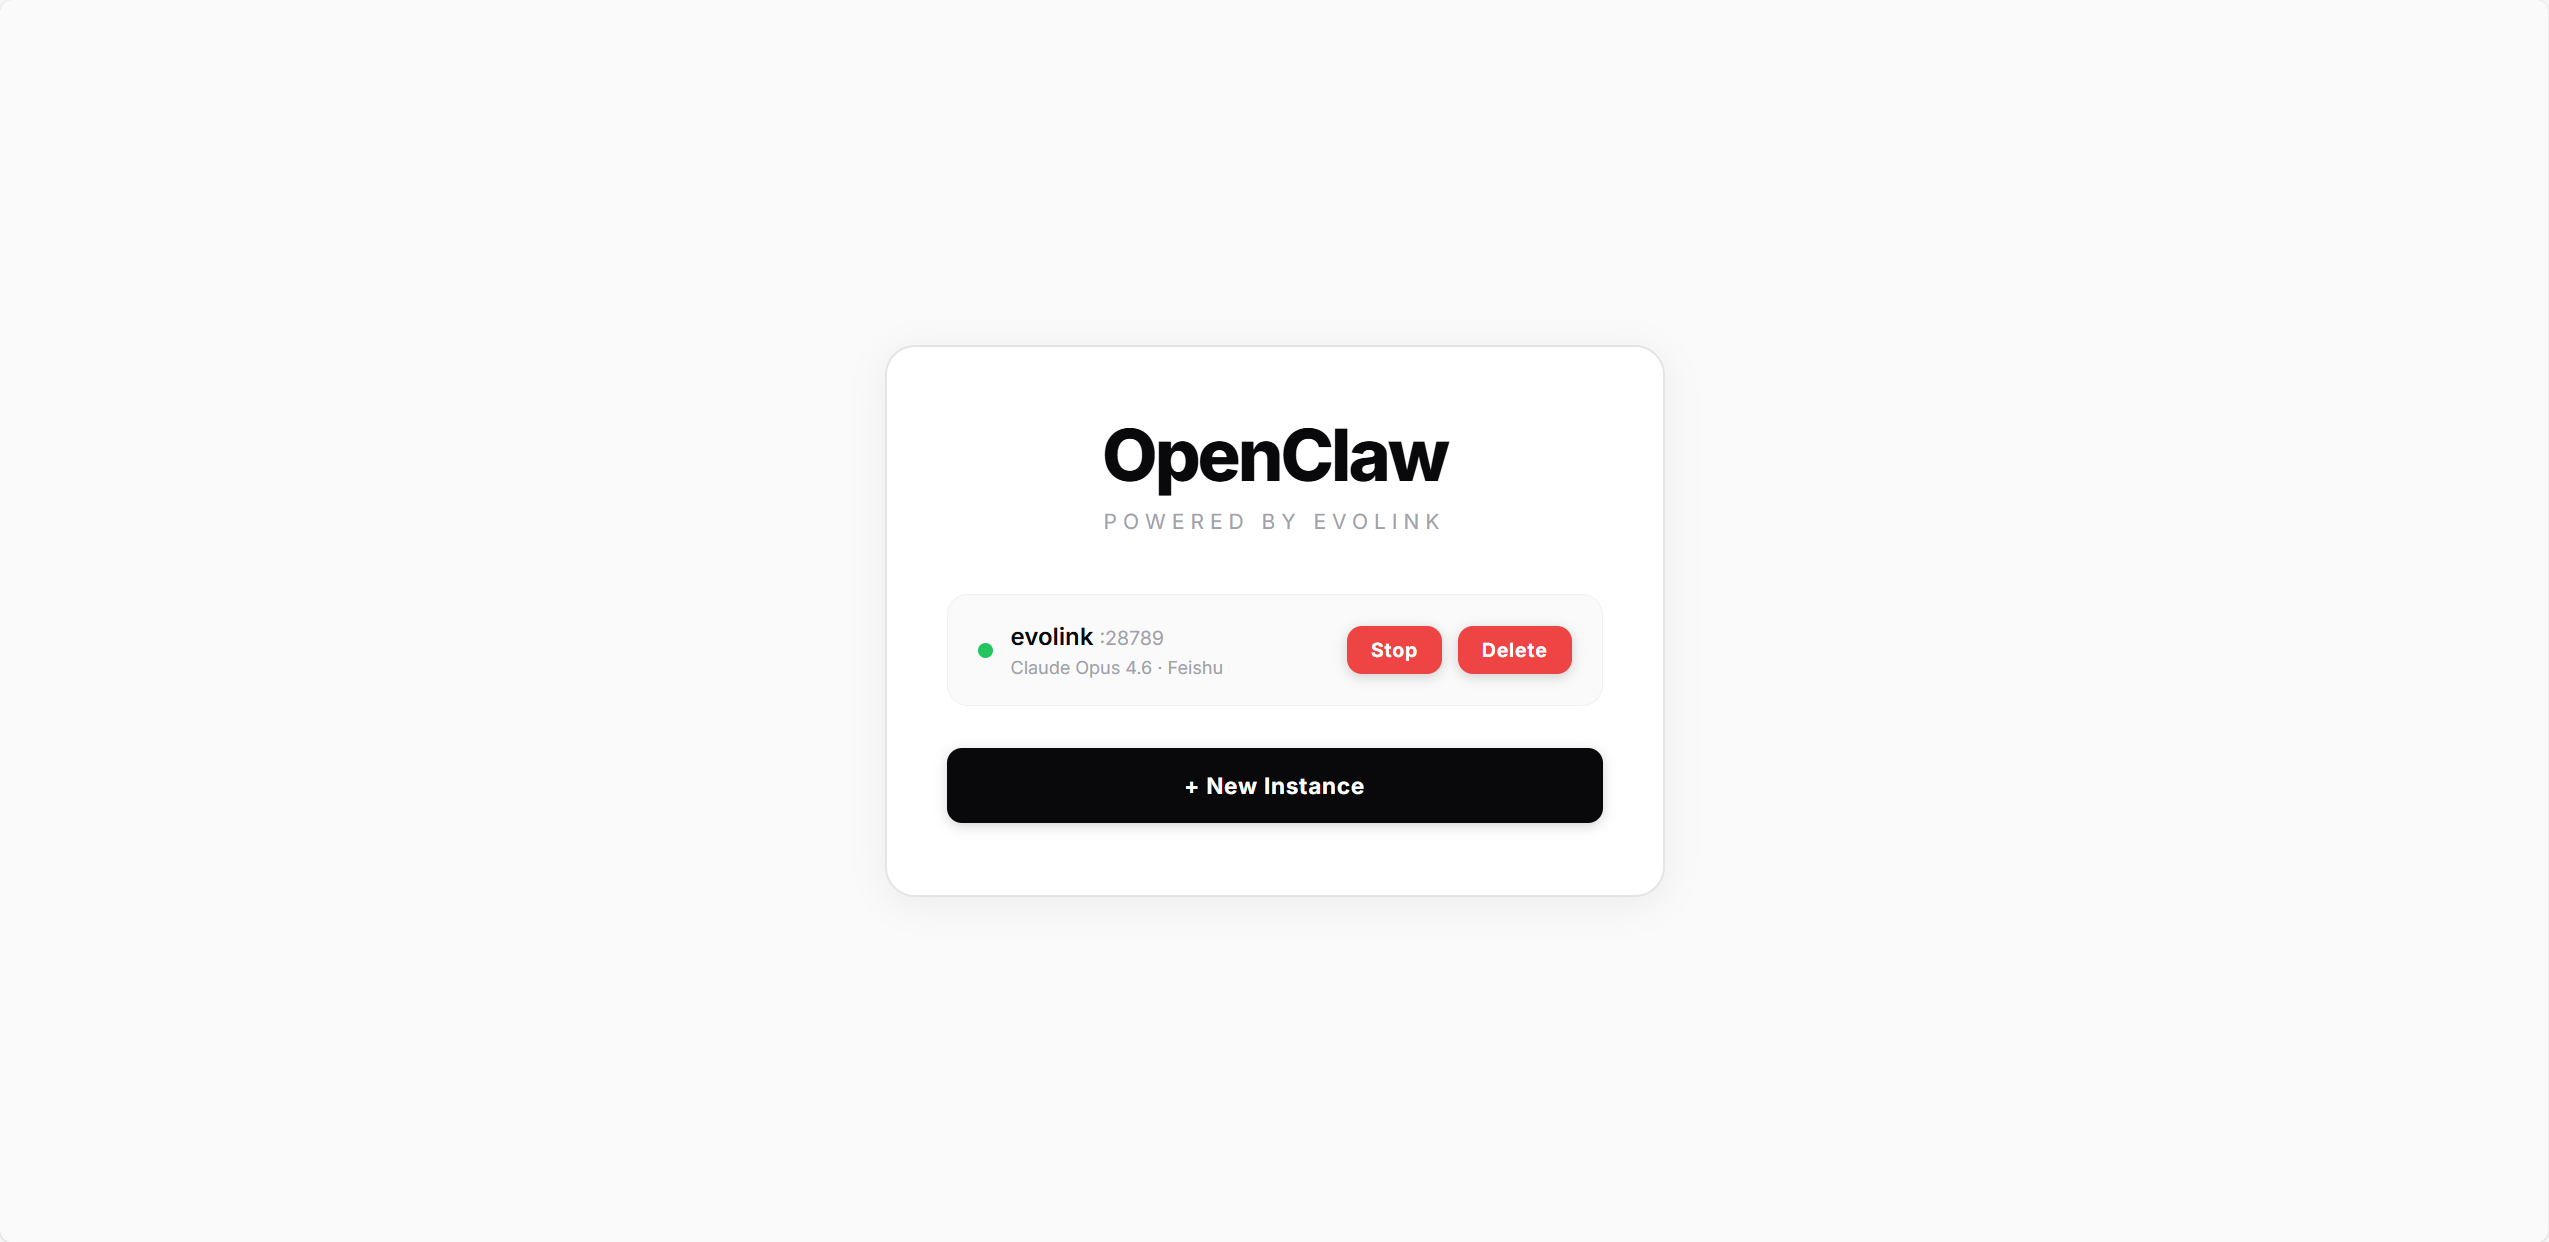 | 状态 | 说明 |
| ----- | ----- |
| 🟢 绿点 | 网关运行中 |
| 🔴 红点 | 网关已停止 |
每个实例卡片会显示使用的模型和通道,可用操作:
* **Start / Stop**:启动或停止网关服务
* **Delete**:删除实例(停止网关并清理所有配置文件)
点击 **+ New Instance** 可创建多个实例,每个实例独立运行在不同端口上。
| 状态 | 说明 |
| ----- | ----- |
| 🟢 绿点 | 网关运行中 |
| 🔴 红点 | 网关已停止 |
每个实例卡片会显示使用的模型和通道,可用操作:
* **Start / Stop**:启动或停止网关服务
* **Delete**:删除实例(停止网关并清理所有配置文件)
点击 **+ New Instance** 可创建多个实例,每个实例独立运行在不同端口上。