> ## Documentation Index
> Fetch the complete documentation index at: https://docs.evolink.ai/llms.txt
> Use this file to discover all available pages before exploring further.
# OpenCode
> 将 OpenCode 连接到 EvoLink.AI
## 概述
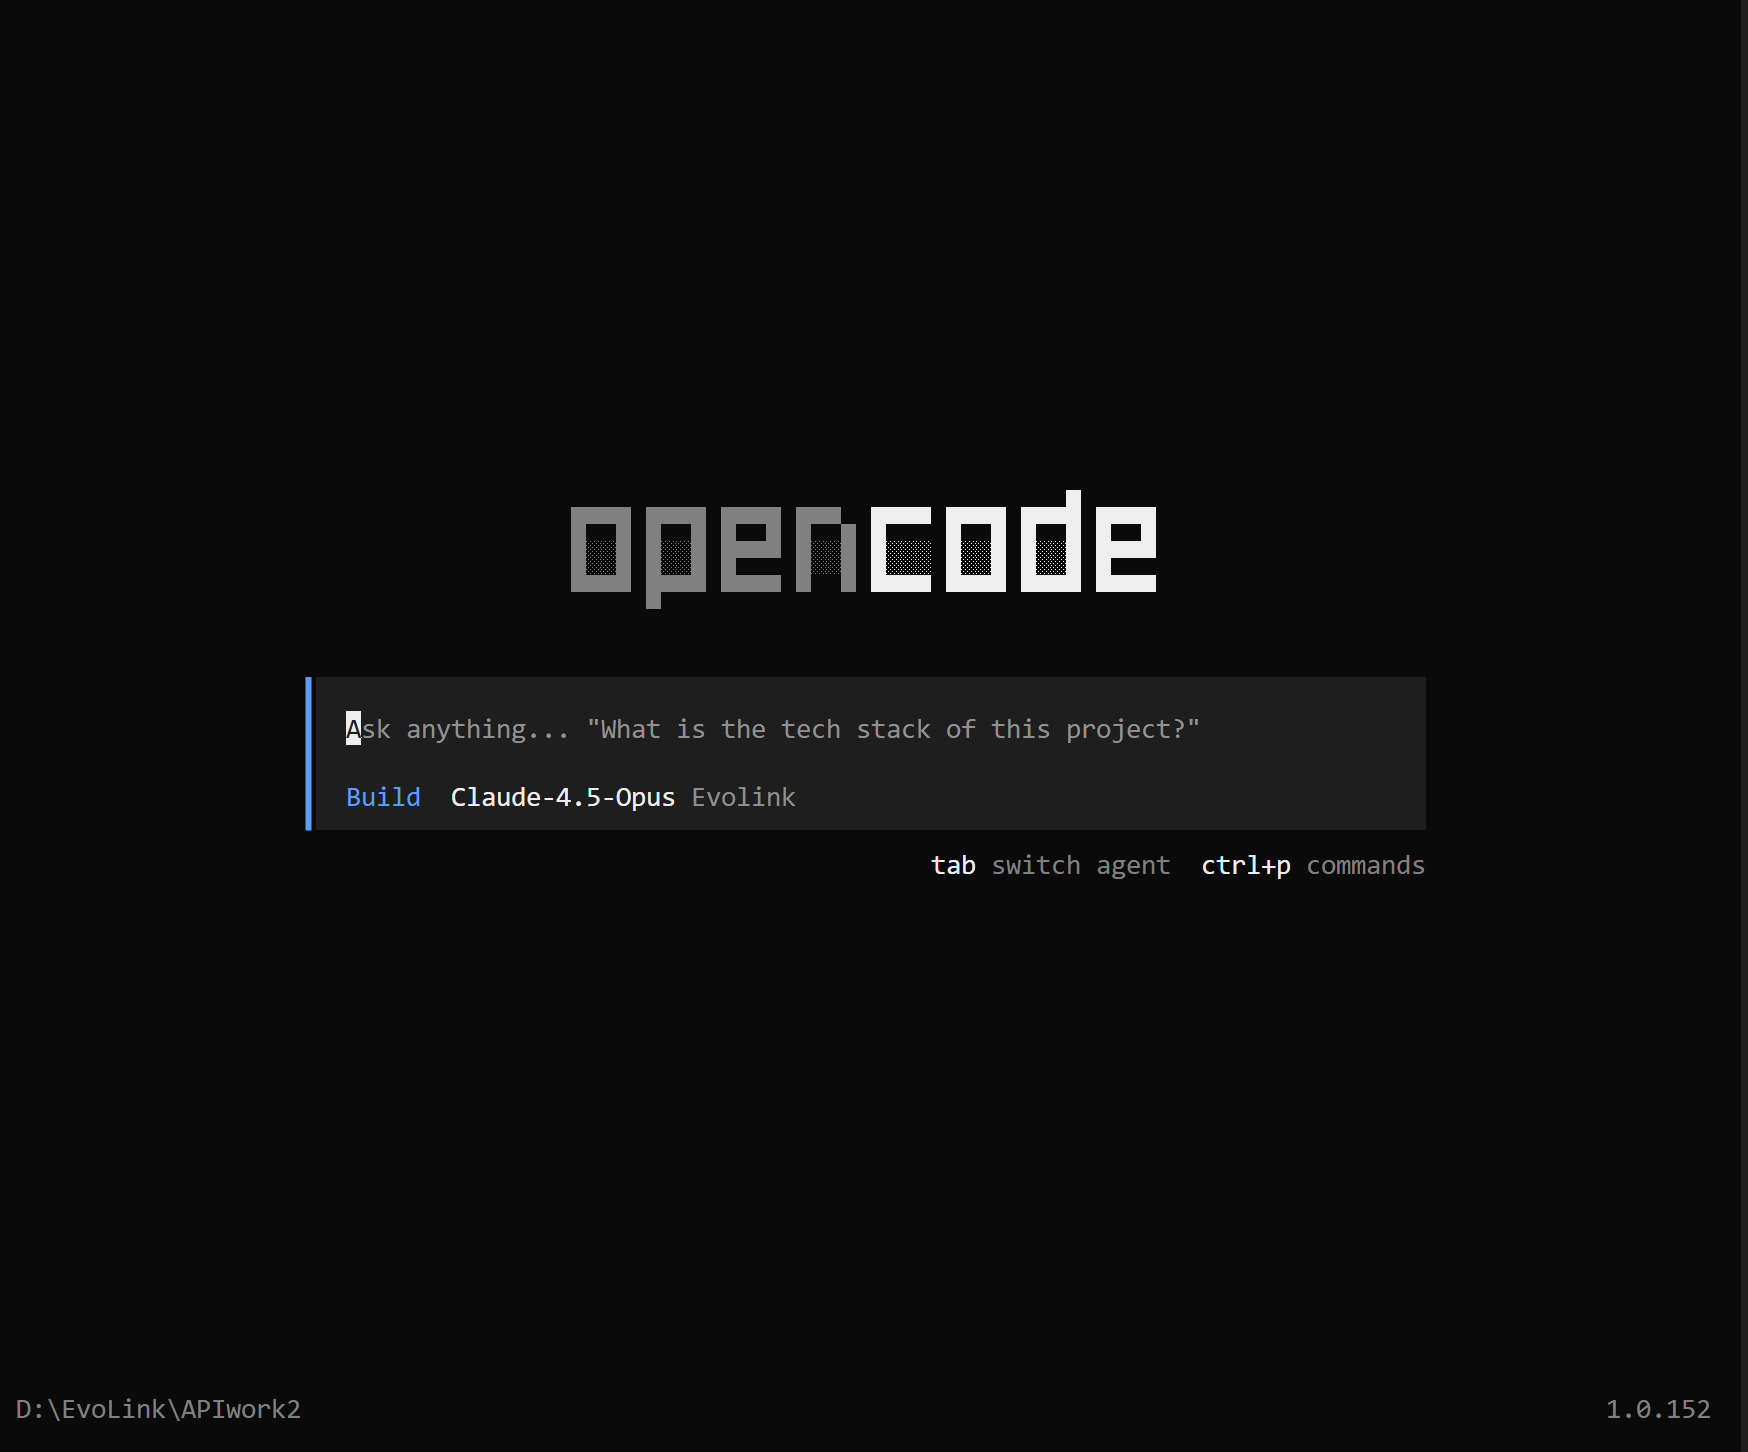 OpenCode 是一款基于 Go 的开源命令行编程工具(CLI),为开发者提供强大的 AI 协助。该工具提供了直观的终端用户界面(TUI),支持多个大语言模型(LLM)供应商,包括 OpenAI、Anthropic、Gemini 等。
通过将 OpenCode 与 **EvoLink API** 进行配置集成,您可以在终端中使用 EvoLink 提供的多种模型能力,包括 **Claude**、**GPT**、**Gemini** 系列,实现统一 Key 的多模型接入。
## 使用前准备
在开始配置之前,请确保已完成以下准备工作:
### 1. 准备终端模拟器
OpenCode 需要在现代终端模拟器中运行,推荐使用以下终端:
* **WezTerm**(跨平台)
* **Alacritty**(跨平台)
* **Ghostty**(Linux 和 macOS)
* **Kitty**(Linux 和 macOS)
Windows 用户也可以使用 PowerShell 或 Windows Terminal。
macOS 用户可以使用系统自带的 Terminal.app 或 iTerm2。
Linux 用户可以使用系统自带的终端或 GNOME Terminal、Konsole 等。
### 2. 获取 EvoLink API Key
* 登录 [EvoLink 控制台](https://evolink.ai/dashboard)
* 在控制台中找到 API Keys,点击"创建新Key"按钮,然后复制生成的 Key
* API Key 通常以 `sk-` 开头,请妥善保存
## 第一步:安装 OpenCode
**提示:** 如果不知道如何打开命令行终端,请查看 [常见问题 - 如何打开命令行终端](#11-如何打开命令行终端?)
最简单的方法是通过安装脚本:
```bash theme={null}
curl -fsSL https://opencode.ai/install | bash
```
或者使用 Homebrew:
```bash theme={null}
brew install anomalyco/tap/opencode
```
Windows 系统推荐先安装 [Node.js](https://nodejs.org/zh-cn/download),然后通过 NPM 安装:
```bash theme={null}
npm i -g opencode-ai@latest
```
或者使用 Chocolatey:
```bash theme={null}
choco install opencode
```
或者使用 Scoop:
```bash theme={null}
scoop bucket add extras
scoop install extras/opencode
```
### 检验安装
```bash theme={null}
opencode --version
```
**成功标志:** 显示版本号信息。
如果你更喜欢图形界面,OpenCode 也提供了桌面应用版本,可以从 [OpenCode 下载页面](https://opencode.ai/download) 下载安装。
## 第二步:配置 EvoLink API
### 1. 初始化服务商(Provider)
安装后先不要直接启动 OpenCode,而是需要在终端中执行以下命令:
```bash theme={null}
opencode auth login
```
OpenCode 是一款基于 Go 的开源命令行编程工具(CLI),为开发者提供强大的 AI 协助。该工具提供了直观的终端用户界面(TUI),支持多个大语言模型(LLM)供应商,包括 OpenAI、Anthropic、Gemini 等。
通过将 OpenCode 与 **EvoLink API** 进行配置集成,您可以在终端中使用 EvoLink 提供的多种模型能力,包括 **Claude**、**GPT**、**Gemini** 系列,实现统一 Key 的多模型接入。
## 使用前准备
在开始配置之前,请确保已完成以下准备工作:
### 1. 准备终端模拟器
OpenCode 需要在现代终端模拟器中运行,推荐使用以下终端:
* **WezTerm**(跨平台)
* **Alacritty**(跨平台)
* **Ghostty**(Linux 和 macOS)
* **Kitty**(Linux 和 macOS)
Windows 用户也可以使用 PowerShell 或 Windows Terminal。
macOS 用户可以使用系统自带的 Terminal.app 或 iTerm2。
Linux 用户可以使用系统自带的终端或 GNOME Terminal、Konsole 等。
### 2. 获取 EvoLink API Key
* 登录 [EvoLink 控制台](https://evolink.ai/dashboard)
* 在控制台中找到 API Keys,点击"创建新Key"按钮,然后复制生成的 Key
* API Key 通常以 `sk-` 开头,请妥善保存
## 第一步:安装 OpenCode
**提示:** 如果不知道如何打开命令行终端,请查看 [常见问题 - 如何打开命令行终端](#11-如何打开命令行终端?)
最简单的方法是通过安装脚本:
```bash theme={null}
curl -fsSL https://opencode.ai/install | bash
```
或者使用 Homebrew:
```bash theme={null}
brew install anomalyco/tap/opencode
```
Windows 系统推荐先安装 [Node.js](https://nodejs.org/zh-cn/download),然后通过 NPM 安装:
```bash theme={null}
npm i -g opencode-ai@latest
```
或者使用 Chocolatey:
```bash theme={null}
choco install opencode
```
或者使用 Scoop:
```bash theme={null}
scoop bucket add extras
scoop install extras/opencode
```
### 检验安装
```bash theme={null}
opencode --version
```
**成功标志:** 显示版本号信息。
如果你更喜欢图形界面,OpenCode 也提供了桌面应用版本,可以从 [OpenCode 下载页面](https://opencode.ai/download) 下载安装。
## 第二步:配置 EvoLink API
### 1. 初始化服务商(Provider)
安装后先不要直接启动 OpenCode,而是需要在终端中执行以下命令:
```bash theme={null}
opencode auth login
```
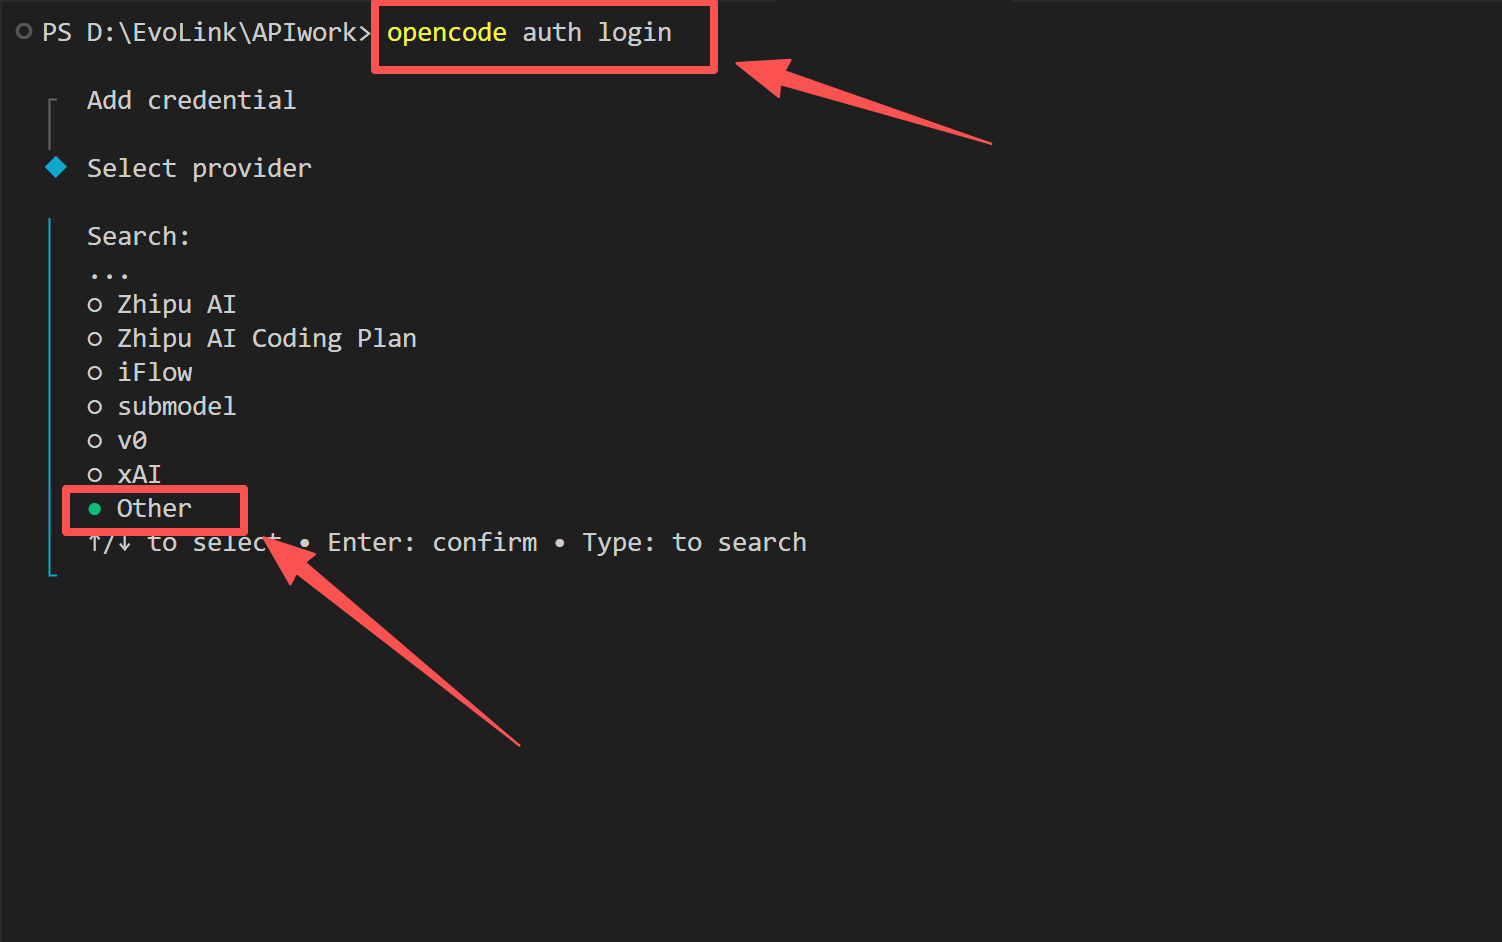 1. 在服务商列表中,选择 **other**(在最下面,可以直接搜索)
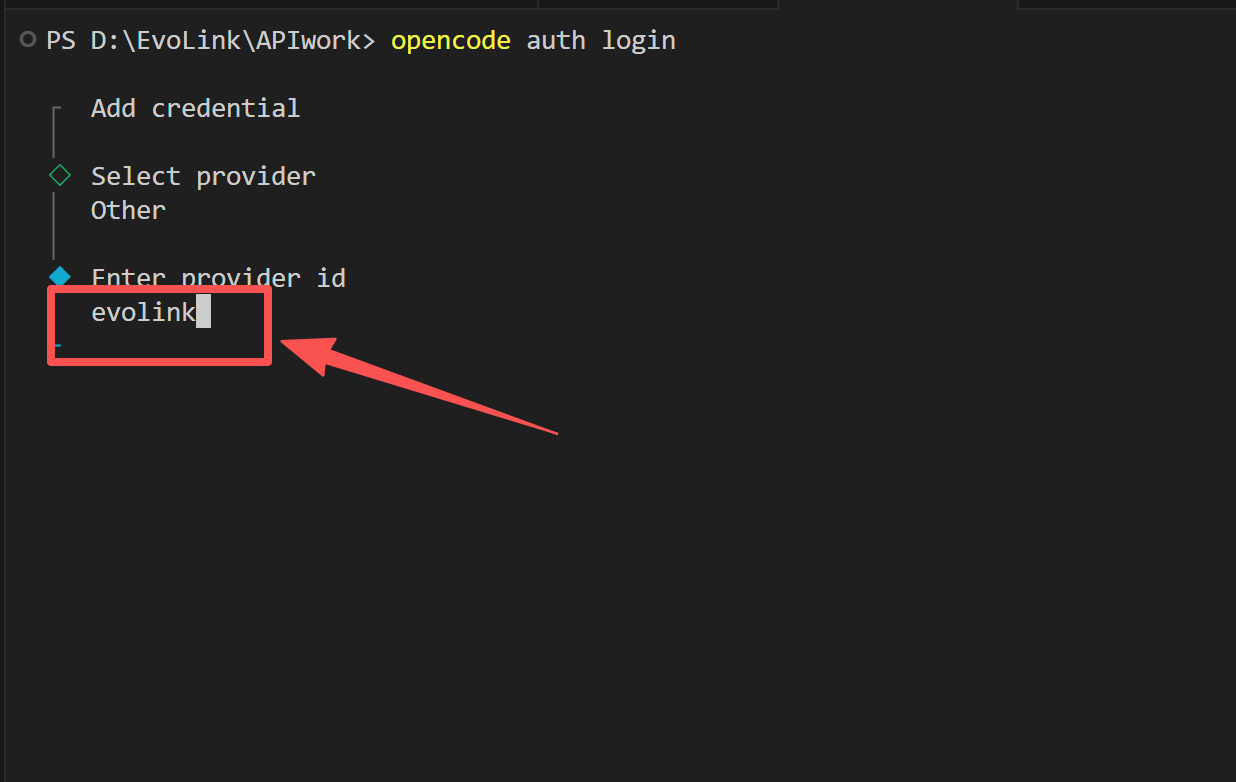
2. 系统会提示你输入 **Provider ID**:请填写 `evolink-anthropic`
1. 在服务商列表中,选择 **other**(在最下面,可以直接搜索)
2. 系统会提示你输入 **Provider ID**:请填写 `evolink-anthropic`
 3. 接着输入 **API Key 令牌**:可填写任意内容(如 `admin`),实际密钥通过配置文件引用
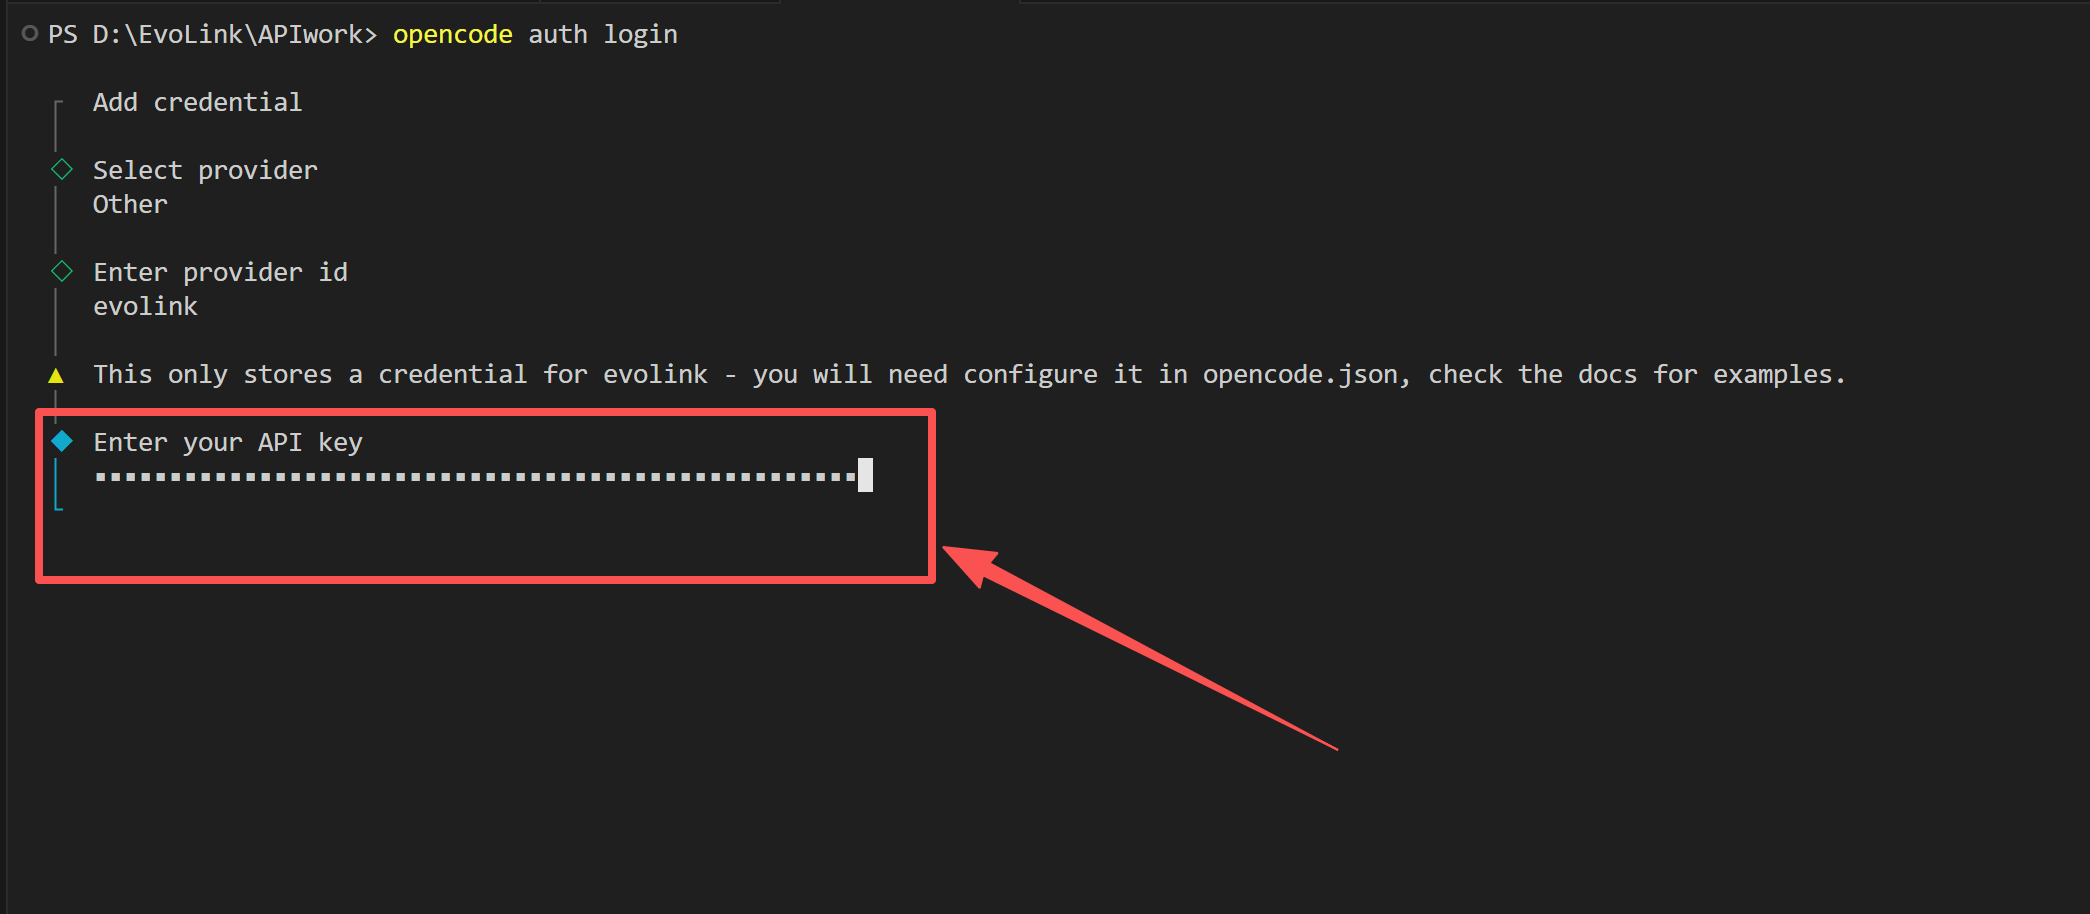 这一步的作用是让 OpenCode 在本地凭证管理器中注册一个自定义服务商。
### 2. 修改配置文件
打开 OpenCode 配置目录:
键盘按下 `Win + R` 键,输入以下内容后回车:
```
%userprofile%\.config\opencode
```
在终端中执行:
```bash theme={null}
cd ~/.config/opencode
```
或在访达/文件管理器中访问 `~/.config/opencode/`
在该目录下创建或编辑 `opencode.json` 文件:
```json theme={null}
{
"$schema": "https://opencode.ai/config.json",
"provider": {
"evolink-anthropic": {
"npm": "@ai-sdk/anthropic",
"name": "EvoLink Claude",
"options": {
"baseURL": "https://direct.evolink.ai/v1",
"apiKey": "你的EvoLink API Key"
},
"models": {
"claude-fable-5": {
"name": "Claude Fable 5",
"modalities": { "input": ["text", "image"], "output": ["text"] }
},
"claude-opus-4-8": {
"name": "Claude Opus 4.8",
"modalities": { "input": ["text", "image"], "output": ["text"] }
},
"claude-opus-4-7": {
"name": "Claude Opus 4.7",
"modalities": { "input": ["text", "image"], "output": ["text"] }
},
"claude-opus-4-6": {
"name": "Claude Opus 4.6",
"modalities": { "input": ["text", "image"], "output": ["text"] }
},
"claude-sonnet-4-6": {
"name": "Claude Sonnet 4.6",
"modalities": { "input": ["text", "image"], "output": ["text"] }
},
"claude-sonnet-5": {
"name": "Claude Sonnet 5",
"modalities": { "input": ["text", "image"], "output": ["text"] }
},
"claude-opus-4-5-20251101": {
"name": "Claude 4.5 Opus",
"modalities": { "input": ["text", "image"], "output": ["text"] }
},
"claude-sonnet-4-5-20250929": {
"name": "Claude 4.5 Sonnet",
"modalities": { "input": ["text", "image"], "output": ["text"] }
},
"claude-haiku-4-5-20251001": {
"name": "Claude 4.5 Haiku",
"modalities": { "input": ["text", "image"], "output": ["text"] }
}
}
},
"evolink-google": {
"npm": "@ai-sdk/google",
"name": "EvoLink Gemini",
"options": {
"baseURL": "https://direct.evolink.ai/v1beta",
"apiKey": "你的EvoLink API Key"
},
"models": {
"gemini-2.5-flash": {
"name": "Gemini 2.5 Flash",
"modalities": { "input": ["text", "image"], "output": ["text"] }
},
"gemini-2.5-pro": {
"name": "Gemini 2.5 Pro",
"modalities": { "input": ["text", "image"], "output": ["text"] }
},
"gemini-3-flash-preview": {
"name": "Gemini 3.0 Flash",
"modalities": { "input": ["text", "image"], "output": ["text"] }
},
"gemini-3-pro-preview": {
"name": "Gemini 3.0 Pro",
"modalities": { "input": ["text", "image"], "output": ["text"] }
},
"gemini-3.1-flash-lite-preview": {
"name": "Gemini 3.1 Flash Lite",
"modalities": { "input": ["text", "image"], "output": ["text"] }
},
"gemini-3.1-pro-preview": {
"name": "Gemini 3.1 Pro",
"modalities": { "input": ["text", "image"], "output": ["text"] }
}
}
},
"evolink-openai": {
"npm": "@ai-sdk/openai",
"name": "EvoLink GPT",
"options": {
"baseURL": "https://direct.evolink.ai/v1",
"apiKey": "你的EvoLink API Key"
},
"models": {
"gpt-5.1": {
"name": "GPT-5.1",
"modalities": { "input": ["text", "image"], "output": ["text"] }
},
"gpt-5.2": {
"name": "GPT-5.2",
"modalities": { "input": ["text", "image"], "output": ["text"] }
},
"gpt-5.4": {
"name": "GPT-5.4",
"modalities": { "input": ["text", "image"], "output": ["text"] }
},
"gpt-5.5": {
"name": "GPT-5.5",
"modalities": { "input": ["text", "image"], "output": ["text"] }
},
"MiniMax-M2.5": {
"name": "MiniMax M2.5",
"modalities": { "input": ["text"], "output": ["text"] }
}
}
}
}
}
```
**⚠️ 重要提示:**
* 将 `"你的EvoLink API Key"` 替换为实际的 API Key
* JSON 格式对符号敏感,请保持原样
## 第三步:开始使用 OpenCode
### 1. 启动 OpenCode
保存配置文件后,重启终端,然后进入你的工作目录:
```shell theme={null}
cd 你的工作目录
```
启动 OpenCode:
```shell theme={null}
opencode
```
### 2. 验证配置
在聊天界面输入命令:
```
/models
```
这一步的作用是让 OpenCode 在本地凭证管理器中注册一个自定义服务商。
### 2. 修改配置文件
打开 OpenCode 配置目录:
键盘按下 `Win + R` 键,输入以下内容后回车:
```
%userprofile%\.config\opencode
```
在终端中执行:
```bash theme={null}
cd ~/.config/opencode
```
或在访达/文件管理器中访问 `~/.config/opencode/`
在该目录下创建或编辑 `opencode.json` 文件:
```json theme={null}
{
"$schema": "https://opencode.ai/config.json",
"provider": {
"evolink-anthropic": {
"npm": "@ai-sdk/anthropic",
"name": "EvoLink Claude",
"options": {
"baseURL": "https://direct.evolink.ai/v1",
"apiKey": "你的EvoLink API Key"
},
"models": {
"claude-fable-5": {
"name": "Claude Fable 5",
"modalities": { "input": ["text", "image"], "output": ["text"] }
},
"claude-opus-4-8": {
"name": "Claude Opus 4.8",
"modalities": { "input": ["text", "image"], "output": ["text"] }
},
"claude-opus-4-7": {
"name": "Claude Opus 4.7",
"modalities": { "input": ["text", "image"], "output": ["text"] }
},
"claude-opus-4-6": {
"name": "Claude Opus 4.6",
"modalities": { "input": ["text", "image"], "output": ["text"] }
},
"claude-sonnet-4-6": {
"name": "Claude Sonnet 4.6",
"modalities": { "input": ["text", "image"], "output": ["text"] }
},
"claude-sonnet-5": {
"name": "Claude Sonnet 5",
"modalities": { "input": ["text", "image"], "output": ["text"] }
},
"claude-opus-4-5-20251101": {
"name": "Claude 4.5 Opus",
"modalities": { "input": ["text", "image"], "output": ["text"] }
},
"claude-sonnet-4-5-20250929": {
"name": "Claude 4.5 Sonnet",
"modalities": { "input": ["text", "image"], "output": ["text"] }
},
"claude-haiku-4-5-20251001": {
"name": "Claude 4.5 Haiku",
"modalities": { "input": ["text", "image"], "output": ["text"] }
}
}
},
"evolink-google": {
"npm": "@ai-sdk/google",
"name": "EvoLink Gemini",
"options": {
"baseURL": "https://direct.evolink.ai/v1beta",
"apiKey": "你的EvoLink API Key"
},
"models": {
"gemini-2.5-flash": {
"name": "Gemini 2.5 Flash",
"modalities": { "input": ["text", "image"], "output": ["text"] }
},
"gemini-2.5-pro": {
"name": "Gemini 2.5 Pro",
"modalities": { "input": ["text", "image"], "output": ["text"] }
},
"gemini-3-flash-preview": {
"name": "Gemini 3.0 Flash",
"modalities": { "input": ["text", "image"], "output": ["text"] }
},
"gemini-3-pro-preview": {
"name": "Gemini 3.0 Pro",
"modalities": { "input": ["text", "image"], "output": ["text"] }
},
"gemini-3.1-flash-lite-preview": {
"name": "Gemini 3.1 Flash Lite",
"modalities": { "input": ["text", "image"], "output": ["text"] }
},
"gemini-3.1-pro-preview": {
"name": "Gemini 3.1 Pro",
"modalities": { "input": ["text", "image"], "output": ["text"] }
}
}
},
"evolink-openai": {
"npm": "@ai-sdk/openai",
"name": "EvoLink GPT",
"options": {
"baseURL": "https://direct.evolink.ai/v1",
"apiKey": "你的EvoLink API Key"
},
"models": {
"gpt-5.1": {
"name": "GPT-5.1",
"modalities": { "input": ["text", "image"], "output": ["text"] }
},
"gpt-5.2": {
"name": "GPT-5.2",
"modalities": { "input": ["text", "image"], "output": ["text"] }
},
"gpt-5.4": {
"name": "GPT-5.4",
"modalities": { "input": ["text", "image"], "output": ["text"] }
},
"gpt-5.5": {
"name": "GPT-5.5",
"modalities": { "input": ["text", "image"], "output": ["text"] }
},
"MiniMax-M2.5": {
"name": "MiniMax M2.5",
"modalities": { "input": ["text"], "output": ["text"] }
}
}
}
}
}
```
**⚠️ 重要提示:**
* 将 `"你的EvoLink API Key"` 替换为实际的 API Key
* JSON 格式对符号敏感,请保持原样
## 第三步:开始使用 OpenCode
### 1. 启动 OpenCode
保存配置文件后,重启终端,然后进入你的工作目录:
```shell theme={null}
cd 你的工作目录
```
启动 OpenCode:
```shell theme={null}
opencode
```
### 2. 验证配置
在聊天界面输入命令:
```
/models
```
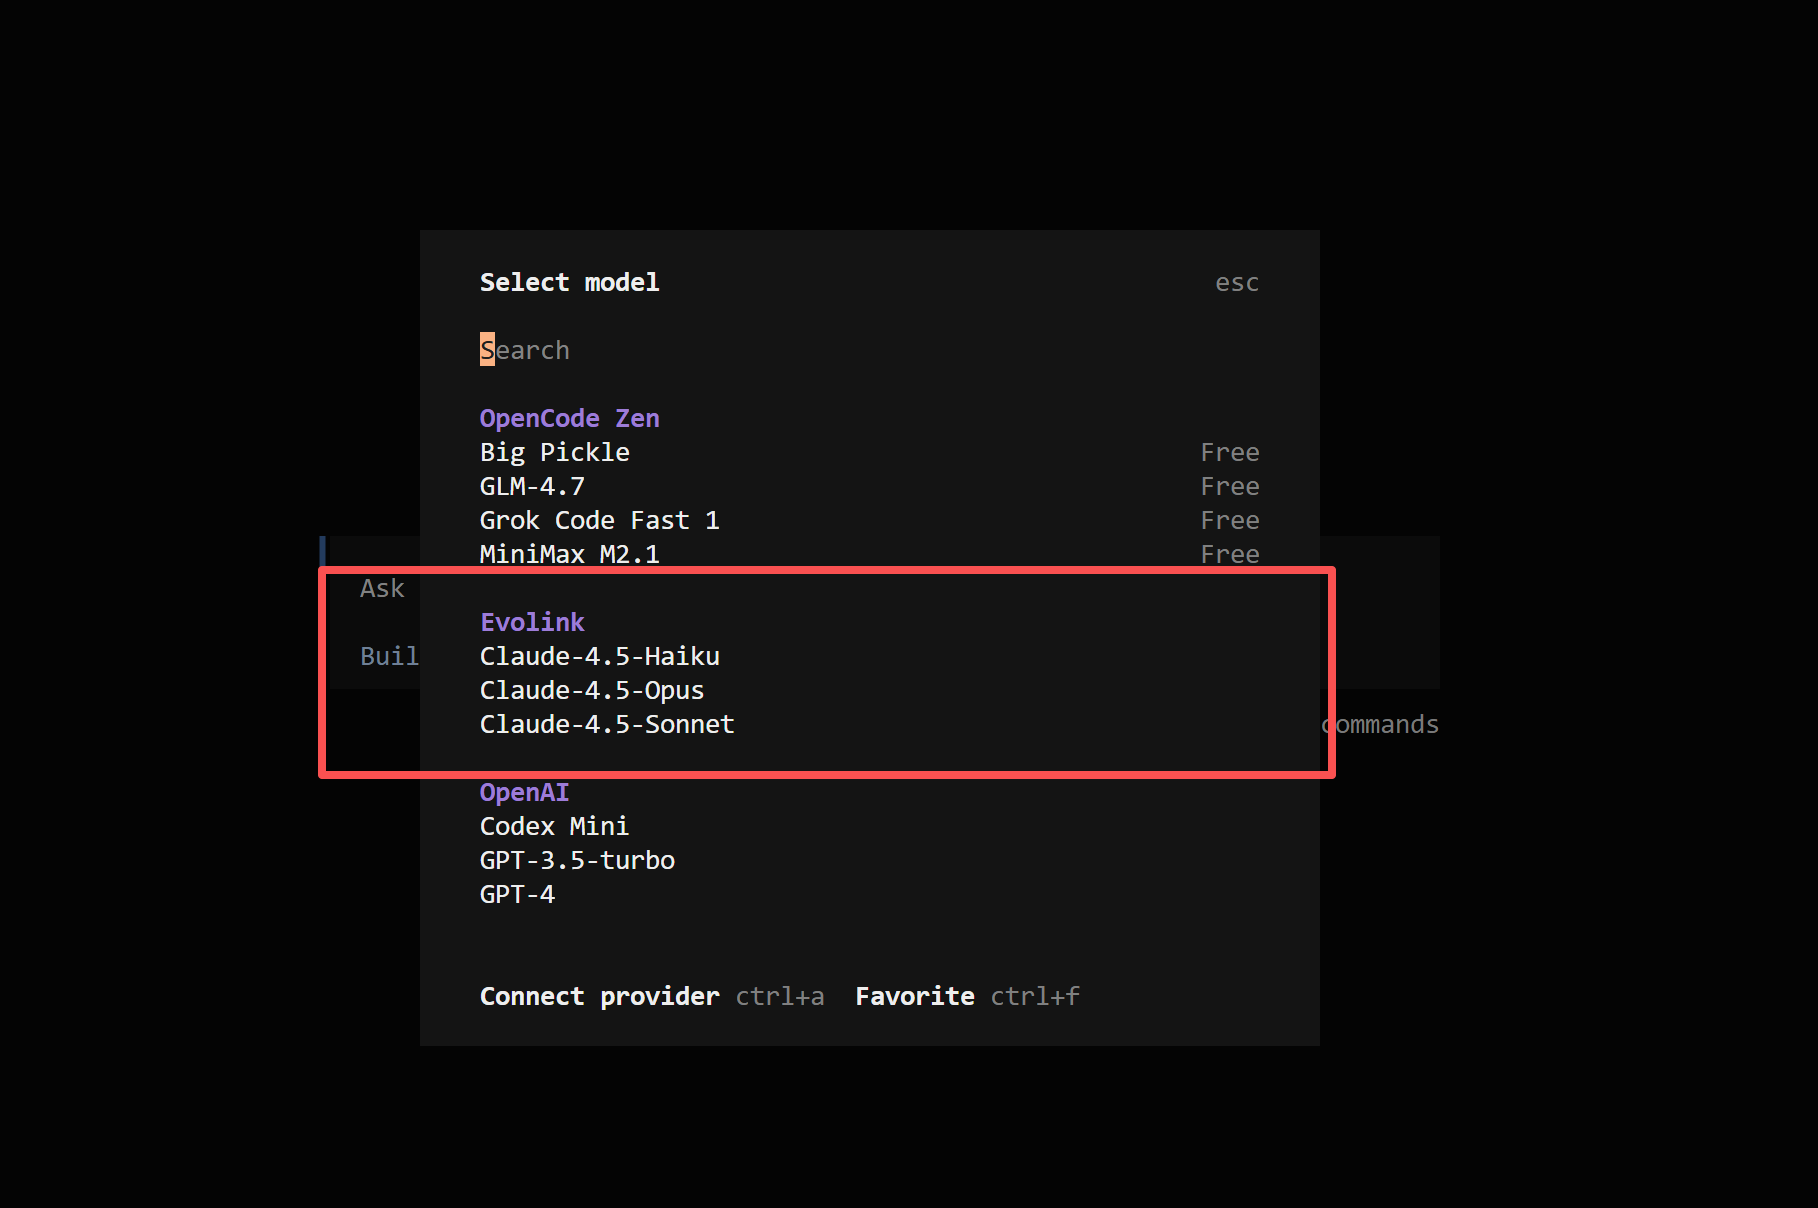 你应该能在模型列表中看到配置的 EvoLink Claude、EvoLink Gemini、EvoLink GPT 及其模型。选择后即可正常使用!
## 常见问题
### 1. OpenCode 是什么?主要用来做什么?
OpenCode 是一款开源的终端 AI 编程助手,提供现代化的 TUI 界面。它支持代码编辑、文件操作、命令执行等功能,适合在终端环境中进行 AI 辅助编程。
### 2. 第一次使用时,如何确认是否已经安装并配置成功?
依次执行以下步骤验证:
* `opencode --version`:确认 OpenCode 已安装
* 启动 OpenCode 并输入 `/models`:确认能看到配置的模型
### 3. 配置文件应该放在哪里?
配置文件 `opencode.json` 应放在以下位置:
* Windows: `C:\Users\{用户名}\.config\opencode\opencode.json`
* macOS / Linux: `~/.config/opencode/opencode.json`
### 4. OpenCode 支持哪些模型?
通过 EvoLink API,OpenCode 支持以下模型:
**Claude 系列:**
* **Claude Opus 4.6 / Sonnet 4.6**:最新一代模型
* **Claude 4.5 Opus / Sonnet / Haiku**:高性能模型家族
**Gemini 系列:**
* **Gemini 2.5 Flash / Pro**:Google 高性能模型
* **Gemini 3.0 Flash / Pro**:新一代 Gemini 模型
* **Gemini 3.1 Flash Lite / Pro**:最新 Gemini 模型
**GPT 系列:**
* **GPT-5.1 / 5.2 / 5.4 / 5.5**:OpenAI 最新模型
* **MiniMax M2.5**:MiniMax 高性能模型
### 5. 如何切换模型?
在 OpenCode 界面中输入 `/models` 命令,然后在模型列表中选择你想使用的模型。
### 6. 修改了配置文件后,为什么没有生效?
* 需要重新启动 OpenCode
* 检查 `opencode.json` 文件格式是否正确(JSON 语法)
* 确认配置文件路径正确
### 7. 使用时出现 401/403 错误一般是什么原因?
* **401 错误**:API Key 未设置或无效
* **403 错误**:API Key 权限不足或已过期
* 请检查配置文件中的 `apiKey` 是否正确
### 8. OpenCode 会不会自动读取或上传我本地的文件和代码?
OpenCode 需要用户主动授权才会读取文件内容,且会在执行敏感操作前请求确认。建议在专门的项目文件夹中使用。
### 9. OpenCode 是否支持中文输入和中文输出?
完全支持。OpenCode 支持中文输入和输出,可以直接用中文提问并获得中文回答。
### 10. OpenCode 适合哪些使用场景?
**适合的场景:**
* 代码编写、调试和重构
* 终端环境下的 AI 辅助编程
* 文件内容分析和处理
* 需要现代化 TUI 界面的用户
**不适合的场景:**
* 需要图形界面的复杂交互
* 不熟悉终端操作的用户
### 11. 如何打开命令行终端?
* 方法一:按 `Win + R` 键,输入 `cmd` 或 `powershell`,按回车
* 方法二:在开始菜单搜索"命令提示符"或"PowerShell"
* 方法三:在文件夹中按住 Shift 键,右键点击空白处,选择"在此处打开 PowerShell 窗口"
* 方法一:按 `Command + 空格` 打开 Spotlight,输入 `Terminal`,按回车
* 方法二:在"应用程序" → "实用工具" → "终端"
* 方法一:按 `Ctrl + Alt + T` 快捷键
* 方法二:在应用程序菜单中搜索"终端"或"Terminal"
## 注意
建议在专门的项目文件夹内启动 OpenCode,避免在敏感目录(如系统目录、包含密钥的目录)中运行。OpenCode 会以当前工作目录为起点进行文件操作。
OpenCode 使用 JSON 格式的配置文件,请确保配置文件语法正确。可以使用在线 JSON 验证工具检查配置文件格式。
你应该能在模型列表中看到配置的 EvoLink Claude、EvoLink Gemini、EvoLink GPT 及其模型。选择后即可正常使用!
## 常见问题
### 1. OpenCode 是什么?主要用来做什么?
OpenCode 是一款开源的终端 AI 编程助手,提供现代化的 TUI 界面。它支持代码编辑、文件操作、命令执行等功能,适合在终端环境中进行 AI 辅助编程。
### 2. 第一次使用时,如何确认是否已经安装并配置成功?
依次执行以下步骤验证:
* `opencode --version`:确认 OpenCode 已安装
* 启动 OpenCode 并输入 `/models`:确认能看到配置的模型
### 3. 配置文件应该放在哪里?
配置文件 `opencode.json` 应放在以下位置:
* Windows: `C:\Users\{用户名}\.config\opencode\opencode.json`
* macOS / Linux: `~/.config/opencode/opencode.json`
### 4. OpenCode 支持哪些模型?
通过 EvoLink API,OpenCode 支持以下模型:
**Claude 系列:**
* **Claude Opus 4.6 / Sonnet 4.6**:最新一代模型
* **Claude 4.5 Opus / Sonnet / Haiku**:高性能模型家族
**Gemini 系列:**
* **Gemini 2.5 Flash / Pro**:Google 高性能模型
* **Gemini 3.0 Flash / Pro**:新一代 Gemini 模型
* **Gemini 3.1 Flash Lite / Pro**:最新 Gemini 模型
**GPT 系列:**
* **GPT-5.1 / 5.2 / 5.4 / 5.5**:OpenAI 最新模型
* **MiniMax M2.5**:MiniMax 高性能模型
### 5. 如何切换模型?
在 OpenCode 界面中输入 `/models` 命令,然后在模型列表中选择你想使用的模型。
### 6. 修改了配置文件后,为什么没有生效?
* 需要重新启动 OpenCode
* 检查 `opencode.json` 文件格式是否正确(JSON 语法)
* 确认配置文件路径正确
### 7. 使用时出现 401/403 错误一般是什么原因?
* **401 错误**:API Key 未设置或无效
* **403 错误**:API Key 权限不足或已过期
* 请检查配置文件中的 `apiKey` 是否正确
### 8. OpenCode 会不会自动读取或上传我本地的文件和代码?
OpenCode 需要用户主动授权才会读取文件内容,且会在执行敏感操作前请求确认。建议在专门的项目文件夹中使用。
### 9. OpenCode 是否支持中文输入和中文输出?
完全支持。OpenCode 支持中文输入和输出,可以直接用中文提问并获得中文回答。
### 10. OpenCode 适合哪些使用场景?
**适合的场景:**
* 代码编写、调试和重构
* 终端环境下的 AI 辅助编程
* 文件内容分析和处理
* 需要现代化 TUI 界面的用户
**不适合的场景:**
* 需要图形界面的复杂交互
* 不熟悉终端操作的用户
### 11. 如何打开命令行终端?
* 方法一:按 `Win + R` 键,输入 `cmd` 或 `powershell`,按回车
* 方法二:在开始菜单搜索"命令提示符"或"PowerShell"
* 方法三:在文件夹中按住 Shift 键,右键点击空白处,选择"在此处打开 PowerShell 窗口"
* 方法一:按 `Command + 空格` 打开 Spotlight,输入 `Terminal`,按回车
* 方法二:在"应用程序" → "实用工具" → "终端"
* 方法一:按 `Ctrl + Alt + T` 快捷键
* 方法二:在应用程序菜单中搜索"终端"或"Terminal"
## 注意
建议在专门的项目文件夹内启动 OpenCode,避免在敏感目录(如系统目录、包含密钥的目录)中运行。OpenCode 会以当前工作目录为起点进行文件操作。
OpenCode 使用 JSON 格式的配置文件,请确保配置文件语法正确。可以使用在线 JSON 验证工具检查配置文件格式。