> ## Documentation Index
> Fetch the complete documentation index at: https://docs.evolink.ai/llms.txt
> Use this file to discover all available pages before exploring further.
# OpenClaw + Feishu
> Connect OpenClaw to EvoLink.AI via Feishu (Lark)
## Overview
OpenClaw is an open-source AI agent Gateway that acts as a bridge between chat applications and AI agents. Through a centralized Gateway process, it connects chat platforms like Telegram, WhatsApp, Discord, and Feishu (Lark) to AI coding agents, enabling direct AI programming interactions within chat windows.
By configuring **EvoLink API** as a custom model provider in OpenClaw and connecting a **Feishu Bot**, you can use EvoLink's Claude models (such as **Claude 4.6 Opus**, **Claude 4.5 Sonnet**, **Claude 4.5 Haiku**) for AI-assisted coding conversations directly in Feishu.
The Feishu channel uses **WebSocket long connection** mode to receive messages — no public URL required.
**This guide covers:**
* Installing and configuring OpenClaw Gateway
* Creating a Feishu enterprise application with bot capability
* Setting up EvoLink API as a custom model provider
* Verifying the connection and getting started
## System Environment Check
Before installation, it's recommended to run the environment checker tool to ensure your system meets OpenClaw's requirements.
### Download Checker Tool
Download the checker tool for your platform from [GitHub Releases](https://github.com/suuuuuu-1/openclaw-env-checker/releases):
| Platform | Filename |
| --------------------- | ------------------------------ |
| Windows | `openclaw-checker-win-x64.exe` |
| macOS (Intel) | `openclaw-checker-macos-x64` |
| macOS (Apple Silicon) | `openclaw-checker-macos-arm64` |
| Linux | `openclaw-checker-linux-x64` |
### Check Items
The tool automatically checks the following:
* ✅ Node.js version (requires >= 22.12.0)
* ✅ npm available
* ✅ Git available
* ✅ Network connectivity (github.com, npmjs.org, evolink.ai)
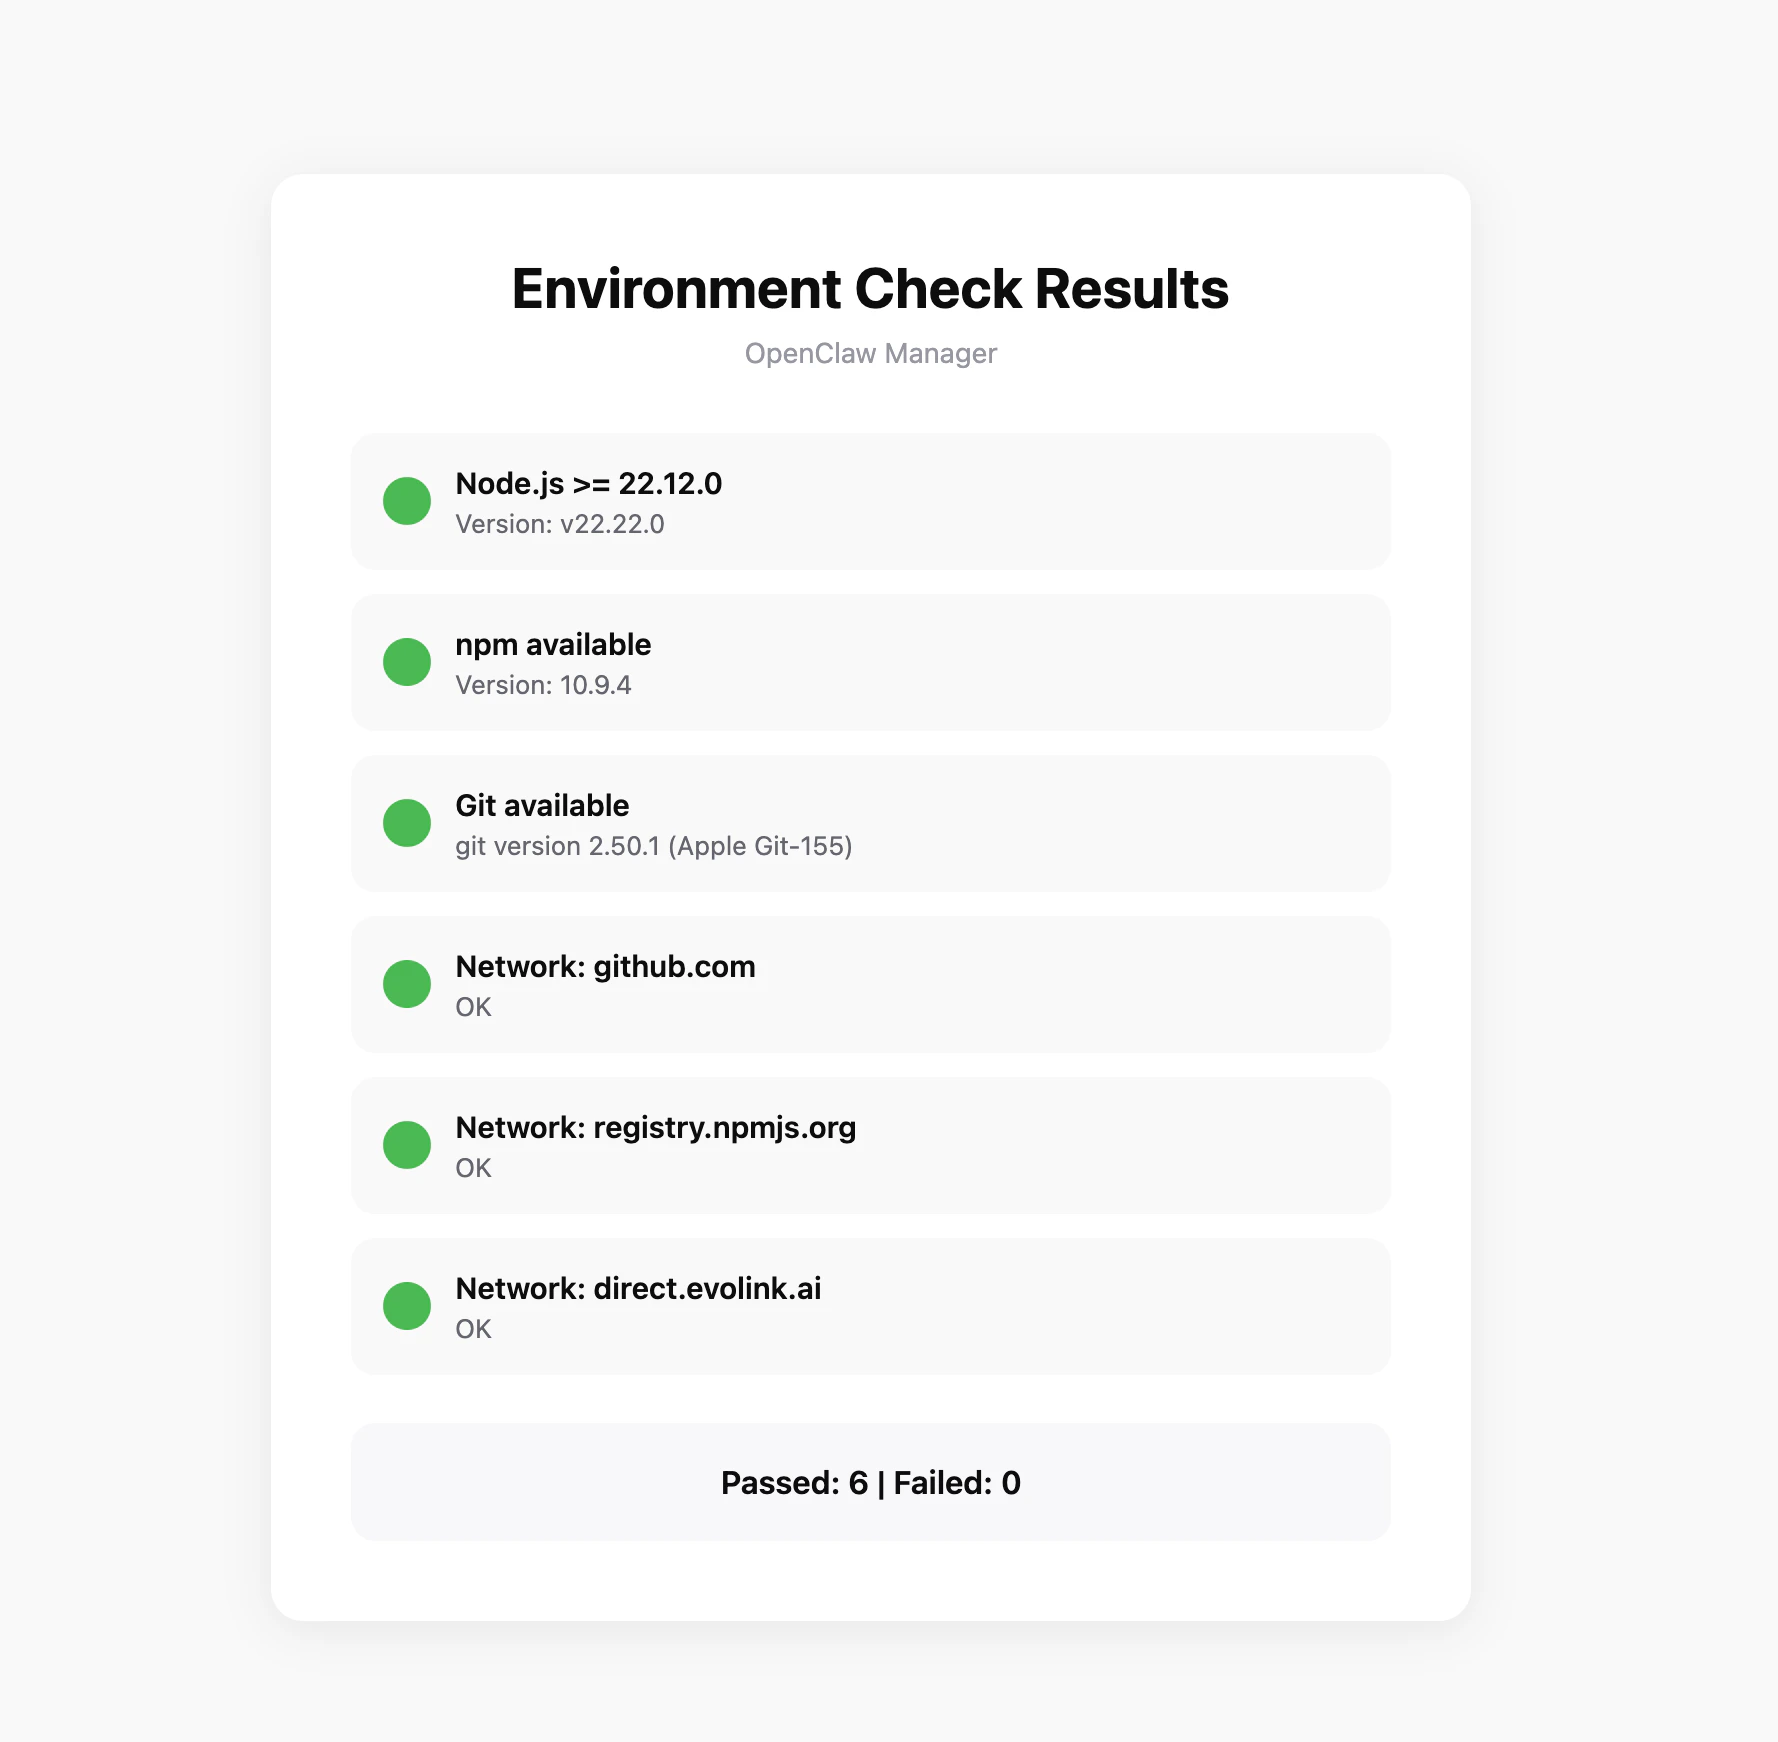 If the check fails, the tool will provide specific fix suggestions.
## Prerequisites
Before configuring, make sure you have:
### 1. Install Node.js
OpenClaw is installed via npm and requires Node.js 22 or higher.
Visit [Node.js official website](https://nodejs.org/en/download), download the Windows installer (.msi file), and run the installation program.
After installation, open PowerShell to verify:
```bash theme={null}
node --version
npm --version
```
It's recommended to run PowerShell as administrator to avoid permission issues during installation.
**Method 1: Using Installer**
Visit [Node.js official website](https://nodejs.org/en/download), download the macOS installer (.pkg file), and run the installation program.
**Method 2: Using Homebrew**
```bash theme={null}
brew install node
```
After installation, open Terminal to verify:
```bash theme={null}
node --version
npm --version
```
If you encounter permission issues during installation, you may need to add `sudo` before the command.
### 2. Get EvoLink API Key
* Log in to [EvoLink Dashboard](https://evolink.ai/dashboard)
* Find API Keys in the dashboard, click 'Create New Key' button, then copy the generated Key
* API Key usually starts with `sk-`
### 3. Prepare a Feishu Account
You need a Feishu enterprise account to create applications on the Feishu Open Platform.
## Step 1: Install OpenClaw
Run the following command in your terminal:
```bash theme={null}
npm install -g openclaw@latest
```
Install the Feishu plugin:
```bash theme={null}
openclaw plugins install @openclaw/feishu
```
## Step 2: Onboarding
Run the onboarding command. OpenClaw will guide you through the initial setup and install the background daemon service:
```bash theme={null}
openclaw onboard --install-daemon
```
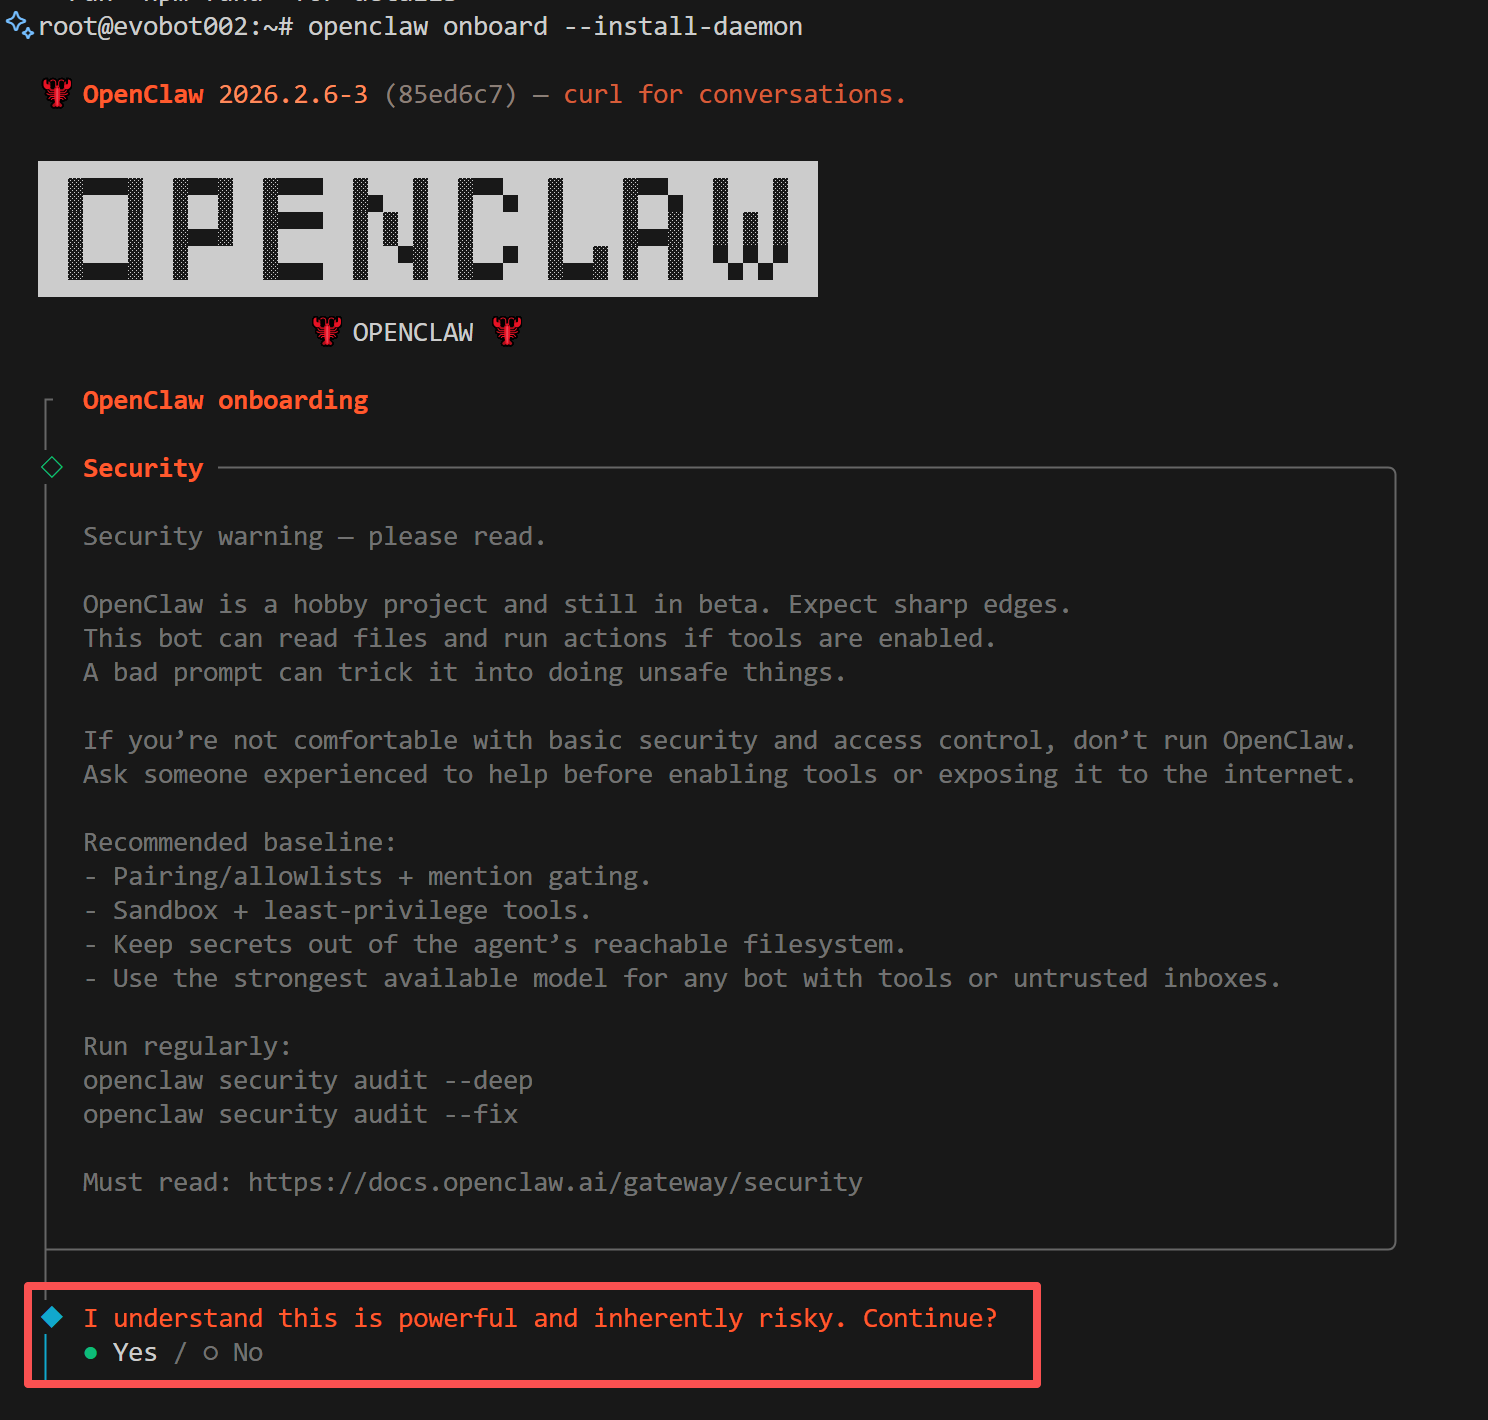
### 1. Confirm Installation
The system will display a risk disclaimer. Confirm to proceed:
If the check fails, the tool will provide specific fix suggestions.
## Prerequisites
Before configuring, make sure you have:
### 1. Install Node.js
OpenClaw is installed via npm and requires Node.js 22 or higher.
Visit [Node.js official website](https://nodejs.org/en/download), download the Windows installer (.msi file), and run the installation program.
After installation, open PowerShell to verify:
```bash theme={null}
node --version
npm --version
```
It's recommended to run PowerShell as administrator to avoid permission issues during installation.
**Method 1: Using Installer**
Visit [Node.js official website](https://nodejs.org/en/download), download the macOS installer (.pkg file), and run the installation program.
**Method 2: Using Homebrew**
```bash theme={null}
brew install node
```
After installation, open Terminal to verify:
```bash theme={null}
node --version
npm --version
```
If you encounter permission issues during installation, you may need to add `sudo` before the command.
### 2. Get EvoLink API Key
* Log in to [EvoLink Dashboard](https://evolink.ai/dashboard)
* Find API Keys in the dashboard, click 'Create New Key' button, then copy the generated Key
* API Key usually starts with `sk-`
### 3. Prepare a Feishu Account
You need a Feishu enterprise account to create applications on the Feishu Open Platform.
## Step 1: Install OpenClaw
Run the following command in your terminal:
```bash theme={null}
npm install -g openclaw@latest
```
Install the Feishu plugin:
```bash theme={null}
openclaw plugins install @openclaw/feishu
```
## Step 2: Onboarding
Run the onboarding command. OpenClaw will guide you through the initial setup and install the background daemon service:
```bash theme={null}
openclaw onboard --install-daemon
```
### 1. Confirm Installation
The system will display a risk disclaimer. Confirm to proceed:
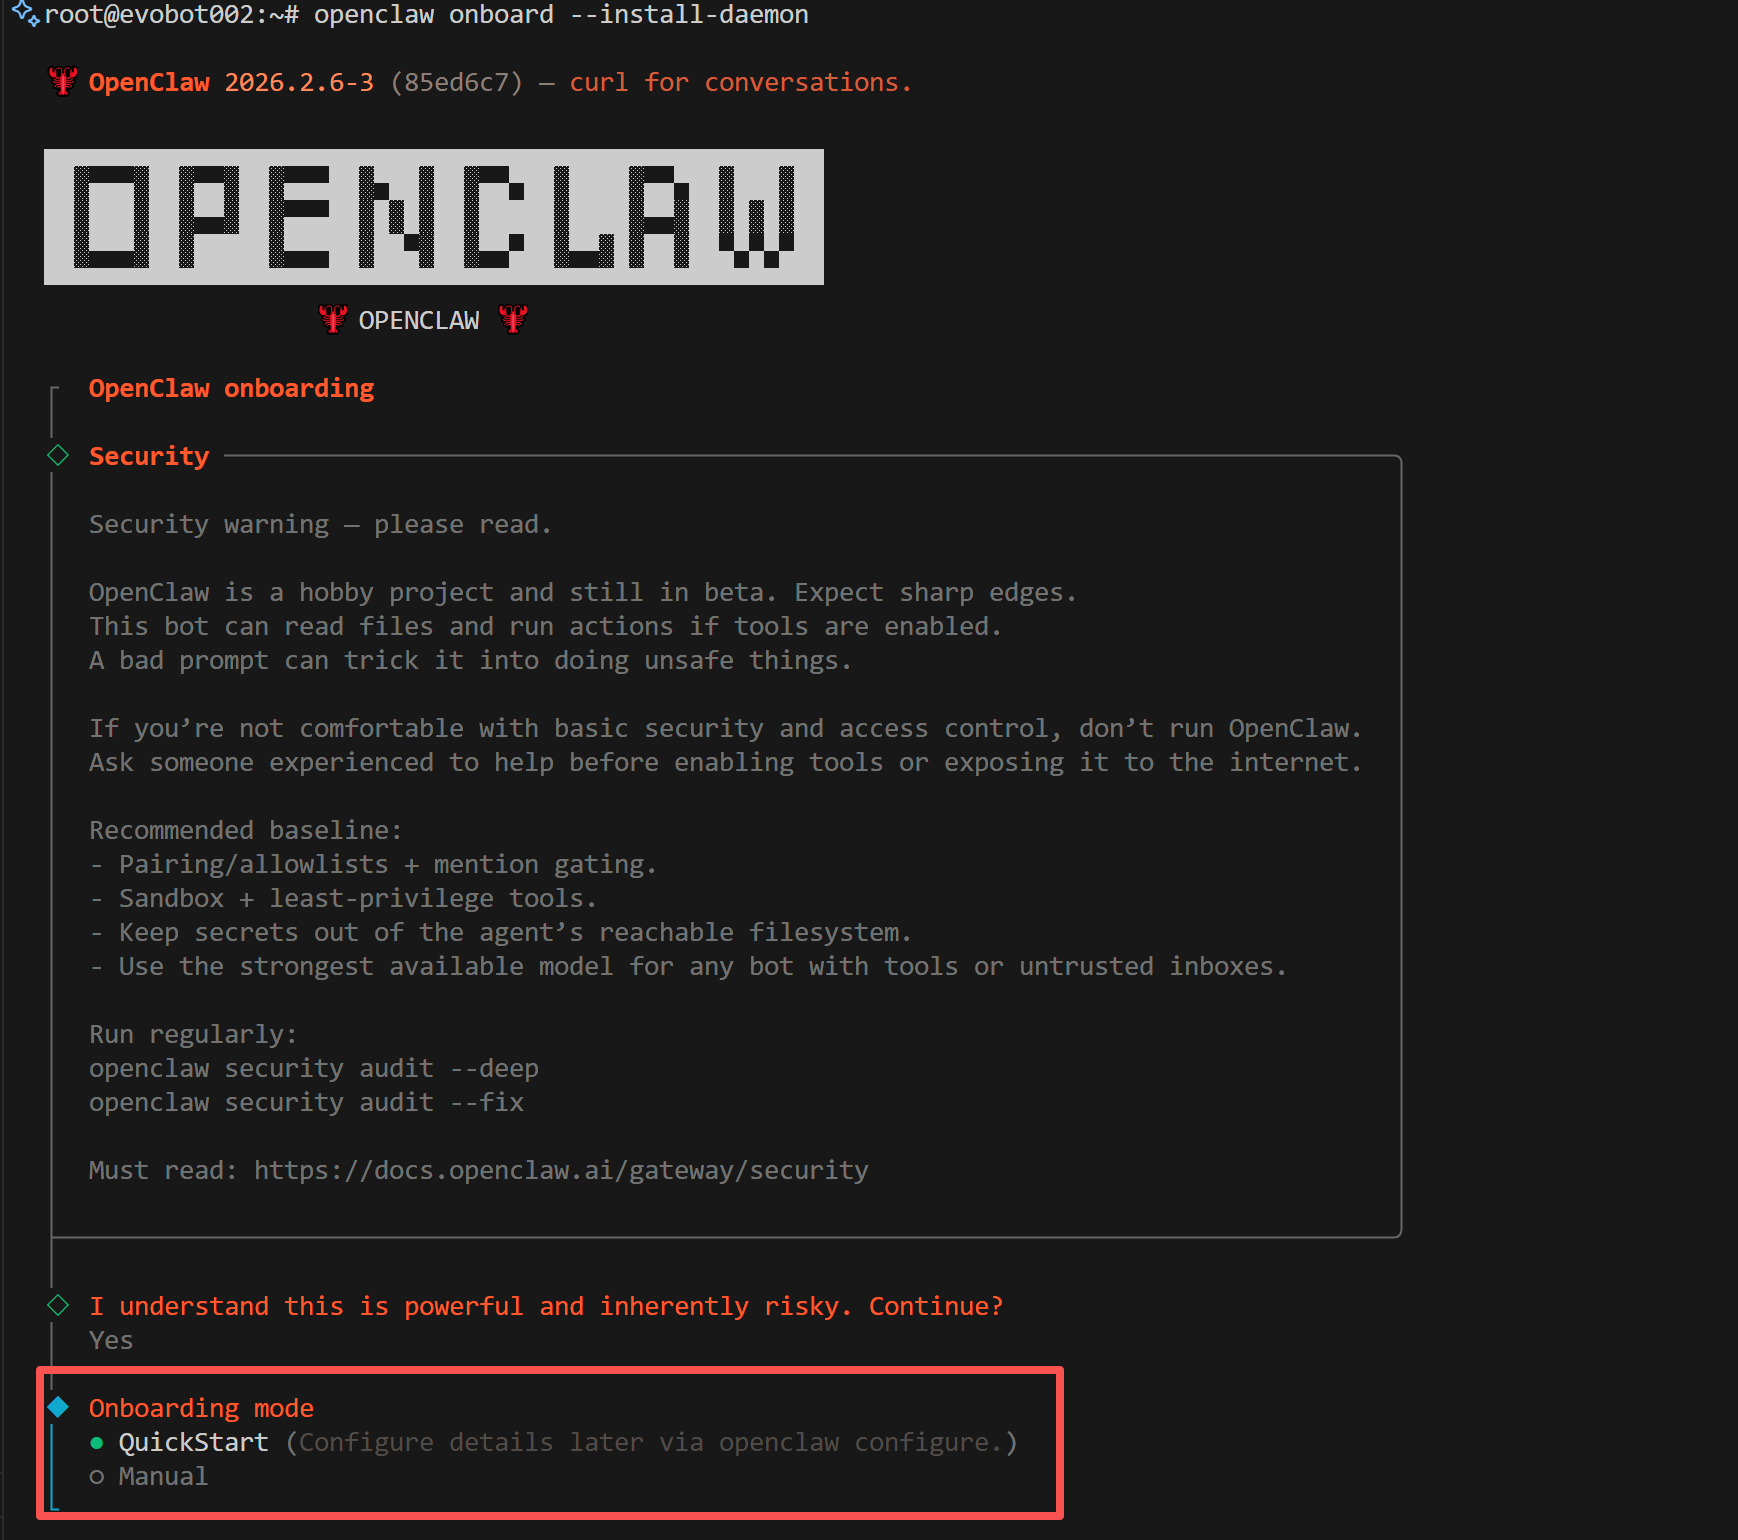
 ### 2. Select Installation Mode
When prompted to choose an installation mode, select **Quickstart**:
### 2. Select Installation Mode
When prompted to choose an installation mode, select **Quickstart**:
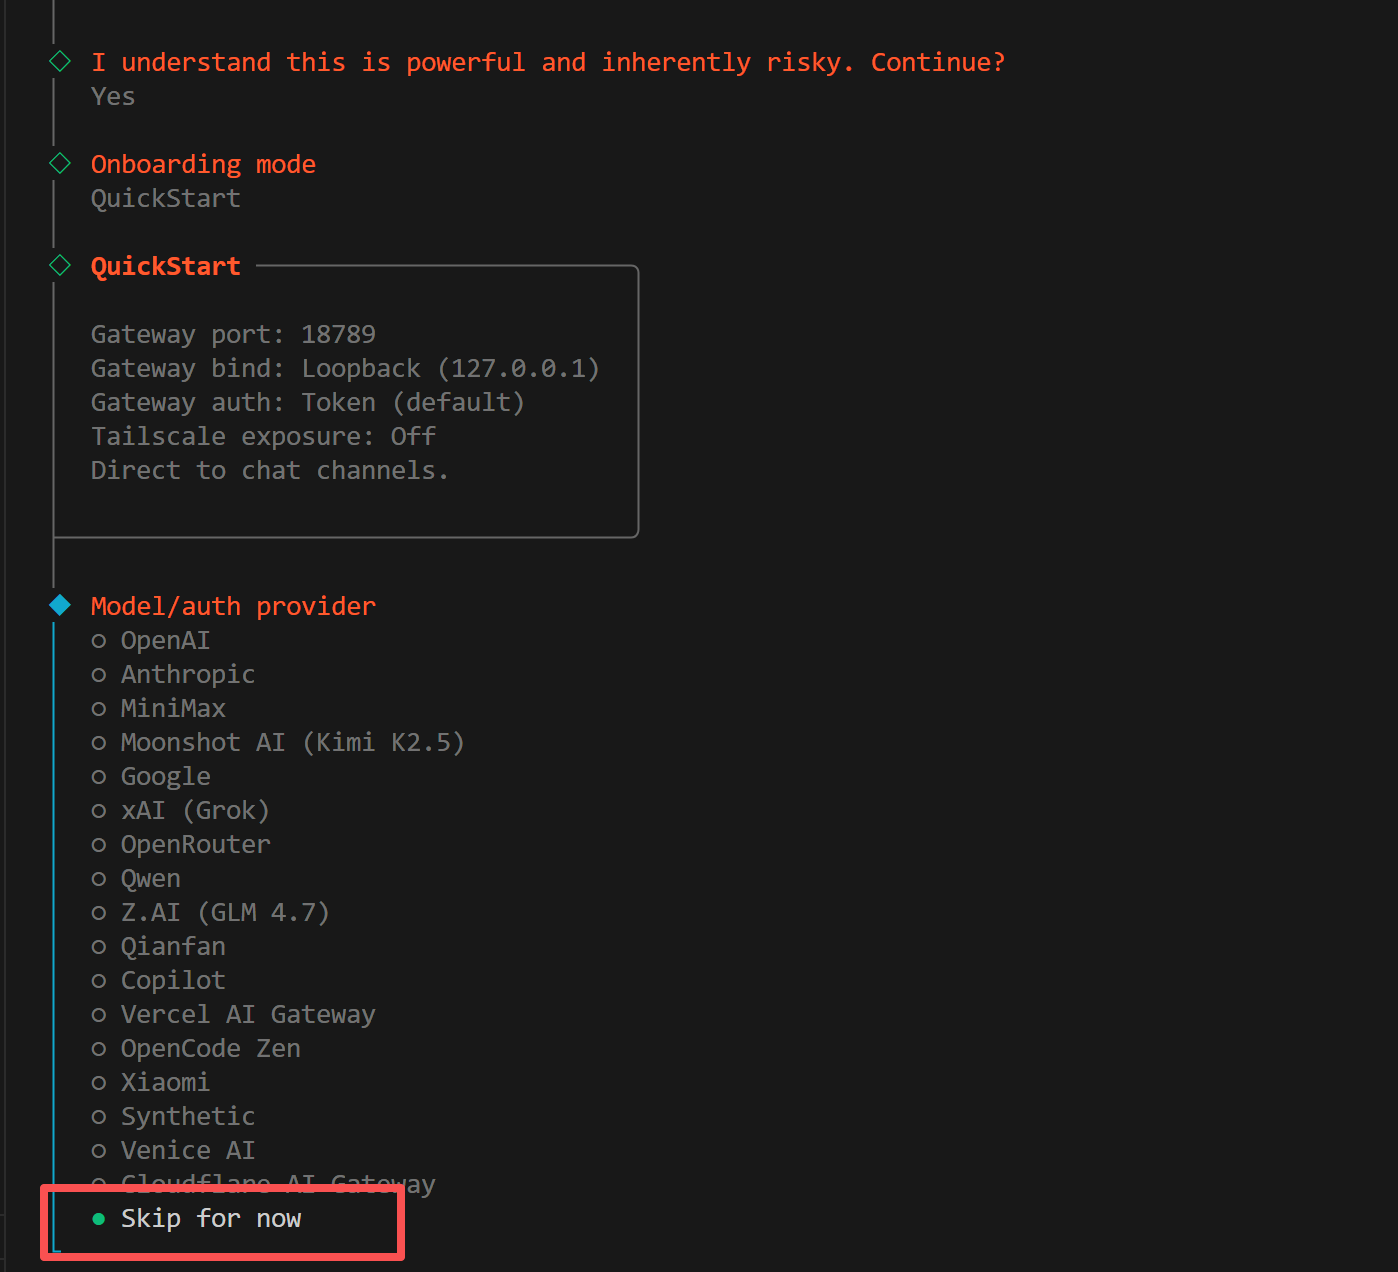
 ### 3. Select Provider
When prompted to choose a model provider, select **Skip**. We will manually configure EvoLink as a custom provider later:
### 3. Select Provider
When prompted to choose a model provider, select **Skip**. We will manually configure EvoLink as a custom provider later:
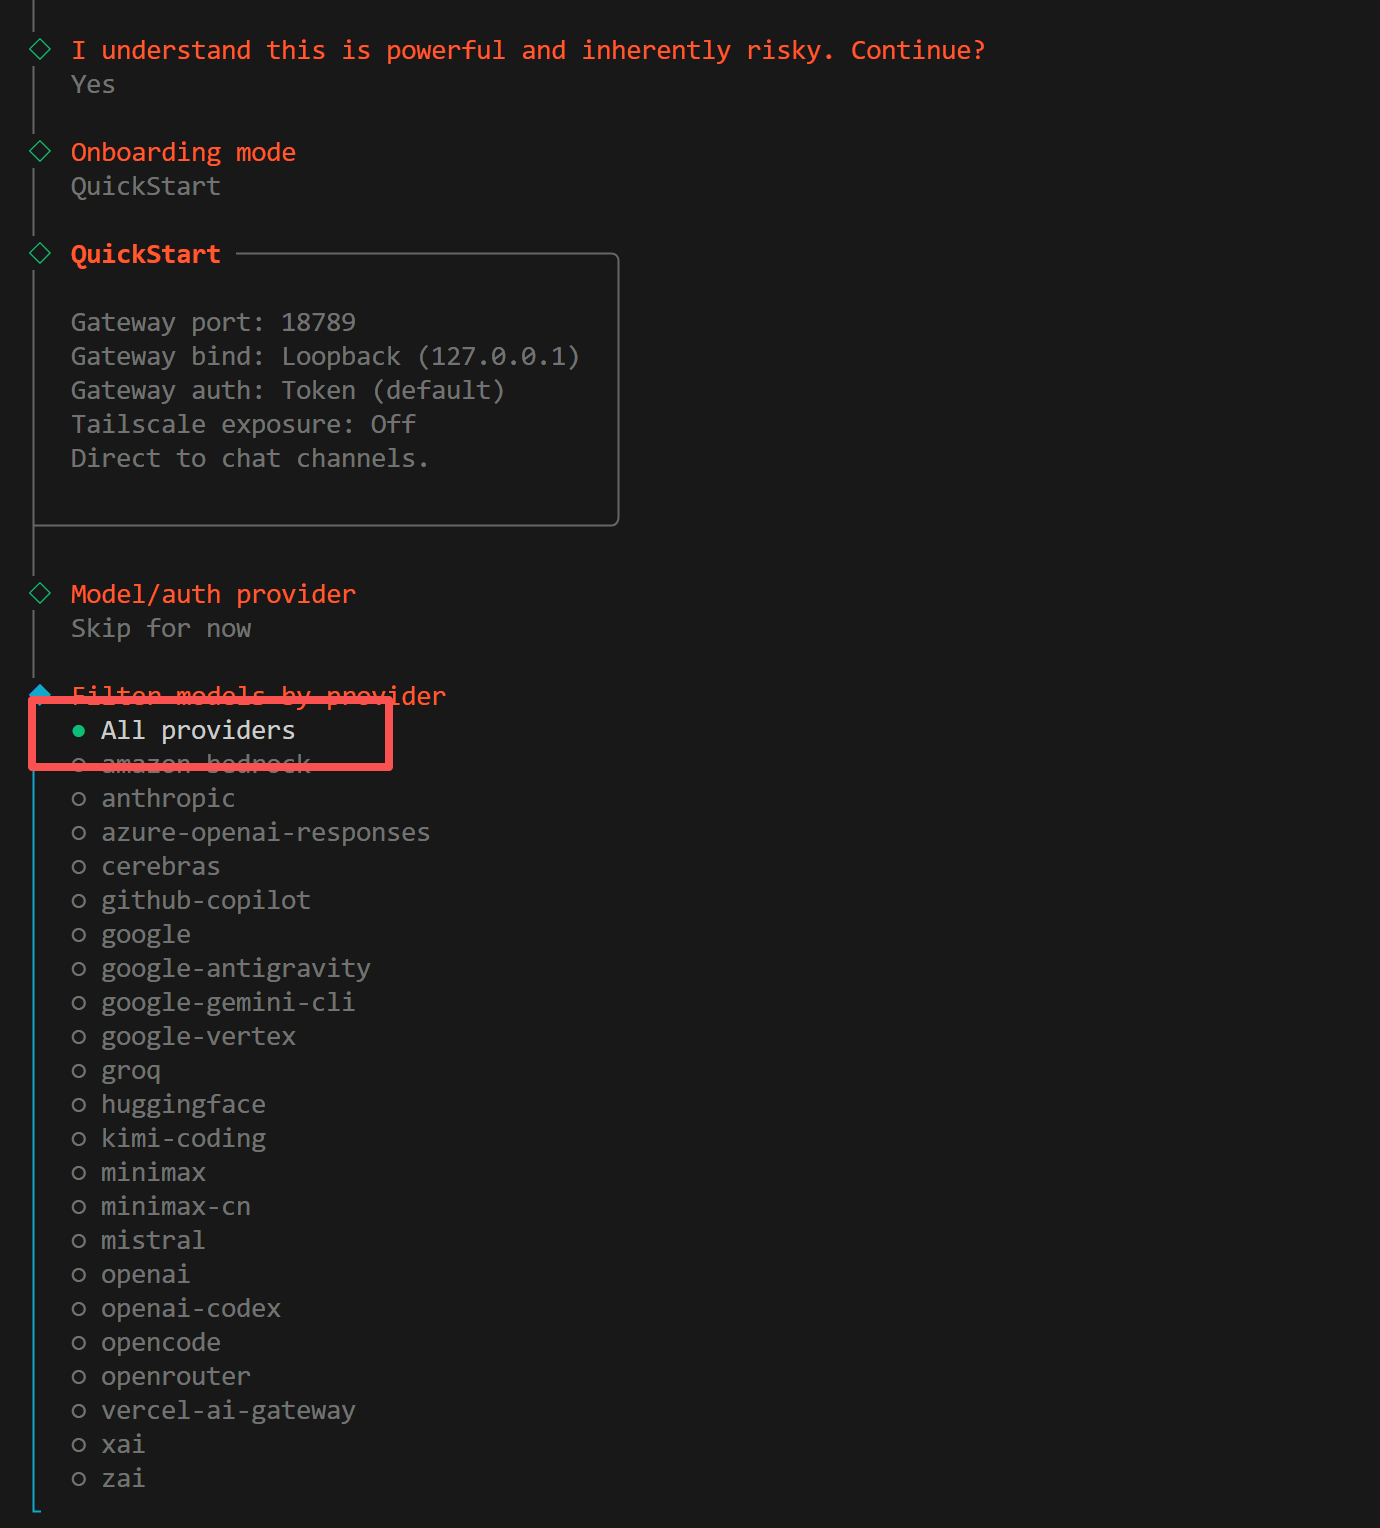
 ### 4. Select Models
When prompted to choose which models to enable, select **All**:
### 4. Select Models
When prompted to choose which models to enable, select **All**:
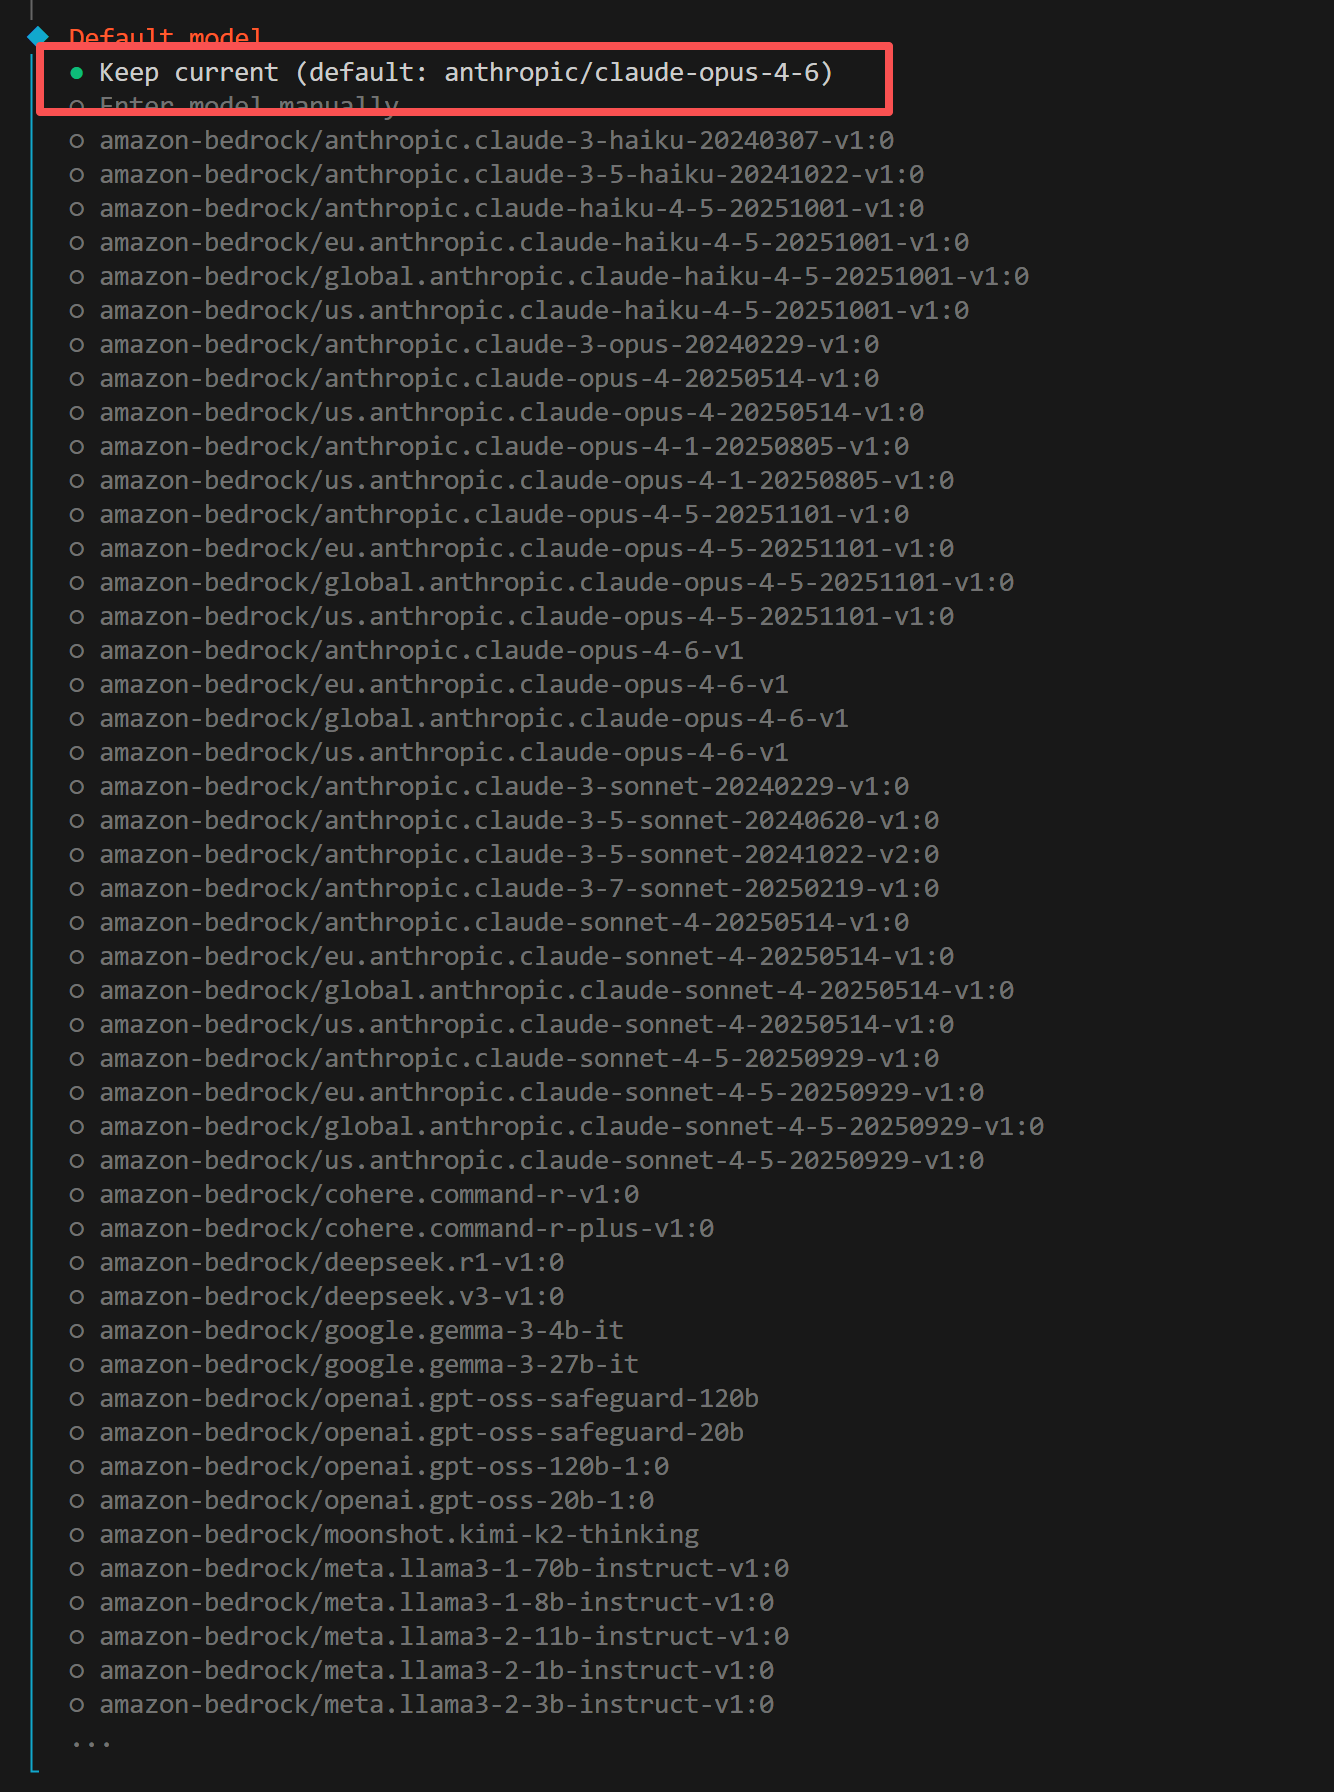
 ### 5. Select Default Model
When prompted to choose a default model, select **Keep current**:
### 5. Select Default Model
When prompted to choose a default model, select **Keep current**:
 ## Step 3: Create Feishu Application
### 1. Log in to Feishu Open Platform
Visit the [Feishu Open Platform](https://open.feishu.cn/app) and log in with your Feishu account.
For Lark (international version), use [https://open.larksuite.com/app](https://open.larksuite.com/app) and set `domain: "lark"` in the configuration.
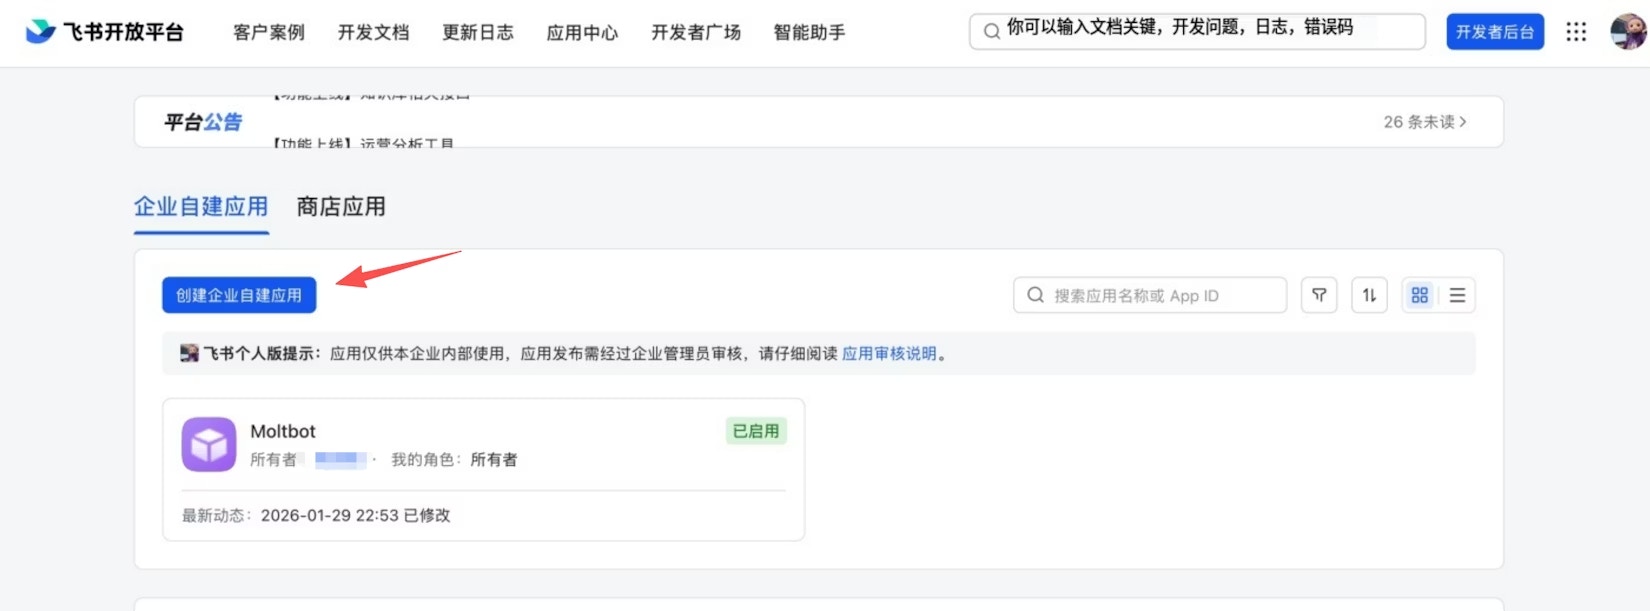
### 2. Create Application
Click **Create Enterprise Self-Built Application**, fill in the application name and description, and choose an icon.
## Step 3: Create Feishu Application
### 1. Log in to Feishu Open Platform
Visit the [Feishu Open Platform](https://open.feishu.cn/app) and log in with your Feishu account.
For Lark (international version), use [https://open.larksuite.com/app](https://open.larksuite.com/app) and set `domain: "lark"` in the configuration.
### 2. Create Application
Click **Create Enterprise Self-Built Application**, fill in the application name and description, and choose an icon.
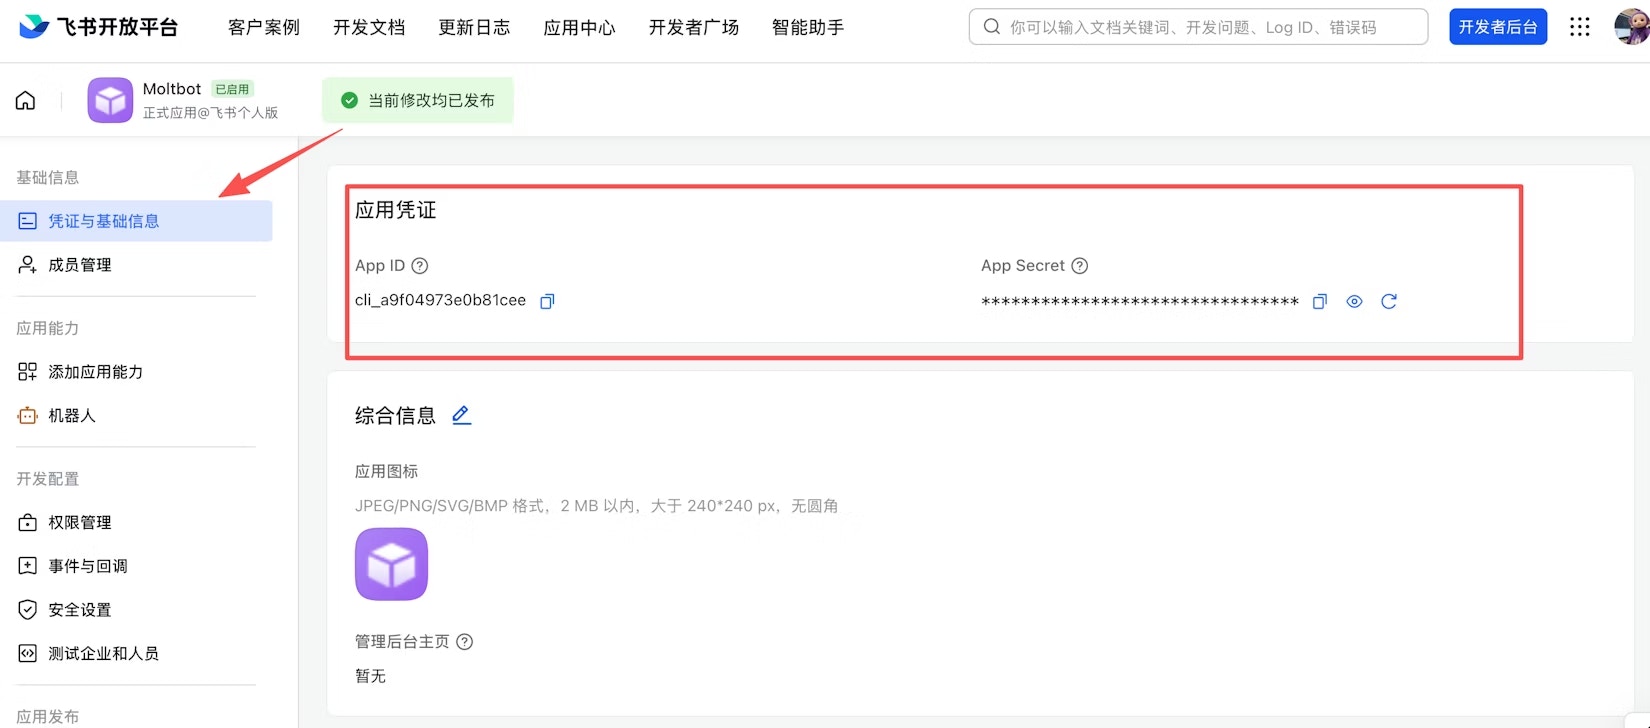
 ### 3. Get Credentials
On the **Credentials & Basic Info** page, copy:
* **App ID** (format: `cli_xxx`)
* **App Secret**
Keep your App Secret safe. Do not share it with others.
### 3. Get Credentials
On the **Credentials & Basic Info** page, copy:
* **App ID** (format: `cli_xxx`)
* **App Secret**
Keep your App Secret safe. Do not share it with others.
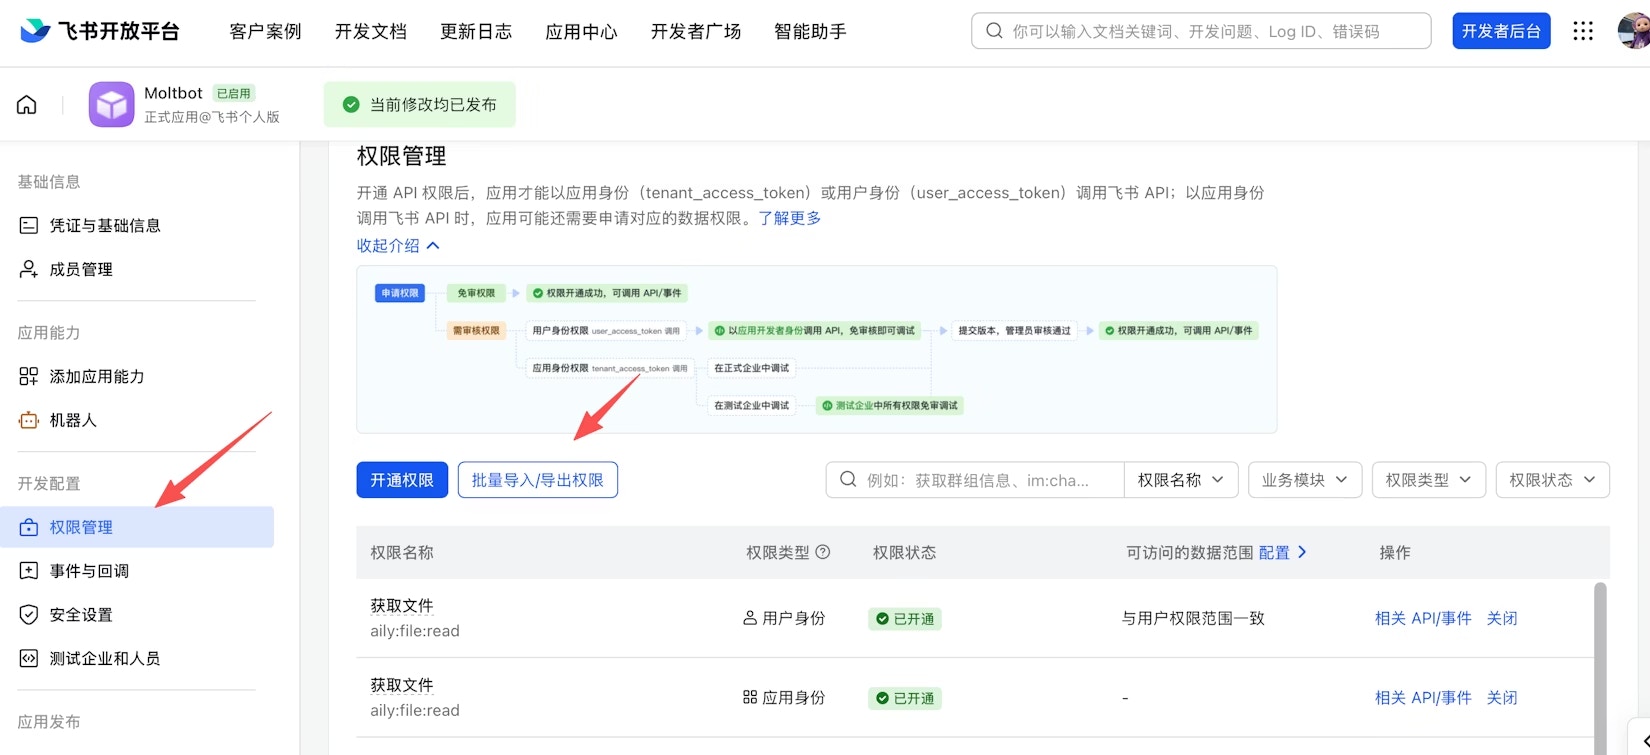
 ### 4. Configure Permissions
On the **Permission Management** page, click **Batch Import** and paste the following JSON to import all required permissions:
```json theme={null}
{
"scopes": {
"tenant": [
"aily:file:read",
"aily:file:write",
"application:application.app_message_stats.overview:readonly",
"application:application:self_manage",
"application:bot.menu:write",
"cardkit:card:write",
"contact:contact.base:readonly",
"contact:user.employee_id:readonly",
"corehr:file:download",
"docs:document.content:read",
"event:ip_list",
"im:chat",
"im:chat.access_event.bot_p2p_chat:read",
"im:chat.members:bot_access",
"im:message",
"im:message.group_at_msg:readonly",
"im:message.group_msg",
"im:message.p2p_msg:readonly",
"im:message:readonly",
"im:message:send_as_bot",
"im:resource",
"sheets:spreadsheet",
"wiki:wiki:readonly"
],
"user": [
"aily:file:read",
"aily:file:write",
"im:chat.access_event.bot_p2p_chat:read"
]
}
}
```
### 4. Configure Permissions
On the **Permission Management** page, click **Batch Import** and paste the following JSON to import all required permissions:
```json theme={null}
{
"scopes": {
"tenant": [
"aily:file:read",
"aily:file:write",
"application:application.app_message_stats.overview:readonly",
"application:application:self_manage",
"application:bot.menu:write",
"cardkit:card:write",
"contact:contact.base:readonly",
"contact:user.employee_id:readonly",
"corehr:file:download",
"docs:document.content:read",
"event:ip_list",
"im:chat",
"im:chat.access_event.bot_p2p_chat:read",
"im:chat.members:bot_access",
"im:message",
"im:message.group_at_msg:readonly",
"im:message.group_msg",
"im:message.p2p_msg:readonly",
"im:message:readonly",
"im:message:send_as_bot",
"im:resource",
"sheets:spreadsheet",
"wiki:wiki:readonly"
],
"user": [
"aily:file:read",
"aily:file:write",
"im:chat.access_event.bot_p2p_chat:read"
]
}
}
```
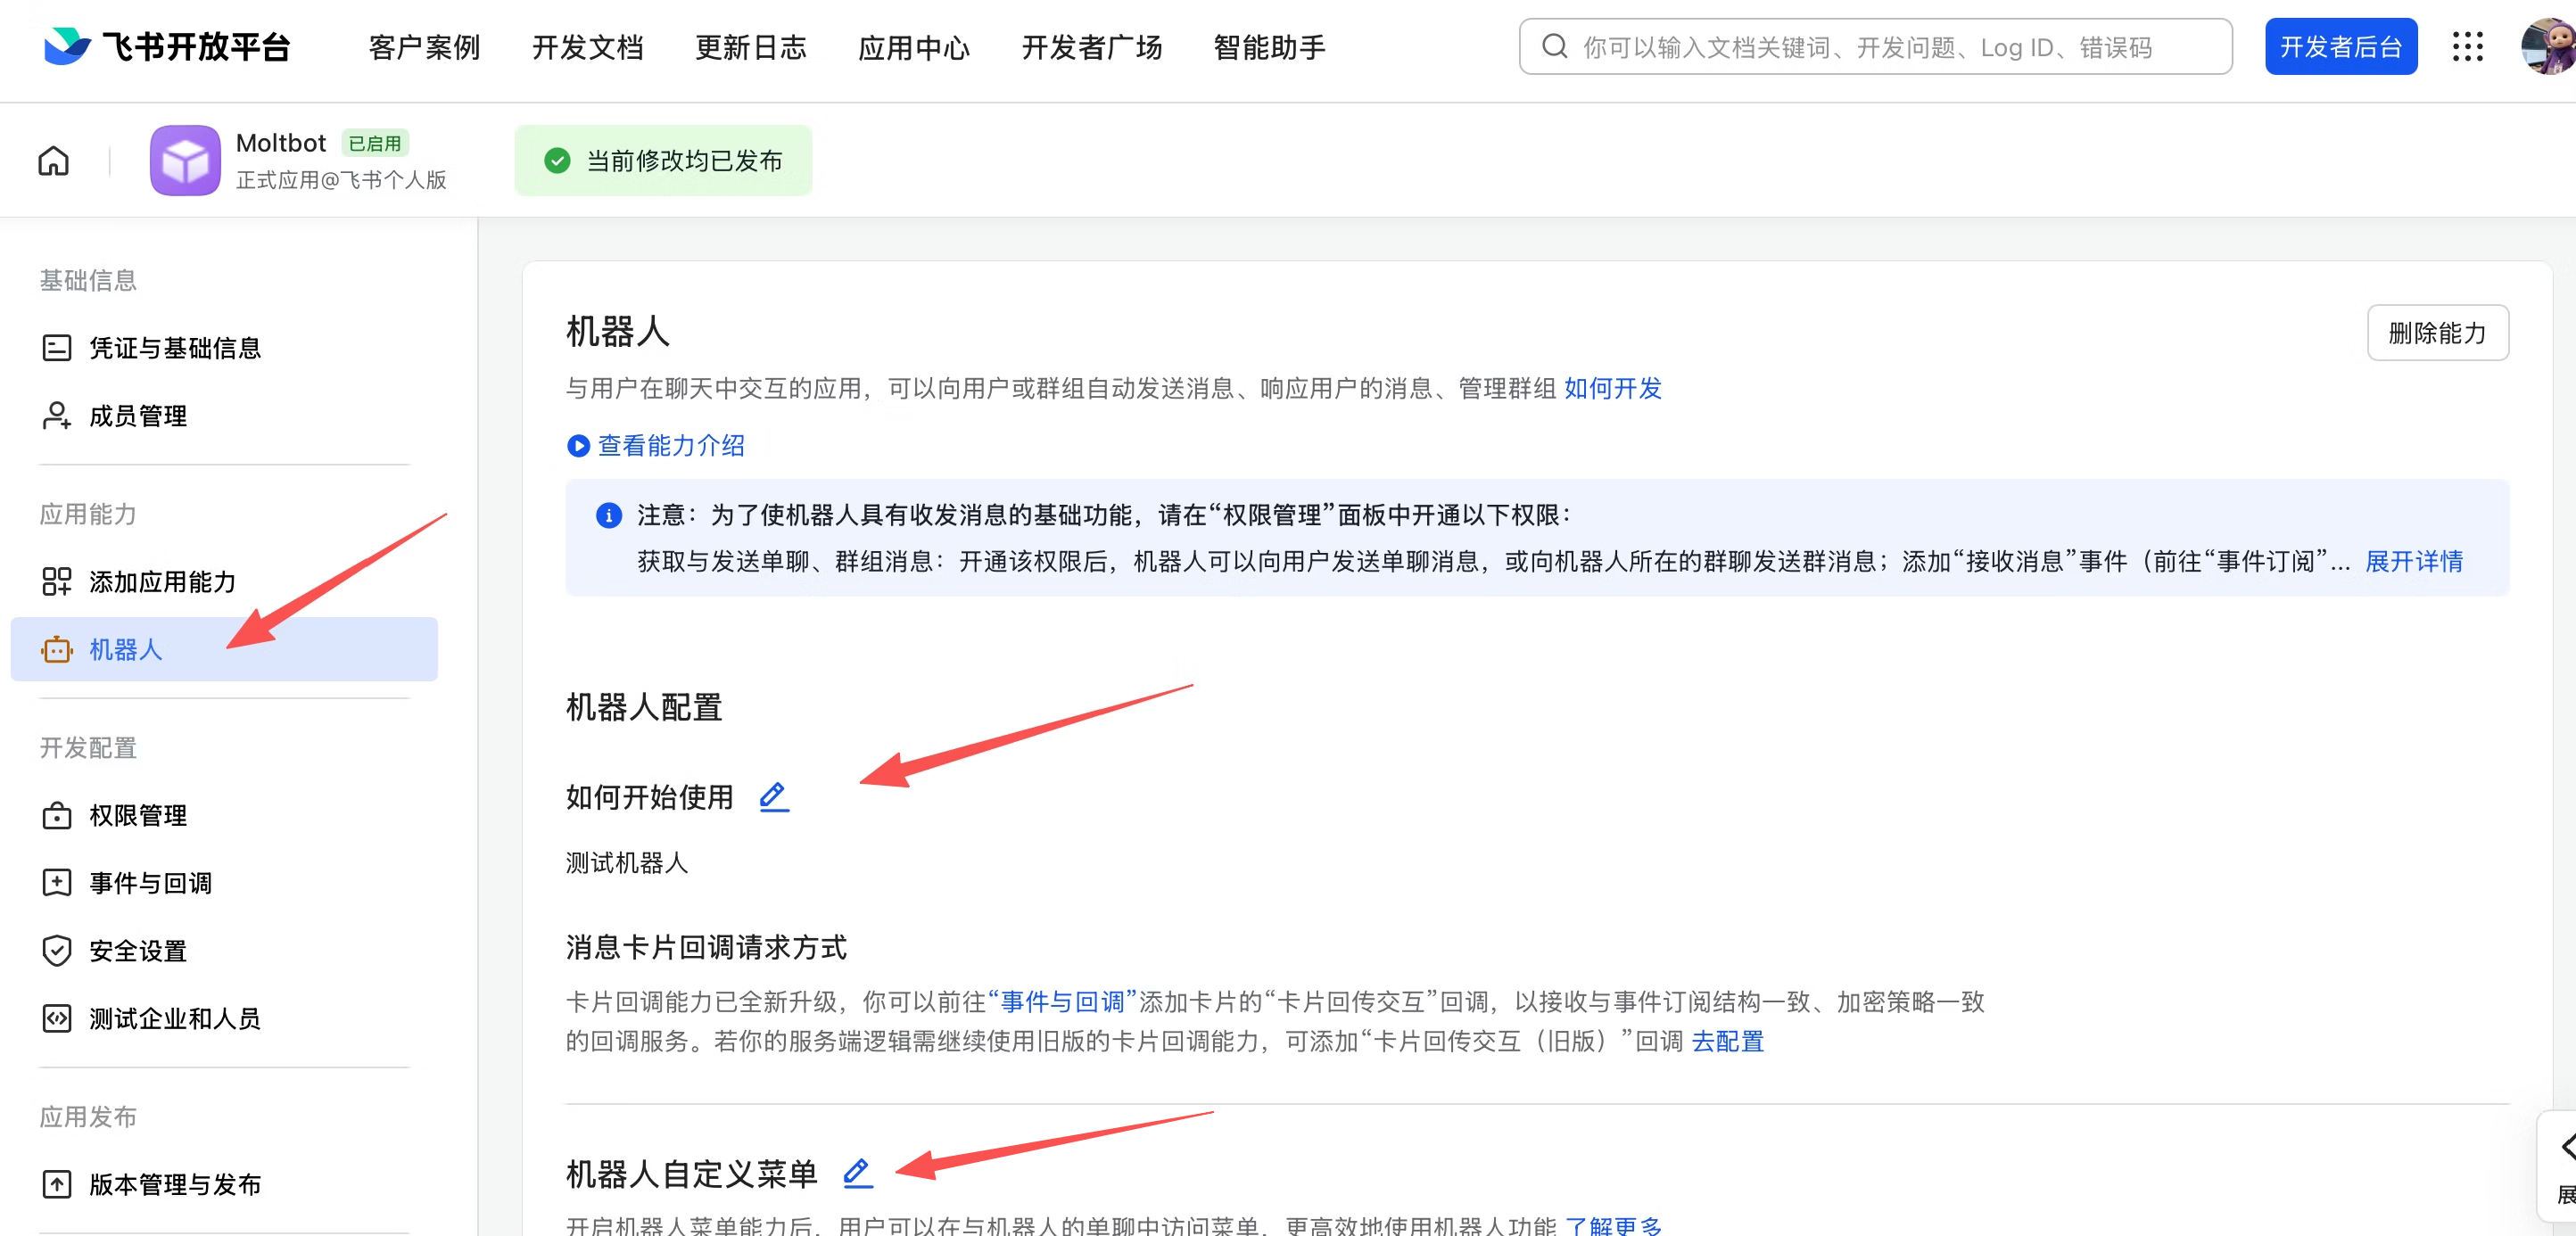
 ### 5. Enable Bot Capability
In the left sidebar, click **App Capabilities**, find the **Bot** card, and toggle the **menu status** to enabled. Once enabled, fill in the bot name and description — users will see these when searching for or chatting with the bot in Feishu.
### 5. Enable Bot Capability
In the left sidebar, click **App Capabilities**, find the **Bot** card, and toggle the **menu status** to enabled. Once enabled, fill in the bot name and description — users will see these when searching for or chatting with the bot in Feishu.
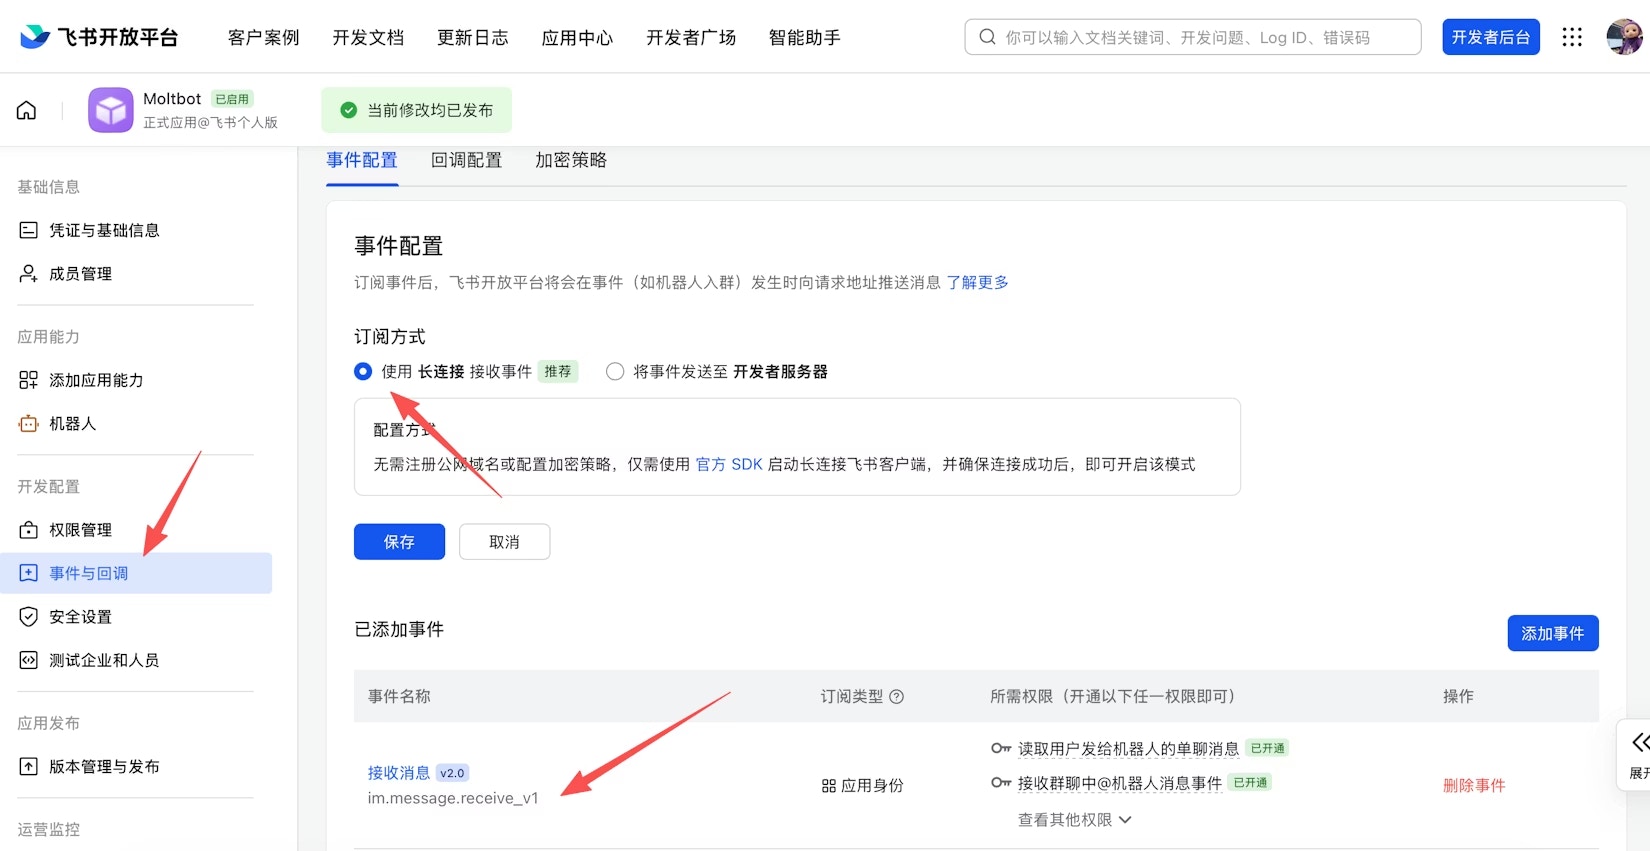
 ### 6. Configure Event Subscriptions
Before configuring event subscriptions, make sure you have:
* Completed the Feishu channel configuration (see Step 4)
* The gateway is running (check with `openclaw gateway status`)
On the **Event Subscriptions** page:
1. Select **Use Long Connection to Receive Events** (WebSocket mode)
2. Add event: `im.message.receive_v1` (Receive Message)
If the gateway is not running or the channel has not been added, the long connection setup will fail to save.
### 6. Configure Event Subscriptions
Before configuring event subscriptions, make sure you have:
* Completed the Feishu channel configuration (see Step 4)
* The gateway is running (check with `openclaw gateway status`)
On the **Event Subscriptions** page:
1. Select **Use Long Connection to Receive Events** (WebSocket mode)
2. Add event: `im.message.receive_v1` (Receive Message)
If the gateway is not running or the channel has not been added, the long connection setup will fail to save.
 ### 7. Publish Application
Go to **Version Management & Release**, create a version, submit for review and publish. Enterprise self-built applications are usually approved automatically.
## Step 4: Configure OpenClaw
OpenClaw's configuration is centralized in `~/.openclaw/openclaw.json`. There are three key configuration domains:
* `plugins.entries.*` — Controls which plugins to load
* `channels.*` — Controls channel connections and account credentials
* `models.providers.*` — Controls model providers
### 1. Add Feishu Channel
Open `~/.openclaw/openclaw.json`:
Enable the Feishu plugin (`plugins.entries`):
```json theme={null}
"plugins": {
"entries": {
"feishu": {
"enabled": true
}
}
}
```
Configure Feishu channel credentials (`channels.feishu`):
```json theme={null}
"channels": {
"feishu": {
"enabled": true,
"dmPolicy": "pairing",
"accounts": {
"main": {
"appId": "cli_xxx",
"appSecret": "your-app-secret",
"botName": "My AI Assistant"
}
}
}
}
```
Feishu credentials must be placed under `channels.feishu.accounts`, NOT under `plugins.entries.feishu`. Placing them in the wrong location will cause an `Unrecognized key` error.
You can also configure via environment variables:
```bash theme={null}
export FEISHU_APP_ID="cli_xxx"
export FEISHU_APP_SECRET="xxx"
```
Run the following command, select Feishu, and enter your App ID and App Secret when prompted:
```bash theme={null}
openclaw channels add
```
Newer versions of OpenClaw may have configuration conflicts with this command. Manual configuration is recommended.
### 2. Configure EvoLink API
In the same `openclaw.json`, find the `models` field and add EvoLink as a custom model provider:
```json theme={null}
"models": {
"providers": {
"evolink-anthropic": {
"api": "anthropic-messages",
"baseUrl": "https://direct.evolink.ai",
"apiKey": "your-evolink-api-key",
"models": [
{ "id": "claude-fable-5", "name": "Claude Fable 5" },
{ "id": "claude-opus-4-8", "name": "Claude Opus 4.8" },
{ "id": "claude-opus-4-7", "name": "Claude Opus 4.7" },
{ "id": "claude-opus-4-6", "name": "Claude Opus 4.6" },
{ "id": "claude-sonnet-4-6", "name": "Claude Sonnet 4.6" },
{ "id": "claude-opus-4-5-20251101", "name": "Claude Opus 4.5" },
{ "id": "claude-sonnet-4-5-20250929", "name": "Claude Sonnet 4.5" },
{ "id": "claude-haiku-4-5-20251001", "name": "Claude Haiku 4.5" }
]
},
"evolink-google": {
"api": "google-generative-ai",
"baseUrl": "https://direct.evolink.ai/v1beta",
"apiKey": "your-evolink-api-key",
"models": [
{ "id": "gemini-3.1-flash-lite-preview", "name": "Gemini 3.1 Flash Lite" },
{ "id": "gemini-3.1-pro-preview", "name": "Gemini 3.1 Pro" },
{ "id": "gemini-2.5-pro", "name": "Gemini 2.5 Pro" },
{ "id": "gemini-2.5-flash", "name": "Gemini 2.5 Flash" },
{ "id": "gemini-3-pro-preview", "name": "Gemini 3.0 Pro" },
{ "id": "gemini-3-flash-preview", "name": "Gemini 3.0 Flash" }
]
},
"evolink-openai": {
"api": "openai-completions",
"baseUrl": "https://direct.evolink.ai/v1",
"apiKey": "your-evolink-api-key",
"models": [
{ "id": "gpt-5.4", "name": "GPT-5.4" },
{ "id": "gpt-5.2", "name": "GPT-5.2" },
{ "id": "gpt-5.1", "name": "GPT-5.1" },
{ "id": "gpt-5.1-chat", "name": "GPT-5.1 Chat" },
{ "id": "gpt-5.1-thinking", "name": "GPT-5.1 Thinking" },
{ "id": "gemini-2.5-pro", "name": "Gemini 2.5 Pro (OpenAI SDK)" },
{ "id": "gemini-2.5-flash", "name": "Gemini 2.5 Flash (OpenAI SDK)" },
{ "id": "gemini-3-pro-preview", "name": "Gemini 3.0 Pro (OpenAI SDK)" },
{ "id": "gemini-3-flash-preview", "name": "Gemini 3.0 Flash (OpenAI SDK)" },
{ "id": "doubao-seed-2.0-pro", "name": "Doubao Seed 2.0 Pro" },
{ "id": "doubao-seed-2.0-lite", "name": "Doubao Seed 2.0 Lite" },
{ "id": "doubao-seed-2.0-mini", "name": "Doubao Seed 2.0 Mini" },
{ "id": "doubao-seed-2.0-code", "name": "Doubao Seed 2.0 Code" },
{ "id": "kimi-k2-thinking", "name": "Kimi K2 Thinking" },
{ "id": "kimi-k2-thinking-turbo", "name": "Kimi K2 Thinking Turbo" }
]
}
}
}
```
Replace `"your-evolink-api-key"` with the actual API Key from your [EvoLink Dashboard](https://evolink.ai/dashboard).
### 3. Configure Default Model
In the `agents` field, set the default model:
```json theme={null}
"model": {
"primary": "evolink-anthropic/claude-opus-4-6"
}
```
### 4. Restart Gateway
Restart the OpenClaw Gateway to apply the configuration:
```bash theme={null}
openclaw gateway restart
```
Always use `openclaw gateway restart` instead of manually starting another process, otherwise you will get a port conflict error.
Verify the configuration is loaded correctly:
```bash theme={null}
openclaw gateway status
```
## Step 5: Verify Connection
### 1. Find the Bot in Feishu
Open Feishu, search for the bot name you created, and start a conversation.
### 2. Get Pairing Code
Send any message to the bot. It will return a pairing code.
### 3. Complete Pairing
Open a new terminal window and run:
```bash theme={null}
openclaw pairing approve feishu
```
Replace `` with the actual code returned by the bot. Make sure to remove the angle brackets `<>`.
### 4. Test Connection
After pairing is complete, send a message to the bot in Feishu:
```
Hello, please introduce yourself
```
If you receive an AI response, the integration is complete.
## Access Control
### Direct Message Access
Default `dmPolicy: "pairing"` — unknown users will receive a pairing code that must be approved by an admin:
```bash theme={null}
openclaw pairing list feishu # View pending approvals
openclaw pairing approve feishu
### 7. Publish Application
Go to **Version Management & Release**, create a version, submit for review and publish. Enterprise self-built applications are usually approved automatically.
## Step 4: Configure OpenClaw
OpenClaw's configuration is centralized in `~/.openclaw/openclaw.json`. There are three key configuration domains:
* `plugins.entries.*` — Controls which plugins to load
* `channels.*` — Controls channel connections and account credentials
* `models.providers.*` — Controls model providers
### 1. Add Feishu Channel
Open `~/.openclaw/openclaw.json`:
Enable the Feishu plugin (`plugins.entries`):
```json theme={null}
"plugins": {
"entries": {
"feishu": {
"enabled": true
}
}
}
```
Configure Feishu channel credentials (`channels.feishu`):
```json theme={null}
"channels": {
"feishu": {
"enabled": true,
"dmPolicy": "pairing",
"accounts": {
"main": {
"appId": "cli_xxx",
"appSecret": "your-app-secret",
"botName": "My AI Assistant"
}
}
}
}
```
Feishu credentials must be placed under `channels.feishu.accounts`, NOT under `plugins.entries.feishu`. Placing them in the wrong location will cause an `Unrecognized key` error.
You can also configure via environment variables:
```bash theme={null}
export FEISHU_APP_ID="cli_xxx"
export FEISHU_APP_SECRET="xxx"
```
Run the following command, select Feishu, and enter your App ID and App Secret when prompted:
```bash theme={null}
openclaw channels add
```
Newer versions of OpenClaw may have configuration conflicts with this command. Manual configuration is recommended.
### 2. Configure EvoLink API
In the same `openclaw.json`, find the `models` field and add EvoLink as a custom model provider:
```json theme={null}
"models": {
"providers": {
"evolink-anthropic": {
"api": "anthropic-messages",
"baseUrl": "https://direct.evolink.ai",
"apiKey": "your-evolink-api-key",
"models": [
{ "id": "claude-fable-5", "name": "Claude Fable 5" },
{ "id": "claude-opus-4-8", "name": "Claude Opus 4.8" },
{ "id": "claude-opus-4-7", "name": "Claude Opus 4.7" },
{ "id": "claude-opus-4-6", "name": "Claude Opus 4.6" },
{ "id": "claude-sonnet-4-6", "name": "Claude Sonnet 4.6" },
{ "id": "claude-opus-4-5-20251101", "name": "Claude Opus 4.5" },
{ "id": "claude-sonnet-4-5-20250929", "name": "Claude Sonnet 4.5" },
{ "id": "claude-haiku-4-5-20251001", "name": "Claude Haiku 4.5" }
]
},
"evolink-google": {
"api": "google-generative-ai",
"baseUrl": "https://direct.evolink.ai/v1beta",
"apiKey": "your-evolink-api-key",
"models": [
{ "id": "gemini-3.1-flash-lite-preview", "name": "Gemini 3.1 Flash Lite" },
{ "id": "gemini-3.1-pro-preview", "name": "Gemini 3.1 Pro" },
{ "id": "gemini-2.5-pro", "name": "Gemini 2.5 Pro" },
{ "id": "gemini-2.5-flash", "name": "Gemini 2.5 Flash" },
{ "id": "gemini-3-pro-preview", "name": "Gemini 3.0 Pro" },
{ "id": "gemini-3-flash-preview", "name": "Gemini 3.0 Flash" }
]
},
"evolink-openai": {
"api": "openai-completions",
"baseUrl": "https://direct.evolink.ai/v1",
"apiKey": "your-evolink-api-key",
"models": [
{ "id": "gpt-5.4", "name": "GPT-5.4" },
{ "id": "gpt-5.2", "name": "GPT-5.2" },
{ "id": "gpt-5.1", "name": "GPT-5.1" },
{ "id": "gpt-5.1-chat", "name": "GPT-5.1 Chat" },
{ "id": "gpt-5.1-thinking", "name": "GPT-5.1 Thinking" },
{ "id": "gemini-2.5-pro", "name": "Gemini 2.5 Pro (OpenAI SDK)" },
{ "id": "gemini-2.5-flash", "name": "Gemini 2.5 Flash (OpenAI SDK)" },
{ "id": "gemini-3-pro-preview", "name": "Gemini 3.0 Pro (OpenAI SDK)" },
{ "id": "gemini-3-flash-preview", "name": "Gemini 3.0 Flash (OpenAI SDK)" },
{ "id": "doubao-seed-2.0-pro", "name": "Doubao Seed 2.0 Pro" },
{ "id": "doubao-seed-2.0-lite", "name": "Doubao Seed 2.0 Lite" },
{ "id": "doubao-seed-2.0-mini", "name": "Doubao Seed 2.0 Mini" },
{ "id": "doubao-seed-2.0-code", "name": "Doubao Seed 2.0 Code" },
{ "id": "kimi-k2-thinking", "name": "Kimi K2 Thinking" },
{ "id": "kimi-k2-thinking-turbo", "name": "Kimi K2 Thinking Turbo" }
]
}
}
}
```
Replace `"your-evolink-api-key"` with the actual API Key from your [EvoLink Dashboard](https://evolink.ai/dashboard).
### 3. Configure Default Model
In the `agents` field, set the default model:
```json theme={null}
"model": {
"primary": "evolink-anthropic/claude-opus-4-6"
}
```
### 4. Restart Gateway
Restart the OpenClaw Gateway to apply the configuration:
```bash theme={null}
openclaw gateway restart
```
Always use `openclaw gateway restart` instead of manually starting another process, otherwise you will get a port conflict error.
Verify the configuration is loaded correctly:
```bash theme={null}
openclaw gateway status
```
## Step 5: Verify Connection
### 1. Find the Bot in Feishu
Open Feishu, search for the bot name you created, and start a conversation.
### 2. Get Pairing Code
Send any message to the bot. It will return a pairing code.
### 3. Complete Pairing
Open a new terminal window and run:
```bash theme={null}
openclaw pairing approve feishu
```
Replace `` with the actual code returned by the bot. Make sure to remove the angle brackets `<>`.
### 4. Test Connection
After pairing is complete, send a message to the bot in Feishu:
```
Hello, please introduce yourself
```
If you receive an AI response, the integration is complete.
## Access Control
### Direct Message Access
Default `dmPolicy: "pairing"` — unknown users will receive a pairing code that must be approved by an admin:
```bash theme={null}
openclaw pairing list feishu # View pending approvals
openclaw pairing approve feishu # Approve
```
You can also configure an allowlist of user Open IDs via `channels.feishu.allowFrom`.
### Group Access
Group policy is controlled via `channels.feishu.groupPolicy`:
* `"open"` — Allow all users in the group (default)
* `"allowlist"` — Only allow users in `groupAllowFrom`
* `"disabled"` — Disable group messages
By default, the bot only responds when @mentioned (`requireMention: true`).
## Common Commands
| Command | Description |
| ------------------------------ | ----------------------------- |
| `openclaw gateway status` | Check gateway status |
| `openclaw gateway restart` | Restart gateway service |
| `openclaw logs --follow` | View real-time logs |
| `openclaw pairing list feishu` | View pending pairing requests |
| `openclaw plugins list` | View installed plugins |
## Troubleshooting
| Issue | Solution |
| ---------------------------- | --------------------------------------------------------------------------------------------------------------------------------------------------------------- |
| Bot not responding in groups | Check if you @mentioned the bot; check if `groupPolicy` is `"disabled"` |
| Bot not receiving messages | Check if the app is published and approved; verify event subscription `im.message.receive_v1` is configured; confirm WebSocket long connection mode is selected |
| App Secret leaked | Reset App Secret on Feishu Open Platform, update config, restart gateway |
| Failed to send messages | Check if `im:message:send_as_bot` permission is granted; check logs with `openclaw logs --follow` |