> ## Documentation Index
> Fetch the complete documentation index at: https://docs.evolink.ai/llms.txt
> Use this file to discover all available pages before exploring further.
# OpenClaw Manual Installation - Smart Model Routing
> Manually install and configure OpenClaw Gateway with Smart Model Routing support
## Overview
OpenClaw is an open-source AI agent Gateway that acts as a bridge between chat applications and AI agents. Through a centralized Gateway process, it can connect chat platforms like Telegram, WhatsApp, Discord, and Feishu to AI programming agents.
This document describes how to manually install OpenClaw and configure **EvoLink API** as a model provider. After completing this document, you can continue to configure specific chat channels (such as Telegram or Feishu).
**This guide covers:**
* Installing and configuring OpenClaw Gateway
* Configuring EvoLink API as a custom model provider
* Verifying the installation
## System Environment Check (Optional)
Before starting the installation, it's recommended to run the environment check tool to ensure your system meets OpenClaw's requirements.
### Download the Check Tool
Download the check tool for your platform from [GitHub Releases](https://github.com/suuuuuu-1/openclaw-env-checker/releases):
| Platform | Filename |
| --------------------- | ------------------------------ |
| Windows | `openclaw-checker-win-x64.exe` |
| macOS (Intel) | `openclaw-checker-macos-x64` |
| macOS (Apple Silicon) | `openclaw-checker-macos-arm64` |
| Linux | `openclaw-checker-linux-x64` |
### Check Items
The tool will automatically check the following:
* ✅ Node.js version (requires >= 22.12.0)
* ✅ npm available
* ✅ Git available
* ✅ Network connectivity (github.com, npmjs.org, evolink.ai)
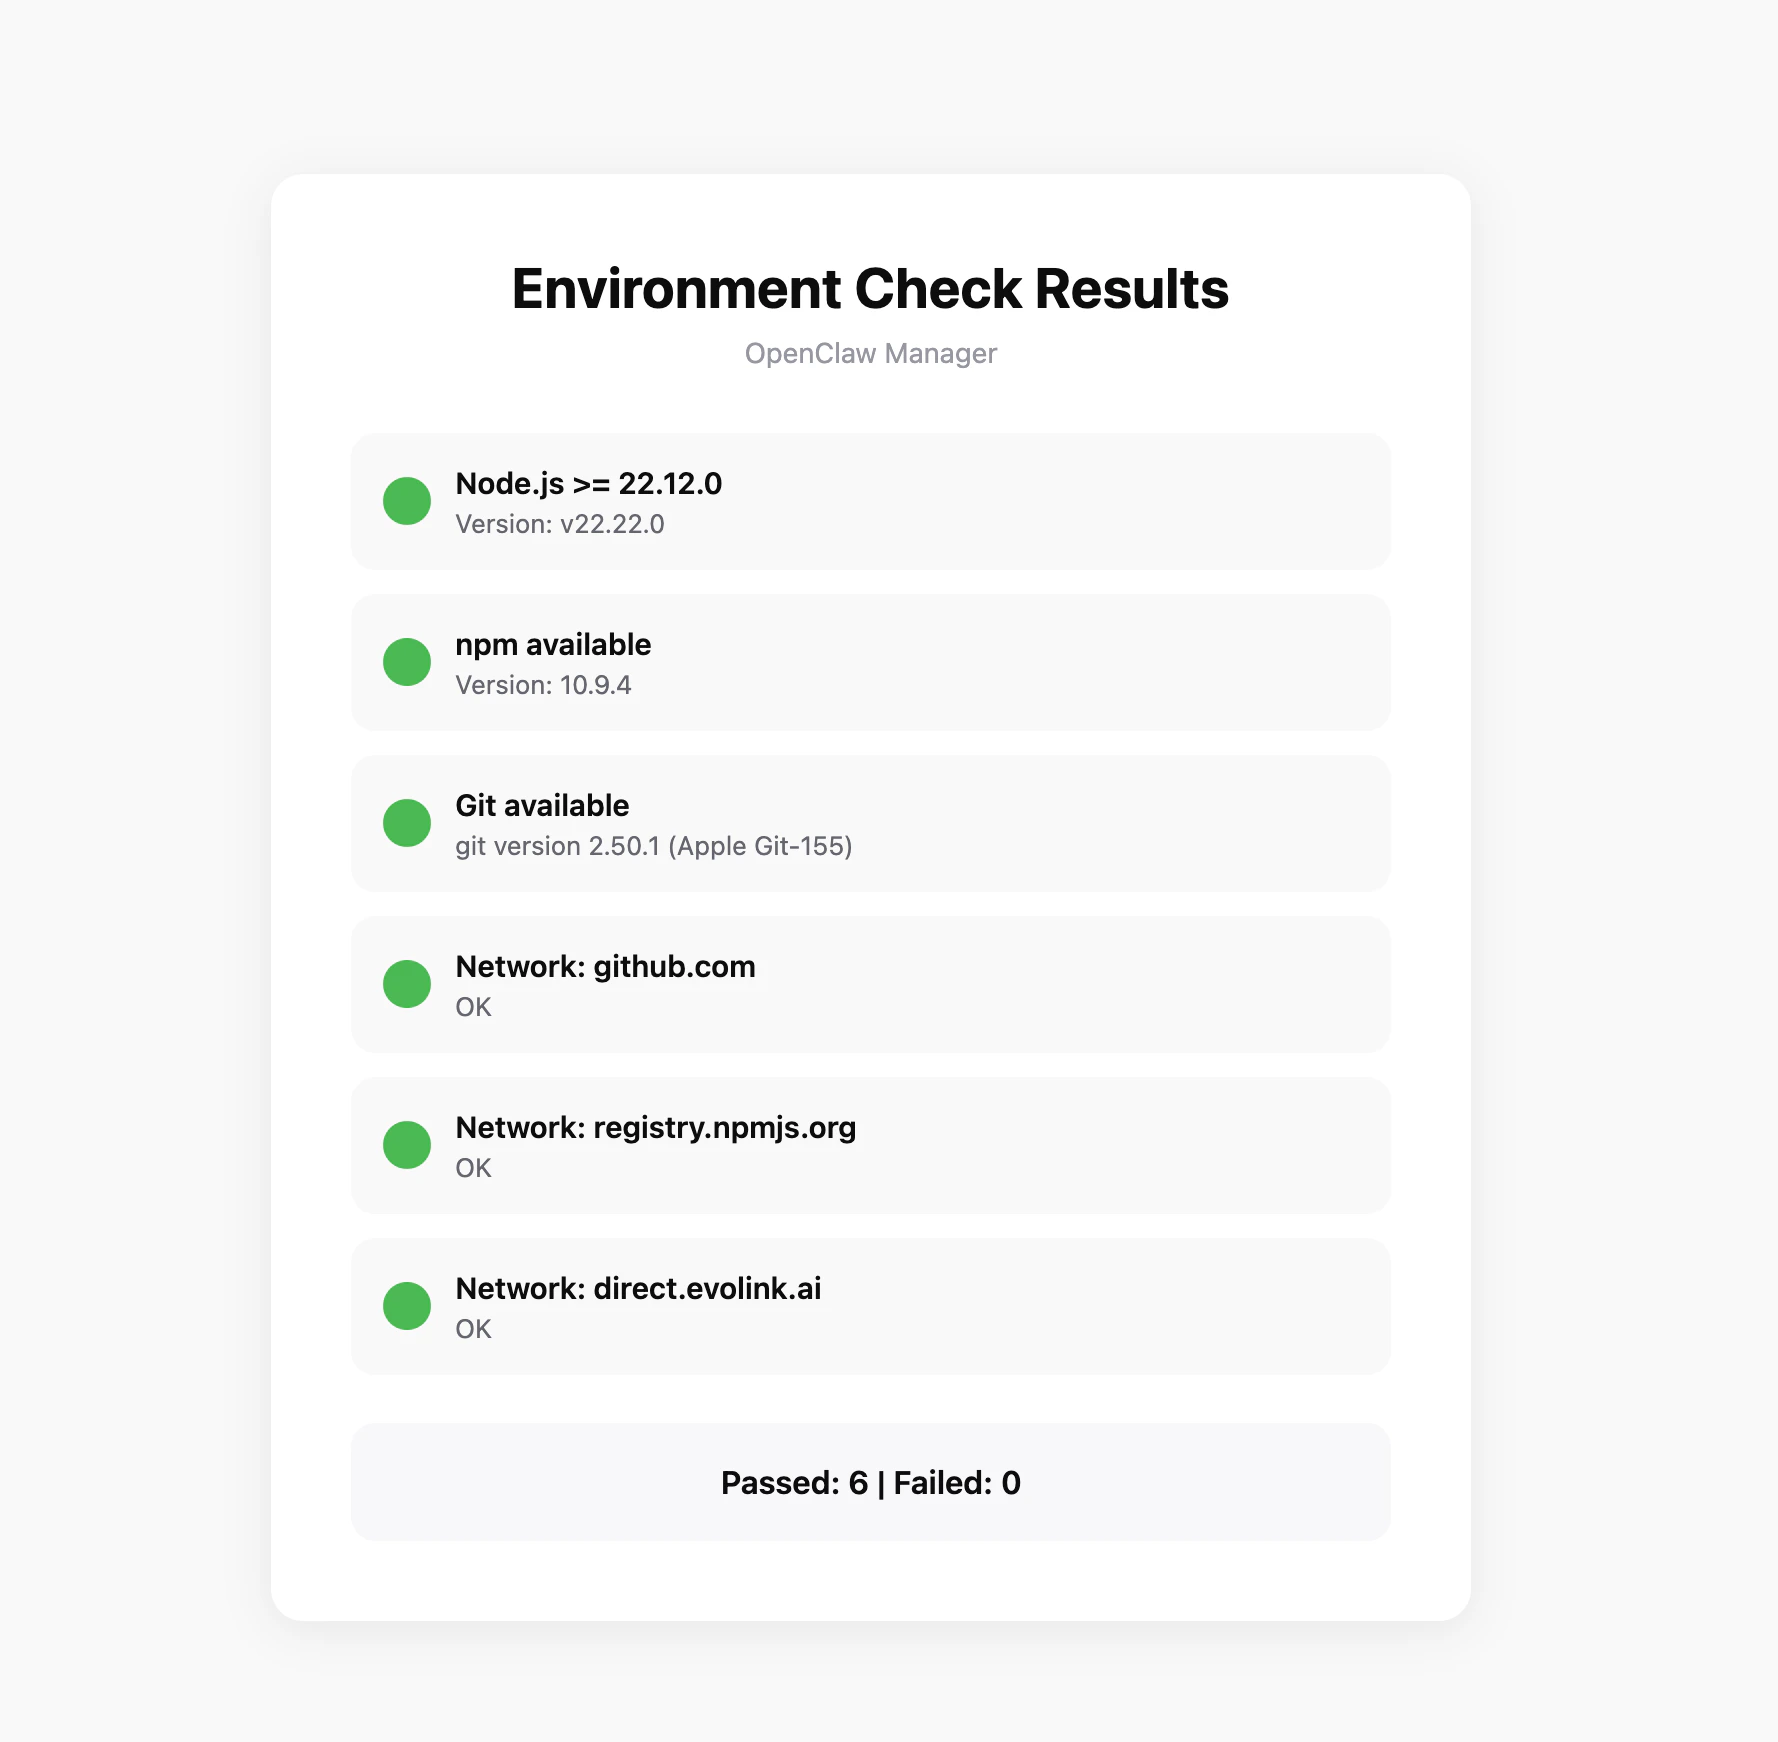 If the check fails, the tool will provide specific fix suggestions.
## Prerequisites
Before starting configuration, ensure you have completed the following:
### 1. Install Node.js
OpenClaw is installed via npm and requires Node.js 22 or higher.
Visit [Node.js official website](https://nodejs.org/en/download), download the Windows installer (.msi file), and run the installation program.
After installation, open PowerShell to verify:
```bash theme={null}
node --version
npm --version
```
It's recommended to run PowerShell as administrator to avoid permission issues during installation.
**Method 1: Using Installer**
Visit [Node.js official website](https://nodejs.org/en/download), download the macOS installer (.pkg file), and run the installation program.
**Method 2: Using Homebrew**
```bash theme={null}
brew install node
```
After installation, open Terminal to verify:
```bash theme={null}
node --version
npm --version
```
If you encounter permission issues during installation, you may need to add `sudo` before the command.
### 2. Get EvoLink API Key
* Log in to [EvoLink Console](https://evolink.ai/dashboard)
* Find API Keys in the console, click "Create New Key", then copy the generated Key
* API Key usually starts with `sk-`, please keep it safe
## Step 1: Install OpenClaw
Execute in terminal:
```bash theme={null}
npm install -g openclaw@latest
```
Verify after installation:
```bash theme={null}
openclaw --version
```
## Step 2: Initialize Setup
Run the onboarding command, OpenClaw will guide you through initial configuration and install the daemon service:
```bash theme={null}
openclaw onboard --install-daemon
```
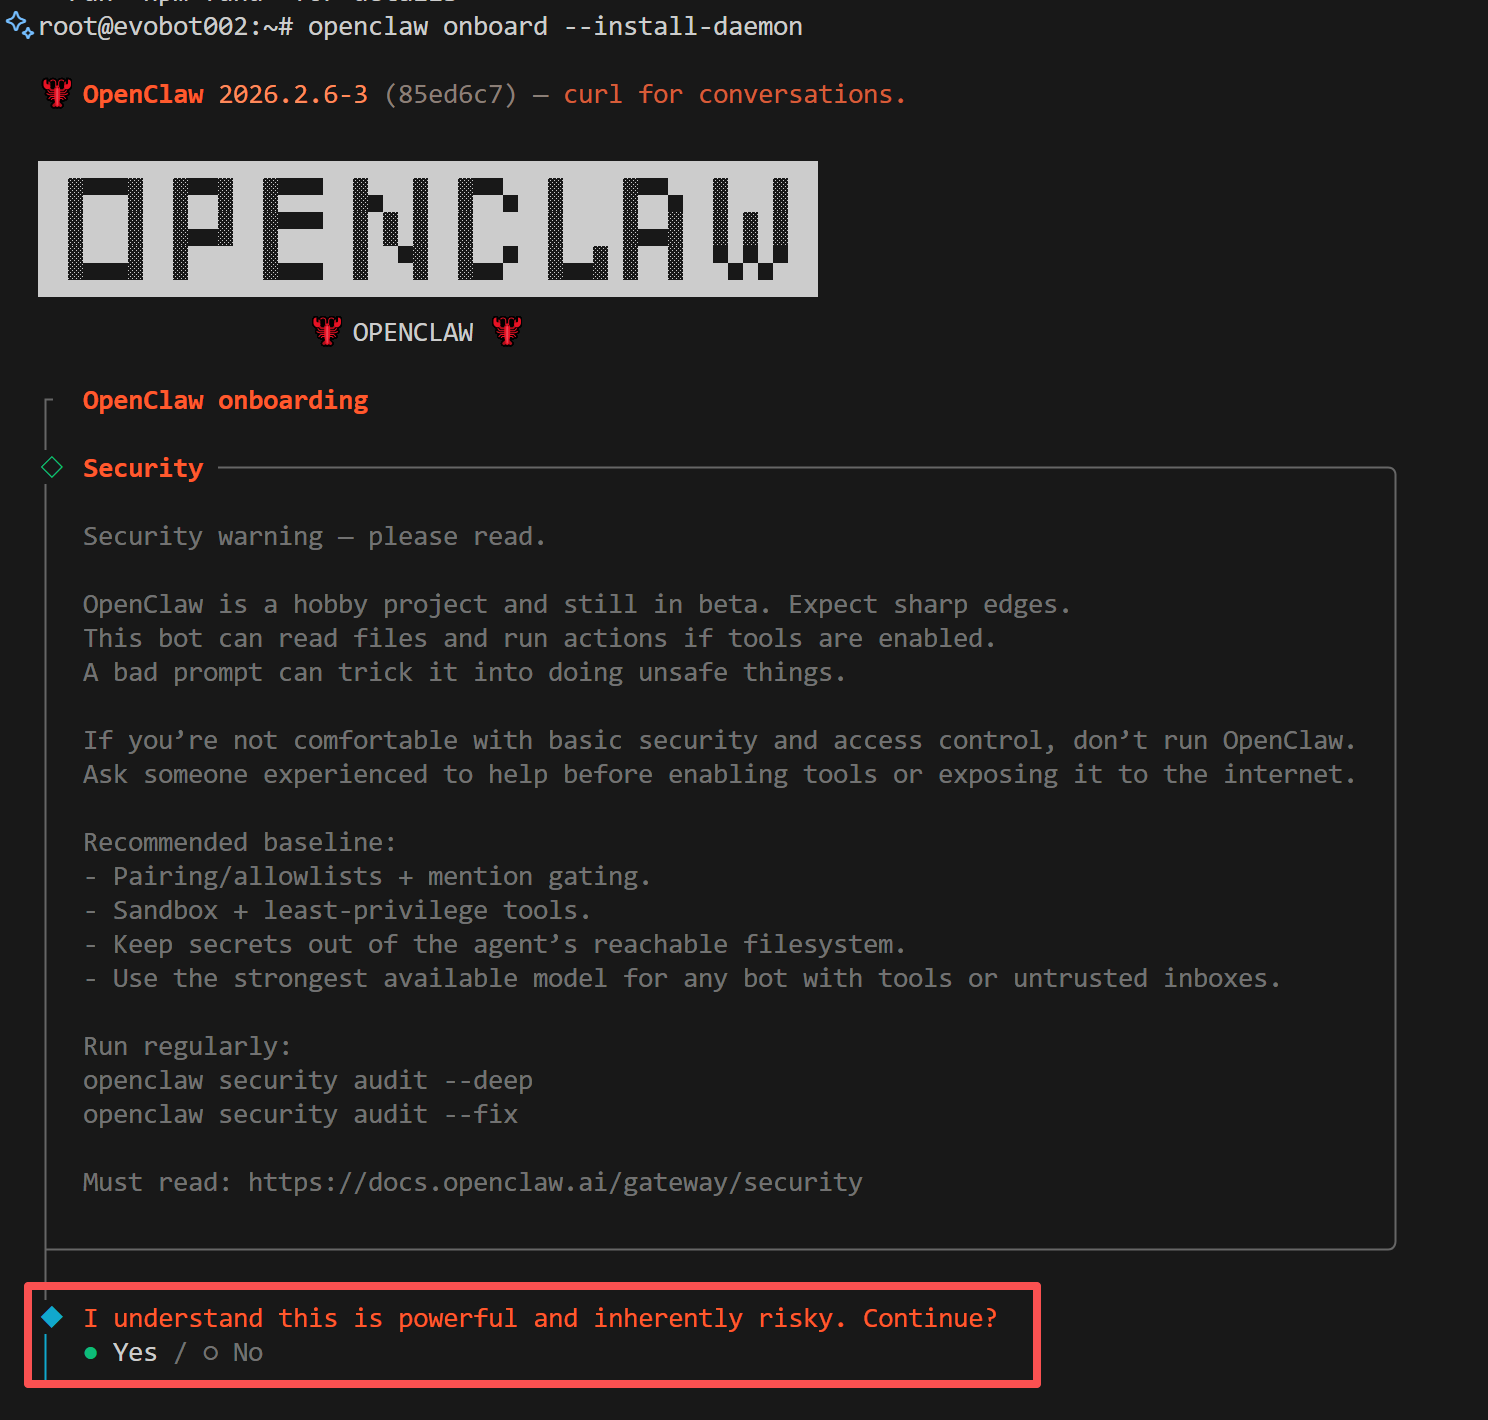
### 1. Confirm Installation
The system will prompt installation risk notice, confirm to continue:
If the check fails, the tool will provide specific fix suggestions.
## Prerequisites
Before starting configuration, ensure you have completed the following:
### 1. Install Node.js
OpenClaw is installed via npm and requires Node.js 22 or higher.
Visit [Node.js official website](https://nodejs.org/en/download), download the Windows installer (.msi file), and run the installation program.
After installation, open PowerShell to verify:
```bash theme={null}
node --version
npm --version
```
It's recommended to run PowerShell as administrator to avoid permission issues during installation.
**Method 1: Using Installer**
Visit [Node.js official website](https://nodejs.org/en/download), download the macOS installer (.pkg file), and run the installation program.
**Method 2: Using Homebrew**
```bash theme={null}
brew install node
```
After installation, open Terminal to verify:
```bash theme={null}
node --version
npm --version
```
If you encounter permission issues during installation, you may need to add `sudo` before the command.
### 2. Get EvoLink API Key
* Log in to [EvoLink Console](https://evolink.ai/dashboard)
* Find API Keys in the console, click "Create New Key", then copy the generated Key
* API Key usually starts with `sk-`, please keep it safe
## Step 1: Install OpenClaw
Execute in terminal:
```bash theme={null}
npm install -g openclaw@latest
```
Verify after installation:
```bash theme={null}
openclaw --version
```
## Step 2: Initialize Setup
Run the onboarding command, OpenClaw will guide you through initial configuration and install the daemon service:
```bash theme={null}
openclaw onboard --install-daemon
```
### 1. Confirm Installation
The system will prompt installation risk notice, confirm to continue:
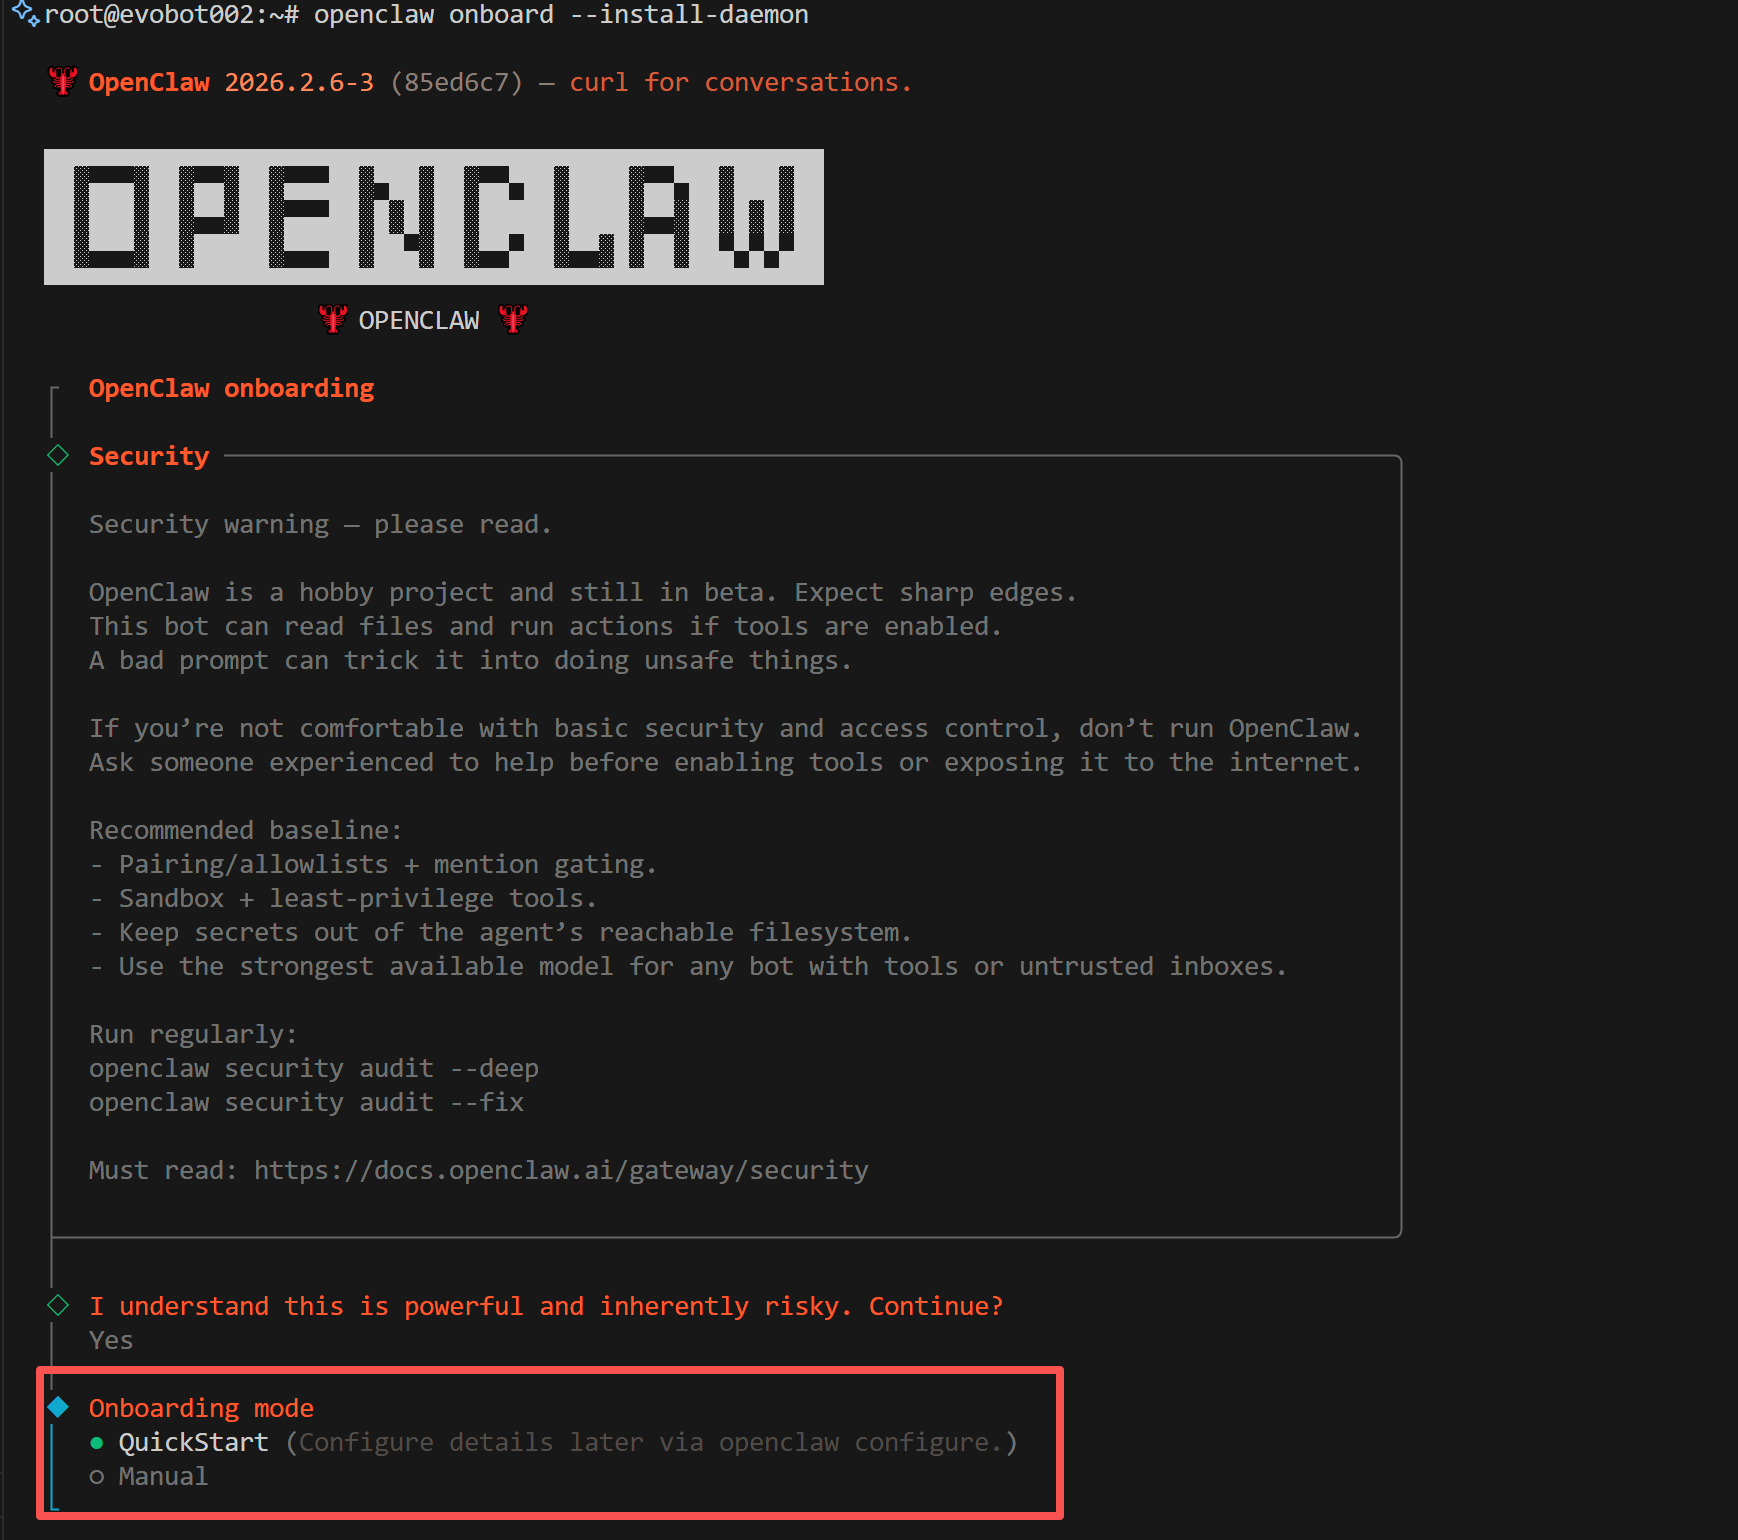
 ### 2. Select Installation Mode
The system will prompt to select installation mode, choose **Quickstart**:
### 2. Select Installation Mode
The system will prompt to select installation mode, choose **Quickstart**:
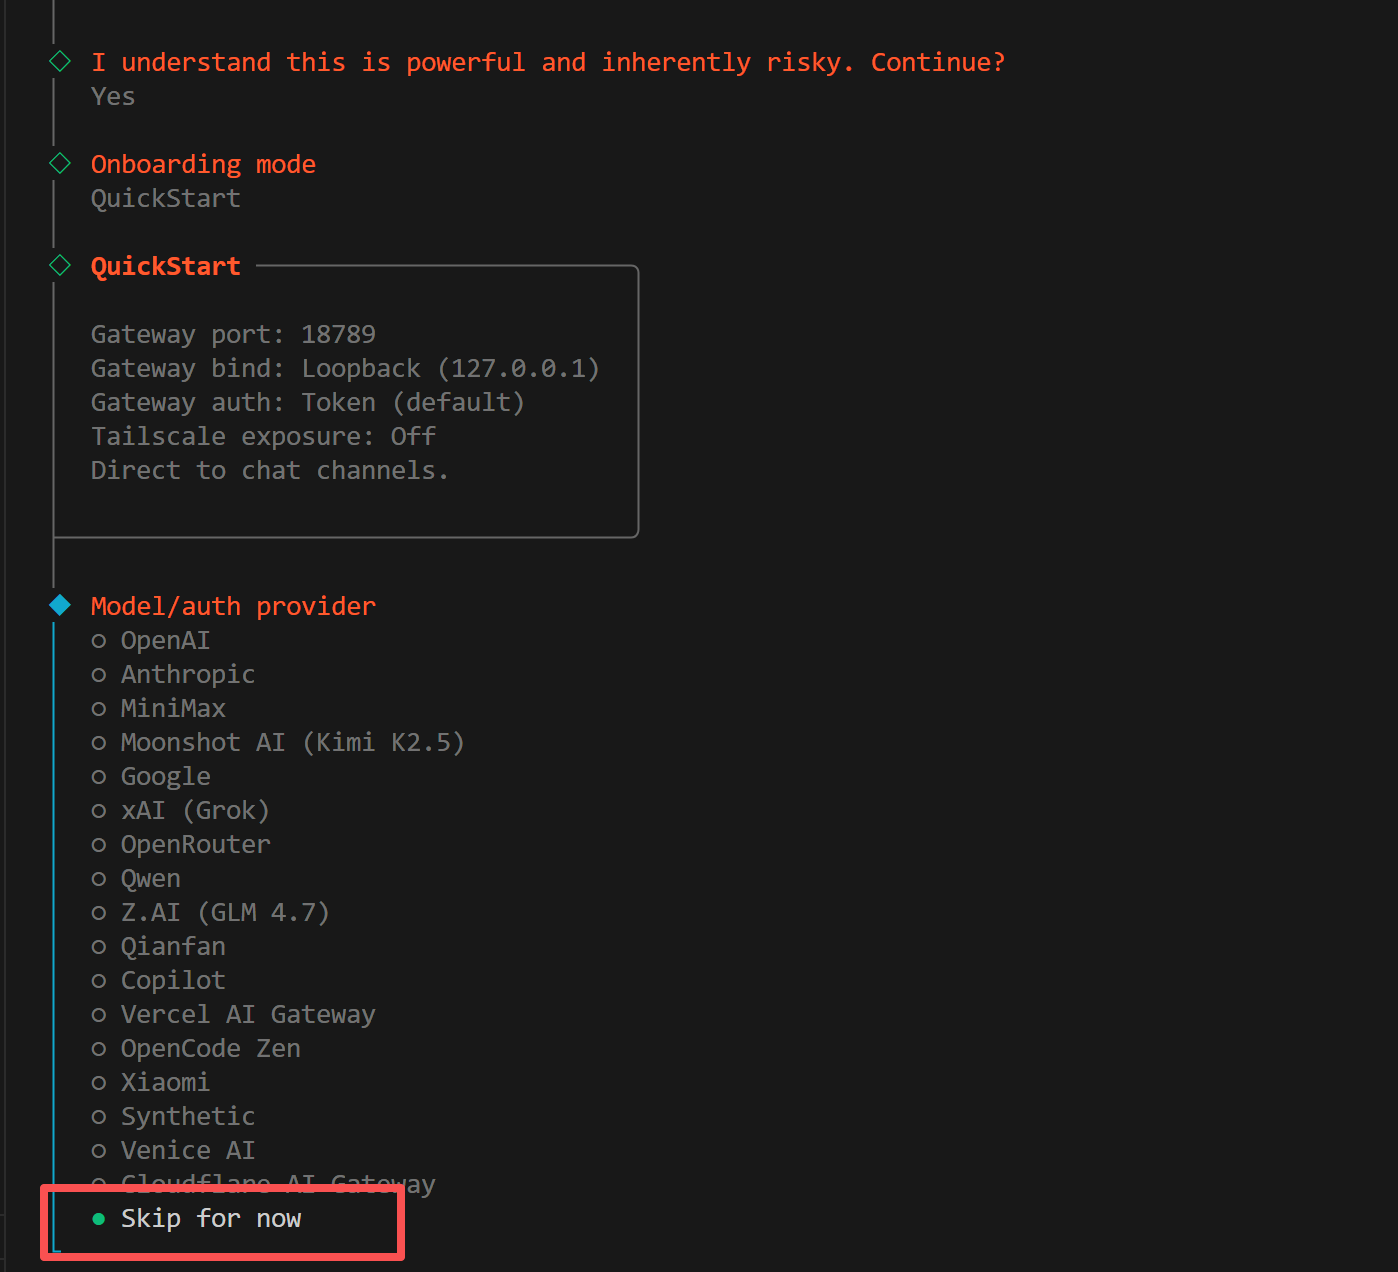
 ### 3. Select Provider
The system will prompt to select model provider, choose **Skip** here, we will manually configure EvoLink as a custom provider later:
### 3. Select Provider
The system will prompt to select model provider, choose **Skip** here, we will manually configure EvoLink as a custom provider later:
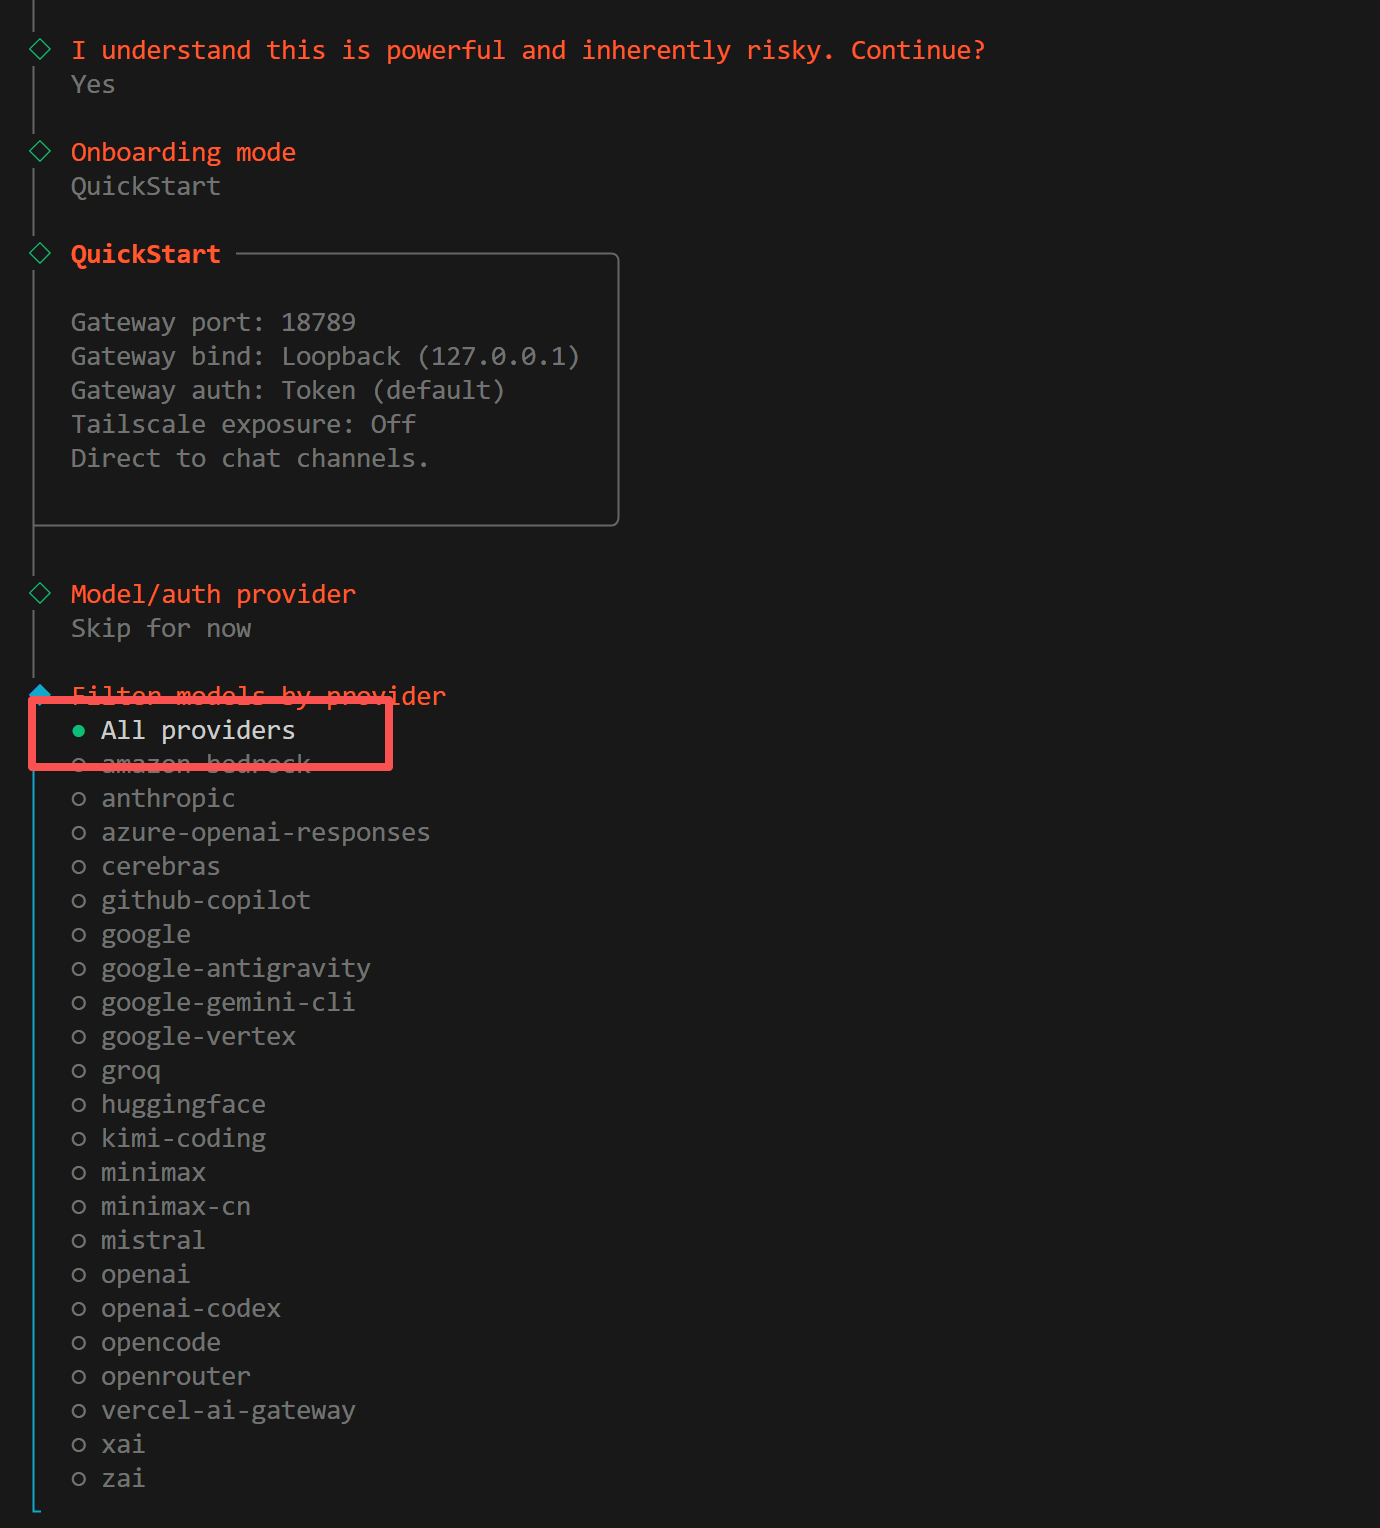
 ### 4. Select Models
The system will prompt to select models to enable, choose **All**:
### 4. Select Models
The system will prompt to select models to enable, choose **All**:
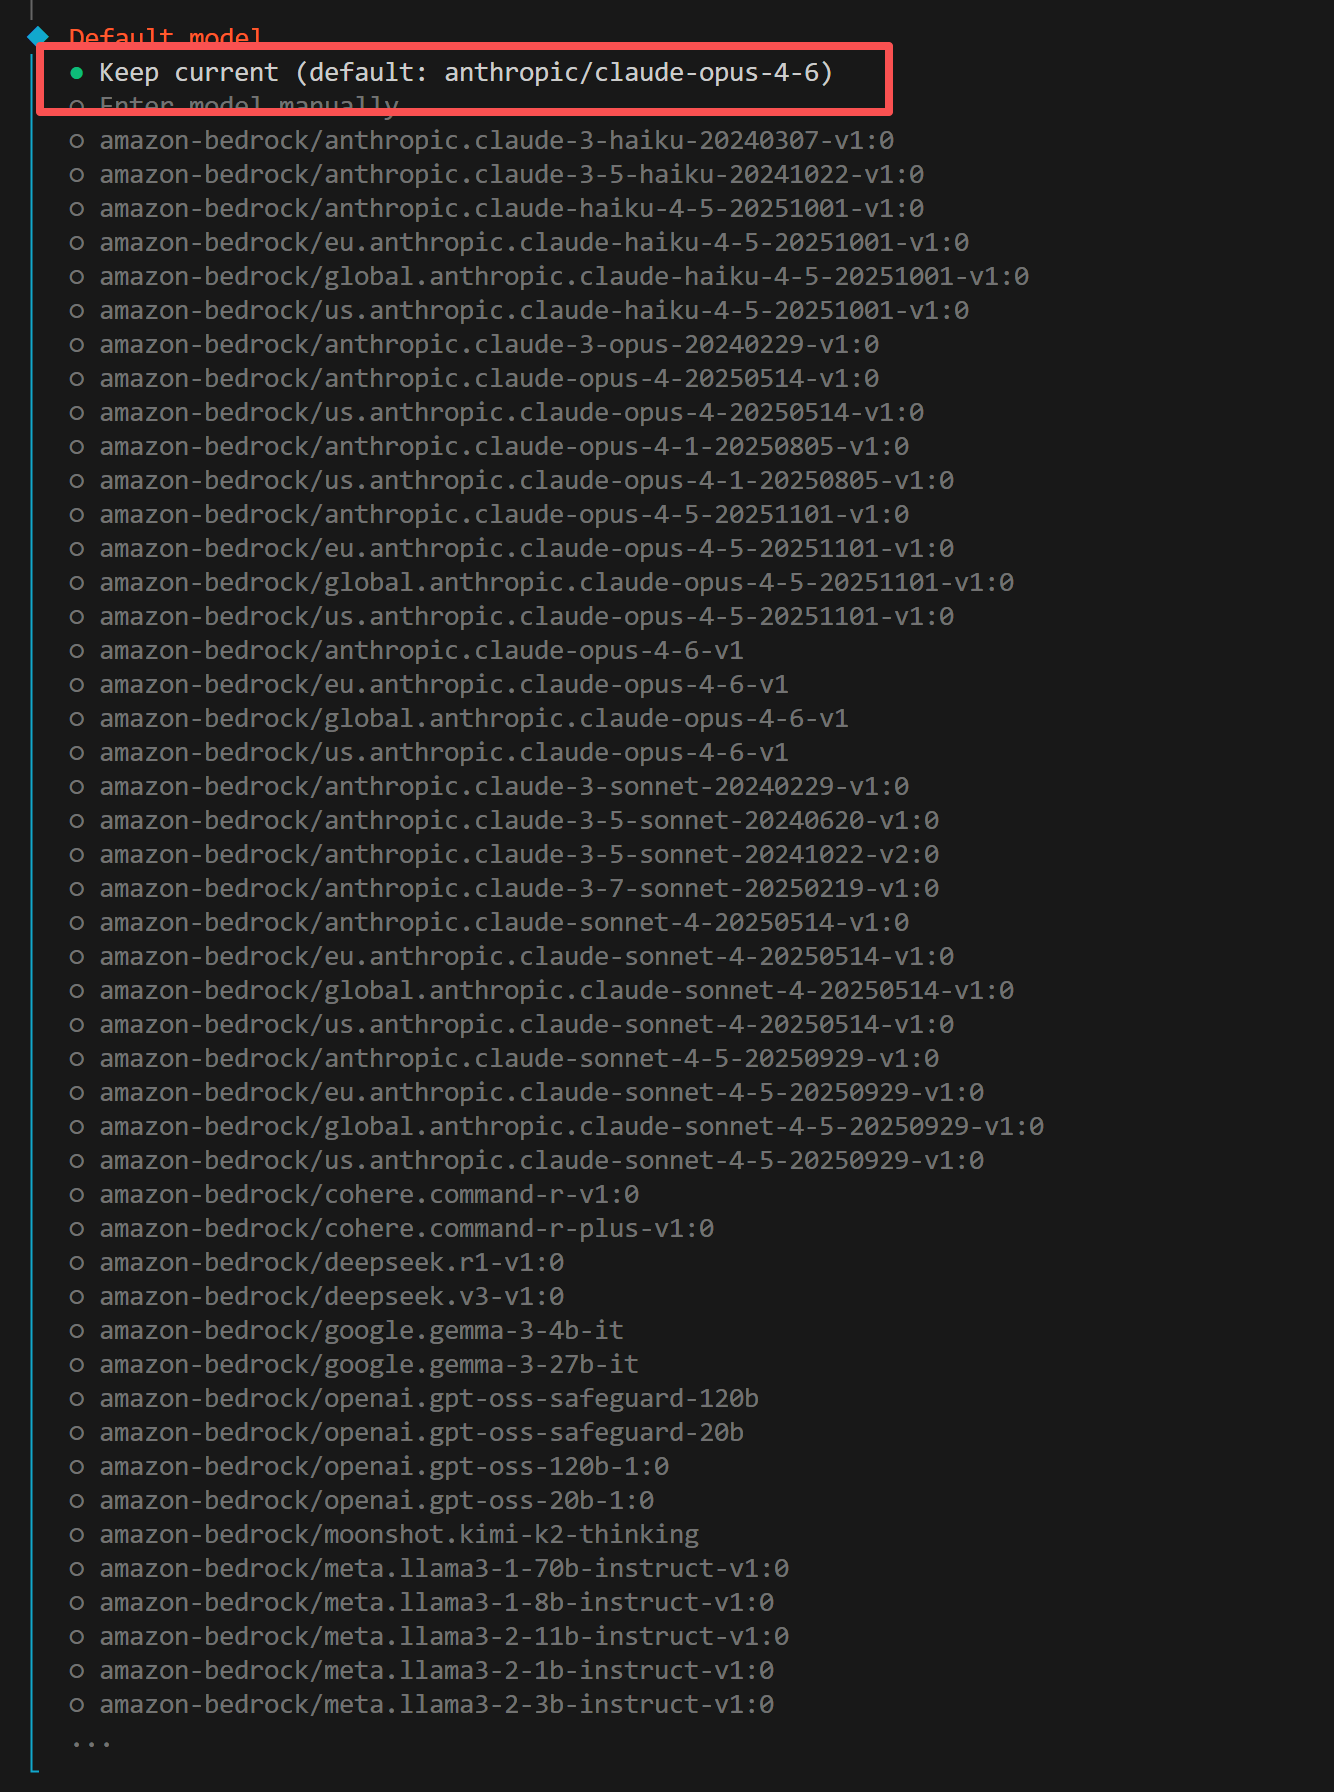
 ### 5. Select Default Model
The system will prompt to select default model, choose **Keep current**:
### 5. Select Default Model
The system will prompt to select default model, choose **Keep current**:
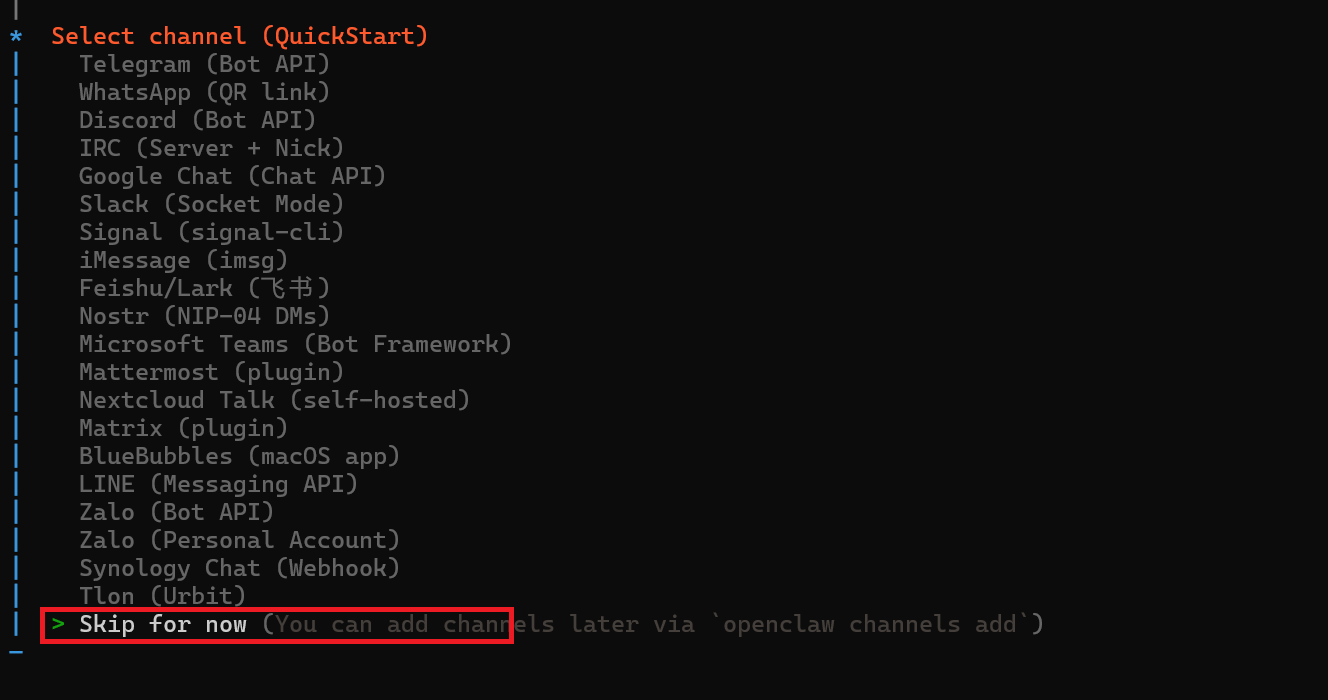
 ### 6. Select Channel
The system will prompt to select a chat channel. It's recommended to choose **Skip for now**, you can add channels later:
### 6. Select Channel
The system will prompt to select a chat channel. It's recommended to choose **Skip for now**, you can add channels later:
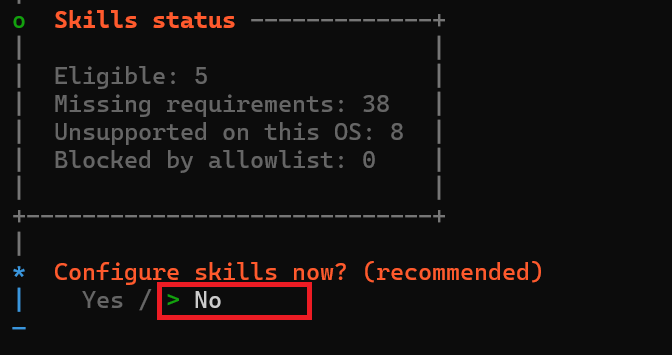
 ### 7. Configure Skills
The system will prompt whether to configure Skills. It's recommended to choose **No**, you can add them later:
### 7. Configure Skills
The system will prompt whether to configure Skills. It's recommended to choose **No**, you can add them later:
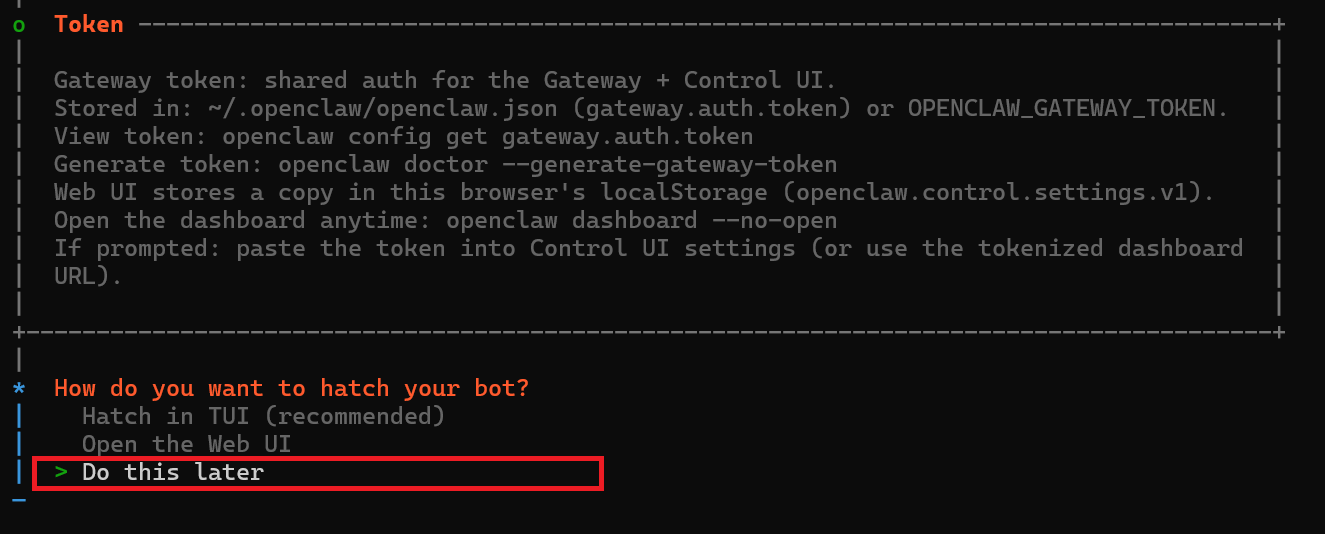
 ### 8. Enable Hooks
The system will prompt whether to enable Hooks. It's recommended to choose **session-memory**:
### 8. Enable Hooks
The system will prompt whether to enable Hooks. It's recommended to choose **session-memory**:
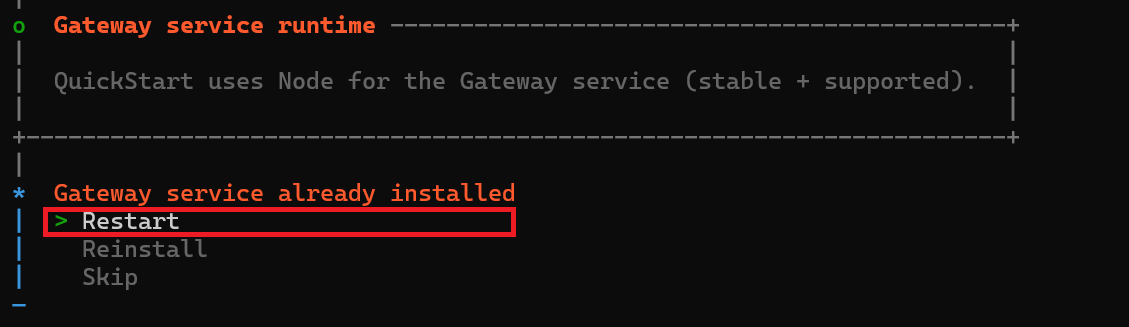
 ### 9. Restart Gateway Service
The system will prompt that the gateway service is already installed, choose **Restart**:
### 9. Restart Gateway Service
The system will prompt that the gateway service is already installed, choose **Restart**:
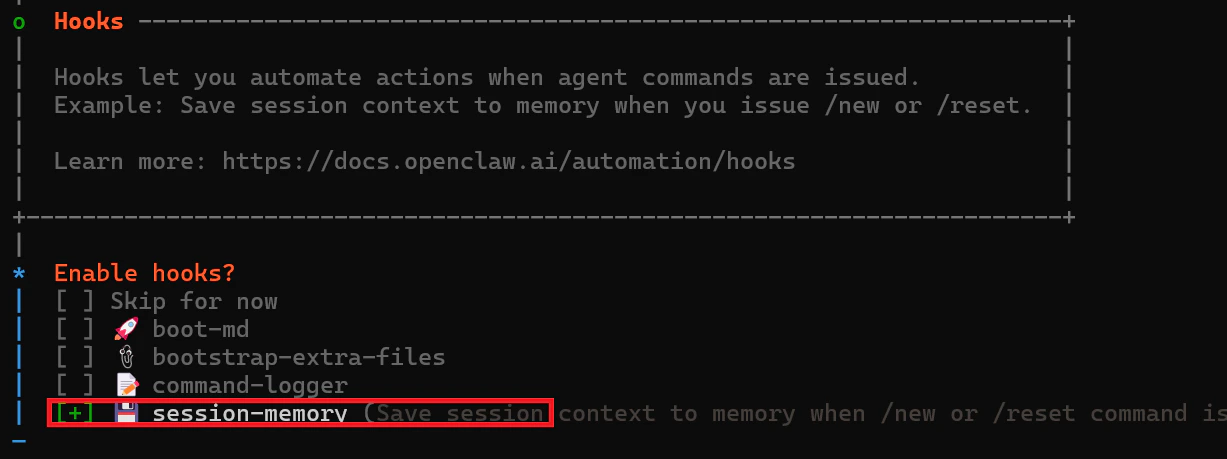
 ### 10. Launch Bot
The system will prompt how to launch the bot. It's recommended to choose **Do this later**:
### 10. Launch Bot
The system will prompt how to launch the bot. It's recommended to choose **Do this later**:
 ## Step 3: Configure EvoLink API & Model Switching
### 1. Locate Two Configuration Files (Important)
OpenClaw model configuration typically involves two files:
* `openclaw.json`: `%USERPROFILE%\.openclaw\openclaw.json`
* `models.json`: `%USERPROFILE%\.openclaw\agents\main\agent\models.json`
* `openclaw.json`: `~/.openclaw/openclaw.json`
* `models.json`: `~/.openclaw/agents/main/agent/models.json`
Open directly:
```bash theme={null}
open ~/.openclaw/openclaw.json
open ~/.openclaw/agents/main/agent/models.json
```
If a provider's `apiKey` / `baseUrl` in `models.json` is non-empty, it will override the corresponding values in `openclaw.json`. It's recommended to keep both consistent.
### 2. Configure Model Providers
It's recommended to configure the following providers in `openclaw.json` (and sync to `models.json`):
```json theme={null}
"models": {
"providers": {
"evolink-anthropic": {
"api": "anthropic-messages",
"baseUrl": "https://direct.evolink.ai",
"apiKey": "Your EvoLink API Key",
"models": [
{ "id": "evolink/auto", "name": "EvoLink Auto" },
{ "id": "claude-fable-5", "name": "Claude Fable 5" },
{ "id": "claude-opus-4-8", "name": "Claude Opus 4.8" },
{ "id": "claude-opus-4-7", "name": "Claude Opus 4.7" },
{ "id": "claude-opus-4-6", "name": "Claude Opus 4.6" },
{ "id": "claude-sonnet-4-6", "name": "Claude Sonnet 4.6" },
{ "id": "claude-opus-4-5-20251101", "name": "Claude Opus 4.5" },
{ "id": "claude-sonnet-4-5-20250929", "name": "Claude Sonnet 4.5" },
{ "id": "claude-haiku-4-5-20251001", "name": "Claude Haiku 4.5" }
]
},
"evolink-google": {
"api": "google-generative-ai",
"baseUrl": "https://direct.evolink.ai/v1beta",
"apiKey": "Your EvoLink API Key",
"models": [
{ "id": "evolink/auto", "name": "EvoLink Auto" },
{ "id": "gemini-3.1-flash-lite-preview", "name": "Gemini 3.1 Flash Lite" },
{ "id": "gemini-3.1-pro-preview", "name": "Gemini 3.1 Pro" },
{ "id": "gemini-2.5-pro", "name": "Gemini 2.5 Pro" },
{ "id": "gemini-2.5-flash", "name": "Gemini 2.5 Flash" },
{ "id": "gemini-3-pro-preview", "name": "Gemini 3.0 Pro" },
{ "id": "gemini-3-flash-preview", "name": "Gemini 3.0 Flash" }
]
},
"evolink-openai": {
"api": "openai-completions",
"baseUrl": "https://direct.evolink.ai/v1",
"apiKey": "Your EvoLink API Key",
"models": [
{ "id": "gpt-5.4", "name": "GPT-5.4" },
{ "id": "gpt-5.2", "name": "GPT-5.2" },
{ "id": "gpt-5.1", "name": "GPT-5.1" },
{ "id": "gpt-5.1-chat", "name": "GPT-5.1 Chat" },
{ "id": "gpt-5.1-thinking", "name": "GPT-5.1 Thinking" },
{ "id": "gemini-2.5-pro", "name": "Gemini 2.5 Pro (OpenAI SDK)" },
{ "id": "gemini-2.5-flash", "name": "Gemini 2.5 Flash (OpenAI SDK)" },
{ "id": "gemini-3-pro-preview", "name": "Gemini 3.0 Pro (OpenAI SDK)" },
{ "id": "gemini-3-flash-preview", "name": "Gemini 3.0 Flash (OpenAI SDK)" },
{ "id": "doubao-seed-2.0-pro", "name": "Doubao Seed 2.0 Pro" },
{ "id": "doubao-seed-2.0-lite", "name": "Doubao Seed 2.0 Lite" },
{ "id": "doubao-seed-2.0-mini", "name": "Doubao Seed 2.0 Mini" },
{ "id": "doubao-seed-2.0-code", "name": "Doubao Seed 2.0 Code" },
{ "id": "kimi-k2-thinking", "name": "Kimi K2 Thinking" },
{ "id": "kimi-k2-thinking-turbo", "name": "Kimi K2 Thinking Turbo" }
]
}
}
}
```
The model IDs above are examples. Please use the models actually available in your EvoLink account.
For Gemini scenarios, `evolink-google.baseUrl` must include `/v1beta`, i.e., `https://direct.evolink.ai/v1beta`. Without this suffix, you may encounter `Forbidden (403)` errors.
### 3. Configure Default Model (Supports Quick Switching)
Set the default model in `agents.defaults`. We recommend using Smart Model Routing `evolink/auto`, which automatically selects a suitable model based on your request:
```json theme={null}
"agents": {
"defaults": {
"model": {
"primary": "evolink-anthropic/evolink/auto"
}
}
}
```
**Smart Model Routing (EvoLink Auto)**: Use `evolink/auto` as the model ID, and the system will automatically select a suitable model from the model pool based on request complexity, length, and type. No manual switching needed — ideal for most general-purpose scenarios. See [EvoLink Auto Documentation](/en/api-manual/language-series/evolink-auto/evolink-auto-quickstart) for details.
To specify a particular model, you can also switch manually:
* Smart Routing: `evolink-anthropic/evolink/auto` (Recommended)
* Claude: `evolink-anthropic/claude-opus-4-6`
* GPT: `evolink-openai/gpt-5.2`
* Gemini: `evolink-google/gemini-3.1-pro-preview`
* Doubao: `evolink-openai/doubao-seed-2.0-mini`
### 4. Quick Switch to EvoLink Models (Recommended)
After completing provider configuration, it's recommended to use CLI commands for model switching instead of manually editing JSON:
```bash theme={null}
# View configured EvoLink OpenAI-compatible models
openclaw models list --provider evolink-openai --plain
# Switch default model (example: gpt-5.4)
openclaw models set evolink-openai/gpt-5.4
# View current active model
openclaw models status --plain
```
If `models list --provider evolink-openai` doesn't show your expected models, check whether both `openclaw.json` and `models.json` have the corresponding provider configured.
### 5. Restart and Verify
Restart the gateway after configuration:
```bash theme={null}
openclaw gateway restart
```
Check status:
```bash theme={null}
openclaw gateway status
```
Send a test message to verify the model is working:
```bash theme={null}
openclaw agent --agent main -m "hi" --json
```
## Common Commands
| Command | Description |
| -------------------------- | ------------------------------ |
| `openclaw gateway status` | Check gateway running status |
| `openclaw gateway restart` | Restart gateway service |
| `openclaw gateway stop` | Stop gateway service |
| `openclaw gateway start` | Start gateway service |
| `openclaw logs --follow` | View gateway logs in real-time |
| `openclaw plugins list` | View installed plugins |
## Troubleshooting
| Issue | Solution |
| ------------------------------------ | ------------------------------------------------------------------------------------------------------------------- |
| npm installation fails | Windows: Run PowerShell as administrator; macOS: Add `sudo` before command |
| Configuration file not found | Confirm onboard process is complete, check if `~/.openclaw/` directory exists |
| Gateway fails to start | Check if port is occupied, use `openclaw gateway status` to view detailed errors |
| Invalid API Key | Confirm API Key is copied correctly, check for extra spaces or quotes |
| Model configuration not effective | Check both `openclaw.json` and `models.json` for consistency (`models.json` may override) |
| Gemini returns `Forbidden (403)` | Check if `models.providers.evolink-google.baseUrl` is `https://direct.evolink.ai/v1beta` (must include `/v1beta`) |
| Old model still used after switching | Run `openclaw models status --plain` to confirm current model, restart with `openclaw gateway restart` if necessary |
## Next Steps
OpenClaw installation and EvoLink API configuration are complete. Next you can:
* **Configure Telegram Channel**: Refer to [OpenClaw + Telegram](/en/integration-guide/openclaw-telegram) documentation
* **Configure Feishu Channel**: Refer to [OpenClaw + Feishu](/en/integration-guide/openclaw-feishu) documentation
* **Use Auto-Installation Tool**: Refer to [OpenClaw Auto Installation](/en/integration-guide/openclaw-auto) documentation
## Step 3: Configure EvoLink API & Model Switching
### 1. Locate Two Configuration Files (Important)
OpenClaw model configuration typically involves two files:
* `openclaw.json`: `%USERPROFILE%\.openclaw\openclaw.json`
* `models.json`: `%USERPROFILE%\.openclaw\agents\main\agent\models.json`
* `openclaw.json`: `~/.openclaw/openclaw.json`
* `models.json`: `~/.openclaw/agents/main/agent/models.json`
Open directly:
```bash theme={null}
open ~/.openclaw/openclaw.json
open ~/.openclaw/agents/main/agent/models.json
```
If a provider's `apiKey` / `baseUrl` in `models.json` is non-empty, it will override the corresponding values in `openclaw.json`. It's recommended to keep both consistent.
### 2. Configure Model Providers
It's recommended to configure the following providers in `openclaw.json` (and sync to `models.json`):
```json theme={null}
"models": {
"providers": {
"evolink-anthropic": {
"api": "anthropic-messages",
"baseUrl": "https://direct.evolink.ai",
"apiKey": "Your EvoLink API Key",
"models": [
{ "id": "evolink/auto", "name": "EvoLink Auto" },
{ "id": "claude-fable-5", "name": "Claude Fable 5" },
{ "id": "claude-opus-4-8", "name": "Claude Opus 4.8" },
{ "id": "claude-opus-4-7", "name": "Claude Opus 4.7" },
{ "id": "claude-opus-4-6", "name": "Claude Opus 4.6" },
{ "id": "claude-sonnet-4-6", "name": "Claude Sonnet 4.6" },
{ "id": "claude-opus-4-5-20251101", "name": "Claude Opus 4.5" },
{ "id": "claude-sonnet-4-5-20250929", "name": "Claude Sonnet 4.5" },
{ "id": "claude-haiku-4-5-20251001", "name": "Claude Haiku 4.5" }
]
},
"evolink-google": {
"api": "google-generative-ai",
"baseUrl": "https://direct.evolink.ai/v1beta",
"apiKey": "Your EvoLink API Key",
"models": [
{ "id": "evolink/auto", "name": "EvoLink Auto" },
{ "id": "gemini-3.1-flash-lite-preview", "name": "Gemini 3.1 Flash Lite" },
{ "id": "gemini-3.1-pro-preview", "name": "Gemini 3.1 Pro" },
{ "id": "gemini-2.5-pro", "name": "Gemini 2.5 Pro" },
{ "id": "gemini-2.5-flash", "name": "Gemini 2.5 Flash" },
{ "id": "gemini-3-pro-preview", "name": "Gemini 3.0 Pro" },
{ "id": "gemini-3-flash-preview", "name": "Gemini 3.0 Flash" }
]
},
"evolink-openai": {
"api": "openai-completions",
"baseUrl": "https://direct.evolink.ai/v1",
"apiKey": "Your EvoLink API Key",
"models": [
{ "id": "gpt-5.4", "name": "GPT-5.4" },
{ "id": "gpt-5.2", "name": "GPT-5.2" },
{ "id": "gpt-5.1", "name": "GPT-5.1" },
{ "id": "gpt-5.1-chat", "name": "GPT-5.1 Chat" },
{ "id": "gpt-5.1-thinking", "name": "GPT-5.1 Thinking" },
{ "id": "gemini-2.5-pro", "name": "Gemini 2.5 Pro (OpenAI SDK)" },
{ "id": "gemini-2.5-flash", "name": "Gemini 2.5 Flash (OpenAI SDK)" },
{ "id": "gemini-3-pro-preview", "name": "Gemini 3.0 Pro (OpenAI SDK)" },
{ "id": "gemini-3-flash-preview", "name": "Gemini 3.0 Flash (OpenAI SDK)" },
{ "id": "doubao-seed-2.0-pro", "name": "Doubao Seed 2.0 Pro" },
{ "id": "doubao-seed-2.0-lite", "name": "Doubao Seed 2.0 Lite" },
{ "id": "doubao-seed-2.0-mini", "name": "Doubao Seed 2.0 Mini" },
{ "id": "doubao-seed-2.0-code", "name": "Doubao Seed 2.0 Code" },
{ "id": "kimi-k2-thinking", "name": "Kimi K2 Thinking" },
{ "id": "kimi-k2-thinking-turbo", "name": "Kimi K2 Thinking Turbo" }
]
}
}
}
```
The model IDs above are examples. Please use the models actually available in your EvoLink account.
For Gemini scenarios, `evolink-google.baseUrl` must include `/v1beta`, i.e., `https://direct.evolink.ai/v1beta`. Without this suffix, you may encounter `Forbidden (403)` errors.
### 3. Configure Default Model (Supports Quick Switching)
Set the default model in `agents.defaults`. We recommend using Smart Model Routing `evolink/auto`, which automatically selects a suitable model based on your request:
```json theme={null}
"agents": {
"defaults": {
"model": {
"primary": "evolink-anthropic/evolink/auto"
}
}
}
```
**Smart Model Routing (EvoLink Auto)**: Use `evolink/auto` as the model ID, and the system will automatically select a suitable model from the model pool based on request complexity, length, and type. No manual switching needed — ideal for most general-purpose scenarios. See [EvoLink Auto Documentation](/en/api-manual/language-series/evolink-auto/evolink-auto-quickstart) for details.
To specify a particular model, you can also switch manually:
* Smart Routing: `evolink-anthropic/evolink/auto` (Recommended)
* Claude: `evolink-anthropic/claude-opus-4-6`
* GPT: `evolink-openai/gpt-5.2`
* Gemini: `evolink-google/gemini-3.1-pro-preview`
* Doubao: `evolink-openai/doubao-seed-2.0-mini`
### 4. Quick Switch to EvoLink Models (Recommended)
After completing provider configuration, it's recommended to use CLI commands for model switching instead of manually editing JSON:
```bash theme={null}
# View configured EvoLink OpenAI-compatible models
openclaw models list --provider evolink-openai --plain
# Switch default model (example: gpt-5.4)
openclaw models set evolink-openai/gpt-5.4
# View current active model
openclaw models status --plain
```
If `models list --provider evolink-openai` doesn't show your expected models, check whether both `openclaw.json` and `models.json` have the corresponding provider configured.
### 5. Restart and Verify
Restart the gateway after configuration:
```bash theme={null}
openclaw gateway restart
```
Check status:
```bash theme={null}
openclaw gateway status
```
Send a test message to verify the model is working:
```bash theme={null}
openclaw agent --agent main -m "hi" --json
```
## Common Commands
| Command | Description |
| -------------------------- | ------------------------------ |
| `openclaw gateway status` | Check gateway running status |
| `openclaw gateway restart` | Restart gateway service |
| `openclaw gateway stop` | Stop gateway service |
| `openclaw gateway start` | Start gateway service |
| `openclaw logs --follow` | View gateway logs in real-time |
| `openclaw plugins list` | View installed plugins |
## Troubleshooting
| Issue | Solution |
| ------------------------------------ | ------------------------------------------------------------------------------------------------------------------- |
| npm installation fails | Windows: Run PowerShell as administrator; macOS: Add `sudo` before command |
| Configuration file not found | Confirm onboard process is complete, check if `~/.openclaw/` directory exists |
| Gateway fails to start | Check if port is occupied, use `openclaw gateway status` to view detailed errors |
| Invalid API Key | Confirm API Key is copied correctly, check for extra spaces or quotes |
| Model configuration not effective | Check both `openclaw.json` and `models.json` for consistency (`models.json` may override) |
| Gemini returns `Forbidden (403)` | Check if `models.providers.evolink-google.baseUrl` is `https://direct.evolink.ai/v1beta` (must include `/v1beta`) |
| Old model still used after switching | Run `openclaw models status --plain` to confirm current model, restart with `openclaw gateway restart` if necessary |
## Next Steps
OpenClaw installation and EvoLink API configuration are complete. Next you can:
* **Configure Telegram Channel**: Refer to [OpenClaw + Telegram](/en/integration-guide/openclaw-telegram) documentation
* **Configure Feishu Channel**: Refer to [OpenClaw + Feishu](/en/integration-guide/openclaw-feishu) documentation
* **Use Auto-Installation Tool**: Refer to [OpenClaw Auto Installation](/en/integration-guide/openclaw-auto) documentation